Wyn’s UI – Part Three (Boss in Action)

Part three of a series. Please read Part One & Part Two.

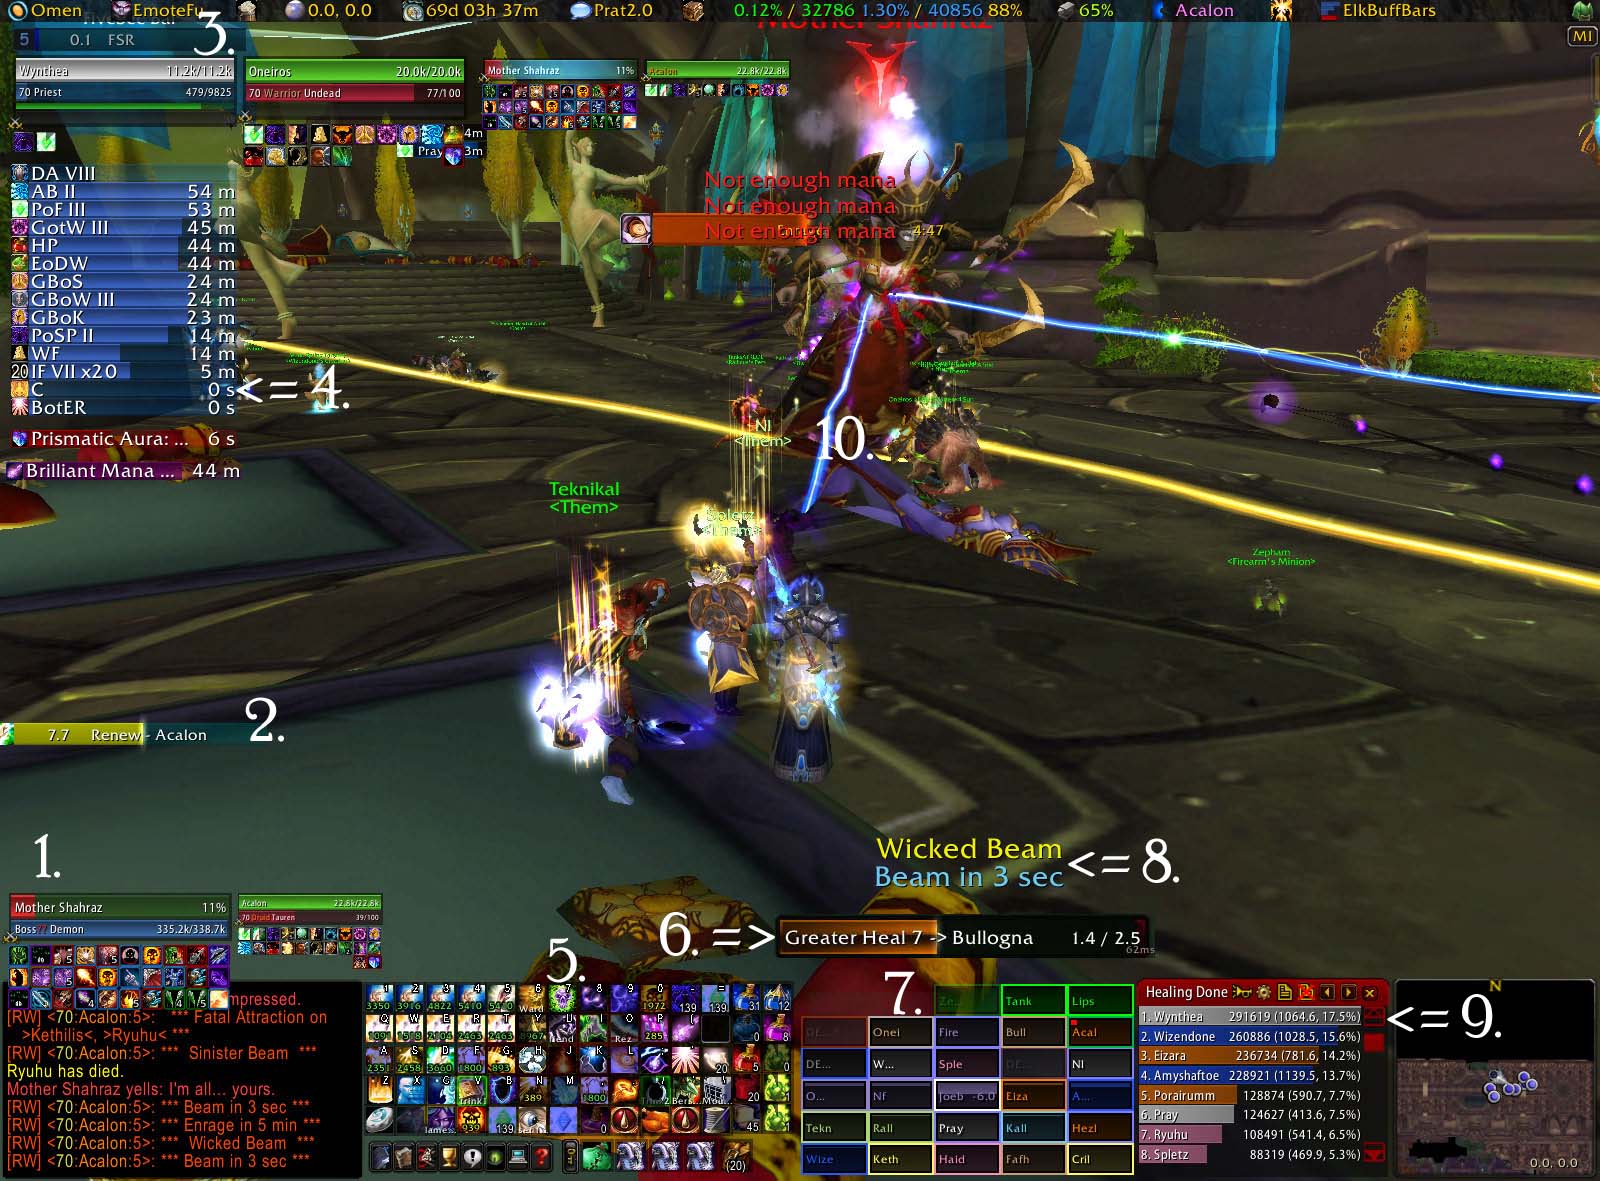
Okay, finally a real action shot like I’ve been promising. Welcome to Mother Shahraz. There’s a LOT going on in this fight, but you do get to stand still for most of it (unless you get Fatal Attraction, but that’s another post altogether.) I picked this shot because it catches a few things – good mana-regen cycle, a solid fight with only one real phase, and me making a pretty big mistake.

Typical Bossfight:

Click to enlarge....as soon as Matt uploads the larger version!


BF Focus

1. I set the boss as my focus on this one, so I can more easily watch for what aura she has and which tank she’s targeting. Different fights call for different focii; just set it to whomever you need to babysit. If you’ll look at the bottom row of myBartender you can see an icon that’s an eye with something pointing at it.
I’ve macro’d that button to set my focus just to make it a little faster and easier. I’ll post about the macros I use at the end of this series.


2.HoT Candy keeps track of everyone I’ve Renewed. Right now, it’s just the MT, but that’s because my mana’s about shot. (No worries, my pot CD finished as I took the SS.) Resto-Druids especially take note: HoT Candy is your friend.

RegenFu Bar
3. This is part of RegenFu. I’m just about out of the Five Second Rule, and will hit some serious mana-regen goodness. Fully buffed, my non-casting regen is over 900, but in full shadow resist, it takes a big hit. So I’ll burn Inner Focus before my next big heal, to maximize the mana I get back without stopping casting. I also wait until I’m out of the FSR to burn my Earring of Soulful Meditation. (If you don’t have it, find a way to get it. The Bangle of Endless Blessingsfrom Botanica is a substitute, but only about half as good.) I rarely make it the full 15 seconds without casting something, but at least I get the full benefit at the beginning.

4. Here’s where this shot catches me not paying close attention. Look here on my ElkBuffBar – Clearcasting is just expiring, but you can see at the top of my screen that I didn’t have enough mana to cast the Circle of Healing I was trying to cast. On Grid, you can see that group 3 was taking pretty even damage – I was spam CoH-ing them to patch them up. I should’ve thrown a G.heal on Joe in the middle, there. I’d’ve been finished with the cast by the time I had enough mana to CoH again, and been able to burn Inner Focus more appropriately, or let one of my Shammies top off the rest of the Warlocks while I regenned a little more.

5. On Bartender, you can see which of my cooldowns are available. Mana management is absolutely critical for these kinds of fights. My Pot CD finished as the SS was taking, Fiend is down, Inner Focus is available, and my Earring is down.
Pot CD
Fiend CDEarring CD

As healers, our mana-rotation is as critical as a DPSers spell rotation. Learning to be efficient is one of the best things you can do to become a better healer. For me it looks something like this:

  • Start: 12.5k manaI can haz cookie?
  • First Pot – 9k mana
  • Pop Earring – 9k mana again
  • Inner Focus – When expensive heal is needed
  • Shadowfiend – 6k mana
  • Second Pot – 7k mana
  • Earring again – ASAP

    And so on.

Mana is a lot like gasoline in your car – it’s just as easy to keep the top 1/4 of the tank full as it is the bottom 1/4. And the earlier you pop those cooldowns, the sooner they’ll be available for you to use again. Once you’ve used them all, just rotate through as soon as they’re available. I tend to Inner Focus for Prayer of Healing, but will use it for G.heal or Binding heal, if necessary. A tip for Mother – don’t wait to Fiend. Your mana will drop faster than you’ll believe, and when that CD comes up again, you’ll be very thankful. Also, watch for the auras that increase or reduce shadow damage. You don’t have to wait for the increase-aura to Fiend, although it will help you, but you will want to avoid the one that will nerf your little guy.

BF Quartz Bar
6. Okay, I’m going to highlight that mistake a bit more here. Since I didn’t use my Clearcast to throw a heal on poor Joe, I pasted this copy of my casting bar in from another screenshot so you could at least see where it goes and how it works. You can see from my toon’s posture that I’m not actually casting anything. Quartz tells me what I’m casting, what rank, shows a timer, and who I had targeted when the cast began. I change targets almost constantly, so that’s a very handy feature.

BF Grid All7. This is one of the best shots to show how Grid works; most of the raid is at full health, and it’s obvious who needs heals. If you look at the top-right square, you can see Acalon – our MT for this fight. The Red dot in the upper left of his box means he has aggro. There will be any number of those little dots when there are multiple mobs targeting people. That dot, rather than damage taken, is my cue to take action in most cases. A working knowledge of the mobs involved helps me know if I should start casting a heal, or just shield/renew the people with aggro. The groups are a little jacked right now – my raid leader moves Shammies into the melee group in a rotation for Bloodlust (Heroism) purposes. You can also clearly see who is dead, and who is out of my range.

BF DBM8.Deadly Boss Mods lets you move where your raid warnings pop up. Back to the concept of reducing eye movement to maximize reaction time, having them right where you can see them helps you know who’s about to need a heal – especially if it’s a fight like Void Reaver or Illidari Council where the boss targets random raid members to take damage.

9. Here’s Recount again. Pray is a shadow priest. He’s beating the Paladins on heals, because they both died early-on. It’s important to note that just like any other statistics, the data is only as valuable as its interpretation. This particular shot tells you very little without knowing the set-up. Por was assigned to heal up those people who get Fatal Attraction. Not very glamorous, and it limits his ability to cross-heal. Wize and I are both on raid-heals, so we’re pretty much neck-and-neck. Eizara is generally assigned to the Tanks, but her mana-efficiency is so excellent that she helps a lot with hotting the raid. She is an absolute BEAST of a resto-druid.

10. Scrolling Combat Text isn’t that important, as far as I’m concerned, for my incoming heals or mana regen – I’m watching bars, so I can see that. The important thing is that it tells you when you gain a buff or debuff. Clearcasting, Diabolic Remedy, Deep Meditation, Band of the Eternal Restorer, Berserking… all that stuff pops up over my head, and keeps me from having to watch my buff list. There are mods that do this, and will personalize it any number of ways, but the stock UI also has this feature now. Unfortunately, I didn’t catch it showing in this ss, and it looked funny ‘shopped in. The “10” is where it would go.

Bossfight Breakdown

These shots were taken during a trash-pull right after Mother. I’m very self-critical, and have found a lot of value in analyzing my own performance after a given boss fight. I wanted to walk you through my personal stats after a fight.

Wynthea's Effective Heal Detail
This is a pretty typical boss-fight mix for me. I’m usually assigned to raid healing, and expected to help out on the tanks when they’re taking extra damage, or their healers are in some way incapacitated. Notice how MANY times particular heals were used: 17 Greater Heals compared with 14 Flash heals. 57 Renews. Clearly, I love me some Circle of Healing. It is my bread-and-butter for raid healing, but be careful not to fall into the trap of spamming it for everything. I have seen priests with upwards of 90% CoH – I cannot stress how inefficient that is. CoH is a great tool, but it is not in any way a substitute for good decision making.

A few examples:

  • My CoH costs approximately 400 mana to heal 5 people for about 1k each. I can patch up a group with roughly 3k damage each for 1200 mana. Not bad, but if that group happens to be my actual group, my ProH heals for about 2.5k per target at a cost of around 900 mana. Time-wise, the 3 second cast is the same as the time it would have taken for me to cast the three CoH’s. It’s actually a faster option, because my GCD won’t be up by the time the ProH is done, so I can move directly on to my next target. ProH also gets cheaper because of how well it lends to burning Inner Focus.
  • CoH is perfect for a situation where a group is taking moderate damage across the board – assuming you throw out about 3 CoH’s on the same group, you just healed 5 people for about 3k each – much better than the time it would have taken to Flash Heal the same people (7.5 seconds) for that amount… but if a single-target is down by even 5k, you’re much better off throwing a rank-5 Greater Heal than spamming 5 CoH’s.

Note: If you are taking damage yourself, and so is the Tank, don’t be afraid to Binding Heal. Once they nerfed the mana cost (it used to be about 1k, and now it’s around 700), it became very viable to heal the two most important targets you have – yourself, and the guy keeping the bad guy from flattening you. It costs about the same as two Flash Heals, and saves you the casting time, and the decision.

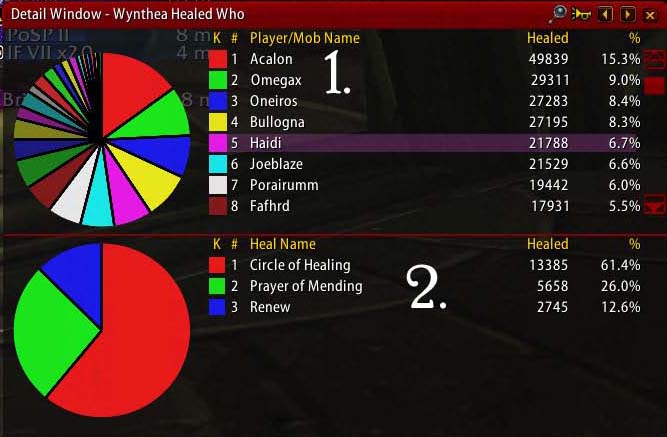
This shot is the report for WHO I healed during the same bossfight.

Healed Who

1. Remember, my assignment was to raid-heal, and supplement on the tanks when their assigned healers needed help. (Usually from getting the Fatal Attraction debuff.) Acalon was our MT, and he got the bulk of my raw heals, usually in the form of ProM, Renew, and Greater Heal, with a few Flash Heals thrown in if I got nervous. I forget where I read it, but a good rule to follow is to Flash Heal if your target needs a heal NOW, Greater Heal if you think you have time, and just Renew them if you KNOW you have time. That said, I keep Renew on the MT at all times, and ProM him as much as possible. My #2 target is Omegax – a warlock with a fondness for Life Tap. His heals are mostly Renews. Oneiros and Bull were our OT’s, their mixes look a lot like Acalon’s.

2. This second area of the screen shows a break down of what heals I used on a particular target. Haidi is one of our healadins, and the first example of my typical raid-healing mix. You can see that he didn’t require any special attention. Working through the rest of the raid heals, this is pretty much typical for everyone, maybe with a Flash Heal thrown in.
To Be Continued. . .

Wyn’s UI – Part Two (Trash)

Part two of a series. Please read Part One

Note: It seemed more relevant to organize these shots by topic rather than in chronological order. So, we’re jumping from Akama to Illidari Council trash.

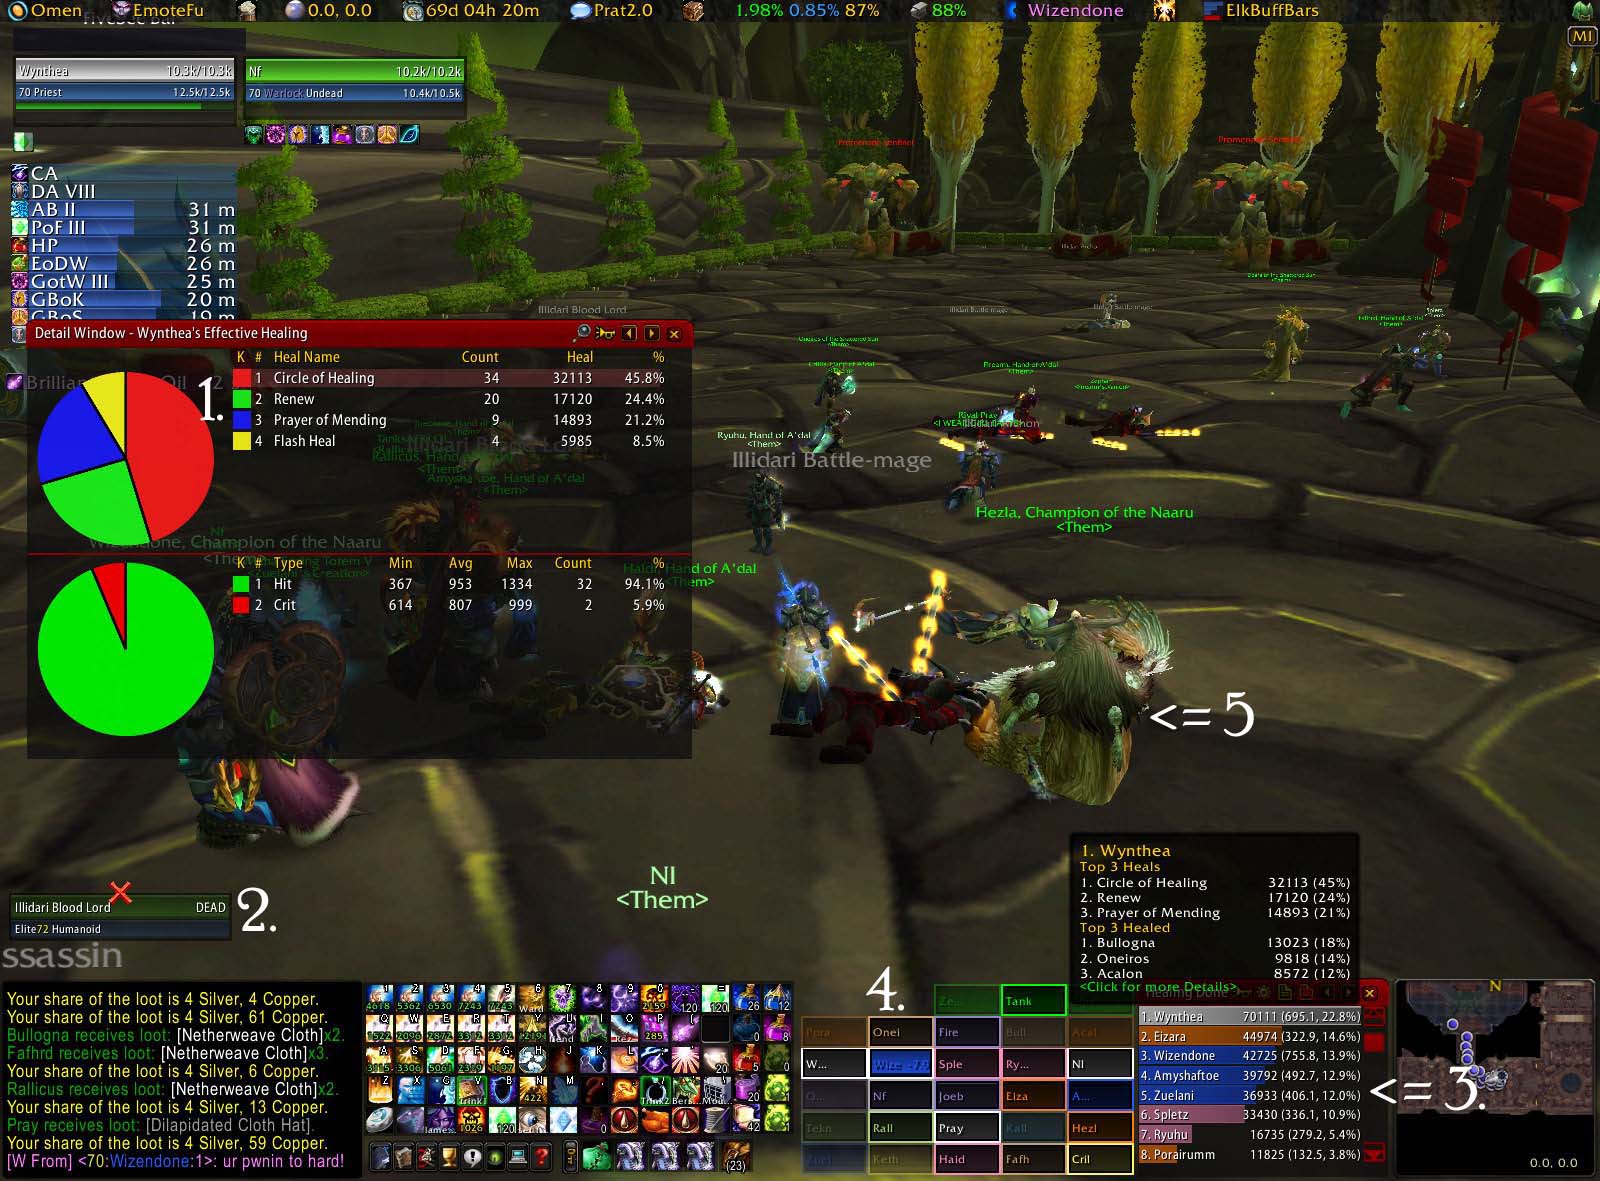
Typical Trash Heal Mix:

Click to enlarge

1. This is pretty typical mix healing on trash. With so much going on, I tend to focus on instant casts. I also use PW:S liberally, but that’s one of few things Recount doesn’t show. I didn’t take an SS of my over-healing, but on trash it’s substantial. My mana-regen is enough that I don’t have to drink between pulls (you can see my mana bar is full). You’ll notice also that I don’t simply spam CoH. It’s overkill, and it’s boring.

2. I have an Illidari Blood Lord set as my focus. This is because he’s a Paladin mob, who will bubble himself and start to heal. The bubble has to be mass-dispelled, so rather than wait for them to call me to dispel it, I just watch him, and cast it as soon as he has the debuff. (around 25-30%.)

3. Recount’s main window. One of the reasons I keep Recount open during combat is to get a good sense of what my fellow healbots are doing. Most of us have been together for a while now, and we have a pretty good idea of our standard baseline. Typically, I’m about 1.5% ahead of Wize, who is around 3% ahead of Eiz, who is about 2% ahead of Por… you get the idea. This is an atypical pull, because Wize is #3. As you can see from Grid, it’s because he got smooshed. (You can’t do your best when you’re dead! remember that!) Also, Por is near the bottom because he was AFK. It’s handy to be able to get a nearly-real-time idea of who’s paying attention to the pull, and who needs to take a break, without having to constantly over-communicate.

The other large reason I keep it open is because my guild is constantly auditioning new healers, and it’s good to be able to give the Raid Leader an accurate opinion of how the new guy is fitting in with the old guard. I also have a pretty good idea of my heal-mates’ gear, and if an under-geared newbie is out-performing a same-class veteran, it will become obvious very fast. With recount, I can see what heals they are casting, who their targets tend to be (tanks, raid, or a combo? do they follow assignments?), and how much over-healing they have. As I’ve said before, over-healing isn’t a huge issue unless people are dying or pulling aggro (then dying), but with a new person, a large amount of over-healing and a low amount of effective heals could indicate a lag problem or a lack of attentiveness. As an additional coaching tactic, I’ll frequently set the trial member as my focus – Quartz allows you to customize those casting bars as well, and I can tell what rank of what heal they’re using, on what target, and at what health level they began their cast. Recount simply makes it easier for me to stalk people, and keeping it open makes the data easier to access. As a side tip, Recount gives you a lot of options for linking the stats. I’ve found that guest healers appreciate getting a quick link to let them know that they’re doing okay. Running with a BT guild on farm can be intimidating, and everyone performs better when they’re relaxed.

I don’t pay a huge amount of attention to recount actually DURING bossfights, I have more to worry about. But I don’t like the idea of opening and closing it all the time any more than I like the idea of not having the trend-style information easily available. And, sometimes, having it up for things like Dispels on RoS phase 1 or Gorefiend helps give real-time feedback to people who need it.

4. With Grid, it’s after the pull, so not much of interest is going on here, but you can see in Wize’s frame what it looks like when someone is highlighted because of low health. Grid also shows exactly what their deficit is, and I have mine set to approximate the amount of incoming heals they’re about to receive. Wize has none incoming, because he just stood up. Again, the faded squares are people who are out of range. You can see the train of people making their way into the Chamber of Command on my mini-map.

5. Yes, we raid with a Battle-Chicken.

To Be Continued. . .

Wyn’s UI – Part One

In the beginning… there was stock. And it was okay, but very limited. Thankfully, Blizzard designed the game to be almost infinitely customizable by players. I started out just wanting to show you the view from my chair, but then I realized that I’ve never found “standing around a major city” screenshots useful. Instead, I’ll be posting some “action shots” of my UI, the mods I use, how, and why. You’ll get a better idea of how I heal, and how I’ve gotten my UI to help me do that. There’s a lot of explanation involved, so I’ll do this in a couple of parts.

Personally, I don’t like a lot of crap that I don’t use sucking up power or my attention. I also like mods that pack a LOT of information into tiny packages. That said, I use a lot of add-ons, and I’m constantly auditioning more and deleting the old ones. Your eyes would bleed if I marked each one and told you what it was, so if you have questions, feel free to leave them in the comments.

Intro to my UI:

I had this idea in the middle of Black Temple, so I waited to get a nice, basic shot. Things will get a little more complicated when it’s in action. Personally, I want the middle of my screen as clear as possible. Priests have a bad reputation for dying, and I’ve found that keeping my field of vision very clear helps me move out of the way and stay alive. The mods I look at the most are right below my ‘toon, with those less relevant during combat further from that point.

Basic UI Shot. Englarged version coming!

1. The bar across the top is FuBar. Lightweight, with lots of modular plug-ins, FuBar makes it really easy to access and customize your mods. Keeps buttons off my mini-map, too. My personal favorite is RegenFu. This little gem tells me my int/mp5/spirit ratio on the fly, and how much time I’m spending in the 5SR; (85% on last fight). It also has a timer bar (which is faint, over my raid frame) that shows when I’m in the 5SR. Over time, I know if spirit or mp5 food or elixirs are more appropriate for a given fight, and I can better control my mana-consumption rate.

2. AG_UnitFrames. Before I used grid, I used AG for my basic Raid Frames. I still use it for 5-mans and a couple of other things because it’s lightweight, and very customizable. I’ve tried Pitbull, but found that it couldn’t do anything AG couldn’t do, and I already had AG the way I wanted it.
(2a) My frame and my target are at the top of the screen, and just above my chat box
(2b) you can see my focus frame and their target (in this case, I’m focused on myself for
some reason, so it’s just a miniature of what’s going on upstairs. Sorry about that.)

3. Grid took some getting used to, but it’s now my favorite mod. It shows a LOT of information in a very elegant and minimalistic manner. My groups are arranged horizontally, and the player names are cut off at a max of 4 letters. They are also colored according to class. That “W…” is me, and my group includes Wizendone (resto-shammy), Nl (s.priest), Haidi, and Alden (both healadins). Those that are greyed out are simply out of range.

A word on targeting: Obviously, you can see my target up at the top of the screen. One of the best rules of being an efficient healer is to maximize your reaction time. Minimizing the distance your eyes need to travel to get the information you need helps. Part of my solution has been to set Grid to have a white border around my target’s square. (Since I have myself targeted, and priests are denoted in white, it’s not showing properly.) Also, I use Quartz for my casting bar, and have it set to show the name of my target in the cast bar. Like this:

This makes it easy to avoid healing the wrong target, since my quartz goes right above grid.

4. Your spells have to go somewhere, and I use Bartender3 to keep mine organized. There are a LOT of mods that do this; find one that you like. You’ll notice that nearly all of them are hotkeyed – I navigate and target with my mouse, and cast with my keyboard. (That blank spot is for my Spirit buffs when I spec disc on the weekends.) You’ll probably notice a lot of icons you don’t recognize – I use macros very heavily. You’ll also notice how many ranks of Greater Heal and Flash heal I use. 4 of each. The fifth (5 and T, respectively) are stopcasting macros with the max-rank of the heal. (T is a little special, but I’ll get to that in the upcoming post on macros.) You may also notice that the only offensive spell I have hotkeyed is Pain. This is because I’m a healer, not a DPSer. Don’t worry, my offensive spells are easy to access (hold shift and scroll the mousewheel up once), it’s just that in the average raid, I don’t need them taking up space. I tend to click pots and such, so I don’t hit them accidentally while typing. The average amount per heal (or offensive spell) on each icon is from Dr. Damage. It helps me down-rank without having to read tool tips and do math in my head.

5. Recount. Use it. Love it. I have some great shots of how to use it for self-coaching later on. I have it running, set to “current fight” AT ALL TIMES. (Which is why it cleared once the boss was dead. Sorry about that, too.) See my previous post for why.

6. Simple Mini Map. I like it because it interfaces well with cartographer, it’s light, and it is very customizable.

7. Prat. A chat mod that lets remove you those damn arrows, and scroll with your mousewheel. Has a bunch of other nifty features I find useful. You’ll notice I don’t keep a combat log open. Recount substitutes for that.

8. ElkBuffBars. Matt made me get this one, and I’m glad he did. Montiors buffs, debufs, and everything else you need to know in a (say it with me!) Lightweight, customizable format.

Essential mods that you can’t see:

Deadly Boss Mods. Don’t leave home without it.

Omen Threat Meter. KTM was great. Omen is better. If you haven’t upgraded, do it now. Omen interfaces with KTM, too, so just because your Tank lives in the stone age isn’t an excuse for you to do the same.

Instant Health. This is a combat log parser that updates the health of your party or raid, with any raid frames, without waiting for the information to be sent to the server and back. It saves insane amounts of time (up to 3 seconds!!), and buys you time to react. As people keep stacking more and more Spell Haste, this kind of thing is going to become more popular.
(Edit: As I’ve been using this, I’ve noticed it messes with Recount and other combat-log parsers. Please be aware that it may interfere with any other mod you have reading this information; it is a known issue with the beta.)

More on Quartz. This has been around for a while, but I wanted to point out that it does more than allow you to change the look of your casting bar. The tail end of a given cast comes up in red (or any color you pick), and alerts you to your latency. What’s more, it allows you to begin a new cast before your computer has finished communicating with the server. This means you’re less at the mercy of Blizzard and your ISP to get those heals off in time. Pre-2.3, Quartz and a stop-casting macro were indispensible for quick heals. I still use stop-casting, although now more for mana regen purposes than global cooldown.

PoM Tracker – I found this after I took these screenies. I used to use Mending Minder, which stopped working at 2.4. This tells you who has your ProM, how many bounces it has left, and how much it’s healing. Nice.

To Be Continued. . .

Why I Always Care About The Meters

You’ll frequently hear raiders knowingly make comments about “the meters.” DPSers who have to crowd-control or dispel have a bit of a case; it’s harder to be #1 if you have more to worry about than standing still, popping pots, and hitting your spells in the right order. Healers occasionally have a point, too: Purge, Dispel, Cure, BoP, PW: Shield, and buffs all take not only mana, but global cooldowns out of our resources to be the “best” healer on the charts.

Here’s the thing though: you will rarely, if ever, find someone complaining about the unfairness of the meters when their name is consistently at the top. Here are a few reasons why I never forget to check the meters:

Supervisory

Whether you think a player is afk’ing trash, throwing out the wrong heals, or making a serious contribution, it will show up on the meters. Add-ons like Recount or WWS allow you to access your players’ habits with an unbelievable level of detail. If you don’t know what’s wrong, you can’t make it better. If you don’t know what’s right, you can’t give meaningful encouragement. Especially when making quantum leaps in content, (10-mans to 25-mans, or jumping tiers) being able to coach your players effectively through the transition is important.

Consistency

This works a couple of ways. On a micro-level, some classes are better suited for certain fights than others. If your Druids typically own highly-mobile fights like Leotheras or Supremus, and a new Druid isn’t keeping up with their peers, it’s a good indication that they need some help. On a macro-level, if, week after week, no matter what the fight, a certain player is always dead-last or near to it, there’s either a gear, hardware, or player issue. The raid leaders need to be able to address underperformance quickly. Why give a raid spot to a 9th healer when you’re effectively only fielding 8? Bring in another DPS, and make the fight shorter instead.

Personal Benchmarks

The first time I consistently broke 1,000 HPS was on Illidan. At first I was proud, but then I realized that I should be pushing my limits that much on EVERY fight. The first screen shot of me breaking 2,000 HPS serves as a constant reminder of my capability, and pushes me to work, heal, and fight harder; every boss, every time. It’s also fun to have some small competition to wake you up when farm content gets boring. Personally, if my favorite resto Shaman gets within 1% of my heals, I start working harder to keep my #1 spot – and he’s not afraid to point it out when he’s gaining on me.

Comparative Benchmarks

I’ve heard the arguments that the meters are skewed: AoE healers always win, healers assigned to players taking the most damage always win, healers that can hold still always win, healers that don’t have to Dispel, Cure, etc. always win. It’s not about winning. It’s about proving to yourself and your raid that you’re doing the best you can. I’ve fought for the top spot with Shamans, Pallys, and Druids. Every guild and healing corps. is different, and the sooner people stop making excuses and start pushing themselves to be their absolute best, the faster the bosses all die.

Accuracy

No meter is perfect. Some of them don’t ascribe things like the last tick of Lifebloom, or the ping of a ProM to the caster. I haven’t seen one yet that records the absorption of PW:S as the life-saver it is. You can tweak some of them so that overhealing or out-of-combat heals show up as effective healing. They all have their quirks, but any data collected over time irons out a lot of the inaccuracies and shows you real trends. I would never chew a player out over one bad night. But if that same player has nothing but bad nights, it’s important to have specific concerns to address with either them, or their class leader.

Timing

Even if the quantity of healing going out is enough, if the timing is off, it doesn’t matter . A tank taking hits for 10k needs an 8k heal. Unless they’re already topped off. Or they’re already dead. Overhealing is sloppy and wasteful, sure, but it’s also unavoidable to an extent. And to be completely honest, if no one’s dying it doesn’t matter much. But if they ARE dying, you need to be able to identify the problem. Grim-meters let you know if poor timing (and inattentive healers) were the culprit, or if the tank needs to put Shieldwall on their bars and learn to move out of fires.

Fairness

Let’s face it. No one wants to be stuck working on the same boss for weeks on end. If the definition of insanity is performing the same action but expecting a different result, it can’t be far from madness to randomly change set-ups without any data behind the decision. If you need to replace a player, you have to know whom to replace. The last thing good leaders want to do is pull a player that’s really doing their best, and keep someone who’s not working hard. And if you’re the one on the cut list, having some data to back up your desire to stay is always a good idea.

No metric is perfect. You can nitpick any measurement of success as biased in any number of ways, and healing meters are no different. The meters are absolutely not the end-all, be-all identifier for the “best” healer – but they are an invaluable tool for improving overall raid performance. My bet is that if you watch them for yourself, and for your raid, and make some key decisions based on the information you learn, you and your guild will progress further, faster, and with better players.

Obligatory Female-Perspective Post or Introducing Wynthea

Urban legends and media coverage both paint the stereotypical WoW-player as a pale, socially-stunted, acne-prone guy in his twenties. He might be in college, or live with his parents, or both. If he has graduated, he probably works in a computer-related field. Either way, the closest he’s gotten to female companionship is his level 28 NE-hunter alt and some lipstick on his hand.

Hi, my name is Ariel. You can call me Wynthea. I work in the finance industry, and live in a chic apartment of my own. I like to cook, swing-dance, pump iron, and watch obscure films. I speak three languages. I think that my red hair should serve as a warning to others. I play WoW. Better than you, and better than your boyfriend.

A girl playing Warcraft for her own reasons is unusual – most of us play to spend time with a boyfriend or family member. I’ve been told that we bring a different perspective to the guilds we lead and the raids we run. As is true in every competitive social and professional setting, we face a unique set of interactions and challenges, which has been well-documented elsewhere. I won’t bore you with tales of harassment, discrimination, or disappointment. It suffices to say that I’ve been called worse, questioned more, and respected by better. And I’m still here. Still playing, still progressing, and still learning.

Occasionally, I like to share a bit of what I’ve been taught, but more than that I like to brainstorm with like-minded players. Through a few lucky clicks, I found the World of Matticus, and started commenting. It was an ironic coincidence when eHarmony’s blog-buddy finder matched us up as sworn enemies. We had a good laugh about it, after the pirate gremlins saved me from his death-ray. Mostly, I sit on vent and listen to Matt whine about not having enough reagents, or forgetting where he hot-keyed Stoneform and Desperate Prayer. In return, he keeps me from screaming at my raid leader and catching a fast G-kick. I’m honored and flattered that Matt has invited me to add a little bit of my perspective to his World. He needs my presence so his sanity doesn’t get lost.

Street Cred

I have two level 70 Priests, one leveled Holy, one Shadow. Both are now Holy-CoH spec.

Renwein of Darrowmere (Human) – moth-balled since 2.3; made it 3/4 TK and 5/6 SSC, runs an occasional weekend-ZA.

Wynthea of Nazjatar (Troll) – Slayer of Illidan and countless gnomes. Red mohawk of DOOM.

My true love in this game is PvE, but I’ve dabbled more and more in PvP – the quickness of an arena match is a good nerve-soother when hours in a raid get to be too much. I have no real PvP claims to fame, but I’ll brag about them when I achieve them.