Guerrilla Raiding: How To Scale Up to 25 Mans

TheFuture

My guild is special. No, really. We’re like a guerrilla force descending from our airborne stronghold to plunge deep behind enemy lines in a surprise raid. This is, you see, an affectionate way of describing my guild’s raids.

We are a small, ten-strong band of fighters not all wearing the same colours because our roots are in a small core relying on PUGgers. It is sometimes a surprise when our raids get going, even though they’re organised in advance. Yet despite these things we’ve managed to storm the citadel right up to Rotface. Not only that, we’re thinking to scale up to 25 man operations. How I hear you cry, is that special?

My guild, you understand, is not a raiding guild. At least that’s what we keep telling ourselves. Herding Cats is a small group of real life friends. But many moons ago we got together, grabbed a few random PUGgers, and poked our noses into Naxxramas, like guilds do. Northrend’s raids became second homes over the months.

In ye olde Naxx runs we decided we just wanted PUGgers to be friendly. Not imbah, not a great tactician, not rocking 18k DPS. Our raids might not be lightning fast but they should be jolly good fun, old chap. Whenever we found a friendly stranger we rejoiced. And kidnapped them. Oh, we didn’t recruit – only invited them to our raids. In this way we cultivated a network of friendly people who fit in with the raiding group.

Our network of non-guildies quickly outgrew the slots we had for 10 man raiding and priority was given to people who were already raiding with us. We thought it sensible to develop a core. Tactically the group would become a single unit capable of learning encounters and to work together in order to move forward. Naturally this had social benefits for our raid members, who were rewarded with progression, loot and group friendships.

The downside of this was that many Herding friends are left out. As the raid leader/organiser, I really feel bad about this downside, as we are lucky enough to have people ask every week if there’s a raid spot for them this week even though they’re often told “I’m sorry but we’re full at the moment.”

So my guild is special but not unique. I’d wager there are a lot of guilds either already in our position or considering adapting to something like it.

How can we include people? 25 mans. Our network is big enough to fill 15-20 slots of a 25 man raid. It’s one huge step for Herding-kind. Dangerous almost. It might bite. Going into the hydra’s den unprepared is a bad idea so we’re arming ourselves and going at it as a team. We’re still thinking about it but this is the current battle plan.

1. Delegation. There are a lot of hats to wear in a 25 man so we’ve agreed to split the hats between the five of us. We’ll have leaders for each role, and they will each have a chat channel to communicate with their players. For example, in the tanks channel the tank leader will ascribe tactics to the tanks and foster communication between them. The other leaders will do the same for healers and melee and ranged DPS. The raid leader’s task is to introduce the raid, keep an eye on the group chat channels, be the deciding force in conflicts and handle unforeseen shenanigans. We’ll also have someone acting as a mentor. Unofficially we’ll have someone else as a morale officer and someone acting as a raid HR department.

2. Housekeeping. This is a brief introduction to the raid, given by the raid leader, which sets out a few basic points. These include our core principles for the run – for example, that we will welcome people amicably and expect them to do the same in return. We’ll also set out other rules on behaviour, breaks, tactics and loot. I’ve spoken before about how important this is, and it can only get more important the more people you have to organise. Setting clear rules from the start creates a safe, fun raid for everyone, Herding Cats veteran or first-timer and gives everyone a fair warning of what’s expected of them before we start.

It relaxes strangers, too. I think that people can join PUG raids expecting an atmosphere of every man for himself; having to constantly defend their playing style, DPS, healing, gear, whatever. We’ve had PUGgers say they’re pleasantly surprised to find a group where this isn’t the prevailing culture.

3. Communication. I believe the more information you communicate the more time you’ll save on wipes. Tactics are fluid things, changeable in progression content and per player experience. We’ll explain tactics for all encounters, provide a chance for suggestions and encourage raiders to ask questions in chat or privately to raid officers at any time. Officers will also keep an eye on their players and have a quiet chat if they suspect a player isn’t clear on something. “Hello Mr.. rogue, nice work on adherents there but you didn’t seem to get any time stabbing Deathwhisper. Any questions about that?” Likewise, we’ll check in with random raiders at random times to find out how they’re feeling.

Communication is most important when things go wrong. When we wipe we have a quick brainstorm in Herding Cats Land. Then we talk to the raid, saying something like “ok, what went wrong there was a deformed fanatic getting loose as phase 2 started. Easy mistake, we’ll get it right this time. Oh, and nice work on her mana shield, guys.”

4. Social. I play this game for fun, don’t know about you. It’s not a single player game and I like interacting with other people. I hope our raiders do too, but in a large group it’s easy for negativity to spread. The morale officer will keep the atmosphere cheery. The mentor’s role is just as important. It’s his task to be there for anyone who’s in any way unsure or needing reassurance. They might be new to raiding, they might be unsure in group settings, they might still be learning their class (who isn’t?). We welcome new players – given the right encouragement they can turn out to be some of the most loyal and best you’ll find.

5. Networking. We can’t fill 25 spots off the bat. We rather like that. It means that we have room to do what we did way back in Naxx times: meet new people and kidnap them to our raids. This way our network will grow whenever we find a new person we like and the entire group will benefit both in raiding and social terms.

If we get a PUGger we don’t like? We call them ‘That Guy’. You know – the guy who backseat raid leads, continually pastes DPS meters, abuses other group members. The list can go on. Ideally we’ll have a very strict policy, backed up by the housekeeping which already informed people what standards we work by. Some people have different attitudes and expectations to raiding than what they find in our group: that’s fine, but if you join a group you go by their expectations.

If someone insults our group members or any Cat finds them annoying in some way, they’re out. Sorry. I don’t care if they’re saved for one raid lockout, I don’t care if they’re the leader of the server’s top raiding guild. I don’t care if they’re hitting 11k healing every fight. I’ll protect my own group over someone who’s just griefed the priest healer they know nothing about. I think this is the most controversial point of our game plan, particularly if we just find someone annoying.

So those are the basics of our arsenal. There are some finer points such as where to begin our venture: we’re thinking ToTC25 for the first raid. It’s relatively short and should be a good ground to help the raid find its feet and bond. Not only that but it should provide some folks with bits of kit for the real progression and leave everyone salivating over the prospect of more next time. We also have a raid spam addon tailor-made for our needs in the works.

And do we, the raid officers, know what we’re doing? Why, yes, old bean. We know the enemy lines and the guerrilla force we’re leading into the Lich King’s chambers.

What about you? Is your guild in a similar position, or considering something like this – are you worried it’ll be a lot more work than you have time for? Are you in a large guild that does in house runs? Are you a PUGger who wishes you did/did not come across more groups like this? Do you think leaning a bit towards carebearing is going to hold us back or benefit us in the long term (and what’s YOUR playing style)?

Rot-Face the Music, People!

The second wing of Icecrown Citadel has been open for just two lockout periods.  There have been the outcries from all sides:

“It’s too soon!”

“Thank God, it’s finally here!”

“Why can’t we just fight Arthas already?”

But my new personal favorite, has GOT to be:

“Rotface is too hard!”

First, let me go on the record that I’m thankful for fights like these.  I’ve mentioned here before, and also when I’ve guest-hosted on Raid Warning (shameless plug), that I loved bosses back in the BC days.  Fights like Leotheras or Al’ar took coordination, teamwork, and dedication.  I remember the guild I was in never took down Al’ar.  Primarily, we lacked perseverance.  We would spend 3-4 attempts on that bird, and then people would gripe about how hard it was and we’d move onto Loot Reaver, I mean Void Reaver.

My point is that in Wrath, we’ve essentially seen easier bosses in raids.  Yogg was hard, Faction Champions held up a lot of guilds, true.  Aside from examples like those, we haven’t seen any fights in ICC thus far that have resembled the challenging nature of a true raid boss.

Rotface as a challenge?  I welcome it.  I think we, as raiders, get tunnel vision too easily.  Most of the fights have been the following:

  • Switching targets to an add or group of adds
  • Stay out of the stuff on the ground
  • Heal through this bout of incoming damage

Hence, Rotface is a breath of fresh air, even if it’s the leading cause of my healer-rage on any given raid night.  Healers, because of the instances of raid damage, have to step it up.  Any combination of the following mechanics will make for a bad experience:

Mutated infection – [UNAVOIDABLE] The primary mechanic for the fight.  Your choice to cleanse it early, though I wouldn’t recommend it unless your raid is totally on their A-Game.  You have to get on top of this as fast as possible because of the Mortal Strike-styled healing debuff.  When I’m assigned to the mutated peeps, I throw PW: Shield, Prayer of Mending, and a quick Penance to pile on Grace.  It’s better to keep them topped off than just keep them alive.

Slime Spray –  [AVOIDABLE] This is a pain in the butt to deal with if people don’t move out of the way.  At roughly 5k each second, multiple victims make healing rough, especially in the later stages of the fight.  It’s a short cast but on a regular timer, so it’s easy to anticipate.  If you keep your raid clumped behind the boss, a simple run-through to the other side is all that’s needed.  Don’t always assume it’s going to the majority of the raid.  Rotface may target the slime tank/kiter.  I’ve seen attempts almost wipe because people ran right into the spray without thinking.

Ooze Flood – [AVOIDABLE] The standard WoW rule of “Don’t stand in the crap on the ground!”  A lot of raiders claim to be taken by surprise, but I don’t buy it.  Not only do you get an audible warning from Petricide, but you see ooze spouting from the pipes before the flood appears.  At crucial moments of kiting or fleeing the ooze explosion, it’s not impossible to miss these entirely.

Radiating Ooze – [SEMI-AVOIDABLE] The only time anyone should be taking damage from this is the person merging an ooze with the big ooze and possibly the player kiting the ooze.  They’ll take damage from their own smaller ooze, which is less, and then momentarily from the big ooze.  I see too many people run INTO the ooze to try to get it to merge.  In actuality, you just need to get the ooze into the 10 yard radius of the big ooze for it to merge.  Even at that, it’s best to wait until your disease is gone to step into that area.  A near-full ooze will tick for a lot of damage, and a half-heal debuff is horrible to try to work through, let alone the tick from the disease itself.  It’s easy to die to this, even with a lot of healers on you.

Unstable Ooze Explosion – [AVOIDABLE] It’s simple.  It’s like the orbs in Void Reaver, except smaller.  Once the ooze explodes, and not before, you should start running away.  From personal experience, try not to be by the tank when it explodes.  If the tank is caught in about 4-5 of those projectile oozes, he or she is a goner.  Don’t run into ooze puddles, and don’t run near other oozes that are still growing.

—–

I highly recommend that you read and know each of the mechanics that I’ve explained above.  These debuffs and mechanics aren’t just for the healers to heal through but for every raider to avoid.  One or two of them together is manageable, but when you’re consistently not paying attention to the different intricacies of the fight, it just makes my soul hurt.

I know there’s a tendency to just want muscle through some of the fights, but on some of these Icecrown fights, it’s imperative to actually know what you’re being afflicted with.  Your little extra focus can get you through that last 30% that most guilds may be struggling with.

Healing Icecrown from a Druid’s Perspective – Part 2

This is a guest post by Epiphanize, a Resto Druid, and co-host of Raid Warning.

Now that we got all that out of the way, it is time to get down to business. You didn’t really show up just to listen to me go on about glyphs, did you? No, you came to heal your branches off! One quick thing: Be sure to check out the comments in my previous article; there were some good suggestions for alternative point distribution.

Lord Marrowgar

So here we are, Lord Marrowgar, a very interesting challenge for healers. However, it does give Druids a chance to show off their ability to heal on the run. This can be a relatively hectic fight, so regardless of whether you are tank or raid healing, you will need to be tossing HoTs at some points during the fight.

Tank Healing

This is the easier of two roles against Marrowgar.  During his initial phase and all the ones where he is not spinning all over the place, it is essentially a one tank fight. Since the nerf, Marrowgar does quit a bit less melee damage. So the damage your meat shield will be taking will be fairly minimal. This is pretty manageable for Trees, as we can keep the tank pretty well topped off with our HoTs.

One ability you need to be prepared for though is Saber Lash.  Saber Lash is an ability similar to Koralon’s Meteor Fists, in which two tanks will need to stack in order to distribute the damage. Your healing priority will be the Main Tank followed by the Off-Tank after a Saber Lash. As a tree, you have the added benefit of hitting both with Wild Growth before topping off the Main Tank. Other than dodging the occasional slow-motion blue flames, there is not much to deal with during this phase.

Raid Healing

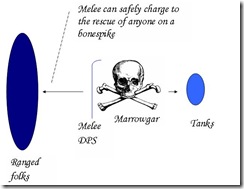
As stated above, this fight can be quite hectic for a raid healer. During the first phase you will have quite a bit to manage. In 10-player, one random player will be Bone Spiked. DPS will be turning to focus on getting the player down as quickly as possible. This presents two things for you as a raid healer. You obviously will need to be focusing on healing the spiked player. I’ve managed to safely keep them up with Rejuvenation and Swiftmend, though this can also be accomplished with a few Nourishes as well. The other thing is people taking Coldflame damage, as they will often be ignoring the flames to get the person off the spike. Again this is usually handled by tossing some Rejuvenations and Wild Growth, saving Swiftmend for anyone who stands in the fire just a bit too long.

The last thing you will be concerned with during the pre-Bone Storm phases is the aforementioned Coldflame. As the raid healer, you will be responsible for topping off anyone who doesn’t get out of the way of the flames quick enough. The damage it does is not too horrible as long as no one just stands there. Its actually more of a nuisance avoiding it yourself, as you will often need to decide between standing their long enough to finish casting a heal, or cutting it short to avoid taking too much damage yourself.

Bone Storm

This phase is pretty similar for Druids regardless of your role. Marrowgar will become untauntable and spin around the room doing relatively minor AOE damage. It is still good to avoid him if possible, as it makes life a bit easier on all the healers. The big thing you will be dealing with is blue flames (of ice?) again. Only this time he drops 4 at a time. This phase is all about survival. Since you will be on the move during this, Druids will be arguably the best healer for this phase. This is where glyphs like Rapid Rejuvenation and Wild Growth start to shine in ICC. Just keep HoTs on everyone and toss Wild Growth on cooldown and you should be fine. Make sure to keep Swiftmend and your NS-HT macro at the ready in case anyone gets into trouble.

One last thing that the Tank Healer needs to consider is the position of the tanks during all chaos. The tanks will be sticking close to Marrowgar during Bone Storm in order to pick him up at the end of the phase. Not only will the tanks be taking a bit extra damage, but you will want to be nearby to keep the Main Tank healed up while everyone gets back to some semblance of order.

Lady Deathwhisper

The next boss in The Citadel is quite a bit easier on the healers than Marrowgar. If your group is good about staying out of Death and Decay and interrupting Frost Bolts, you won’t have to mash the keyboard nearly as much. For Druids, this fight is all about situational awareness and keeping in range of the players taking damage.

Phase 1

The key to Lady Deathwhisper is getting through her first phase. During this phase she will be behind a mana shield that DPS will need to burn through in between dealing with adds that spawn from either side of the room. After that, the fight is pretty much tank and spank. In my experience, this is the fight where you are most likely to only use 2 healers.

The mechanics of the adds are pretty complicated at times, so it is good to familiarize yourself with them. There will be times the tank and raid will be taking increased damage based on these mechanics. There is a lot of movement involved, so there will often be times you will have to drag your stump across the room to toss a heal or two.

There are a few other considerations during this phase. First,  Adherents will place Curse of Torpor on random raid members that increases the cooldown of their abilities, so you will want to make sure you are decursing as often as possible. There will be a bit of randomness from the Death and Decay and Shadow Bolts, so be on the look out. Again, there is going to be some bouncing back and forth because of adds, so communicate with the other healer(s) to make sure you have all your bases covered.

Phase 2

Congratulations, you have made it through the hard part. After her shield is down she becomes tauntable, only has 3 million hit points, and the adds stop spawning. Since this is often 2-healed, you will more than likely be both on raid duty and tank duty. While this phase is pretty much tank and spank, there are some things going on that affect the healers.

The tanks will be swapping as Deathwhisper places a stacking debuff on the tank that reduces their threat. So you will want to keep an ear out for who is tanking her and focus your healing accordingly. She will still be dropping Death and Decay, as well as random frost bolts that should be interrupted. Finally, she will summon on non-targetable Vengeful Shade that will follow a player around and explode if it catches them. You will need to do your best to avoid them if they follow you, and be prepared to heal someone if they get caught (if they don’t get one-shotted).  It’s a pretty quick phase though, and you will be on your way up the elevator in no time.

Gunship Battle

This is a gimmick fight through and through and is a lot of fun. There aren’t really a lot of important mechanics here for healers. Your gunship has two guns that you use to attack the enemy’s gunship.  Occasionally, the opposing ship will summon a mage/sorcerer that will freeze your guns. You will then need to send some raid members over to kill it in order free up your cannons. Back on your own ship, mobs will appear through a portal that will need to be killed, while avoiding incoming rockets and axe-throwers.

Defenders

This is the easier of the two healing roles. Usually one tank and some ranged DPS will stay behind to deal with the enemy boarding party.  The portal will spawn a Sergeant and some Marines. The Sergeant is the only one that really poses any threat, as he has pretty nasty Bladestorm and Wounding Strike abilities. Most of your healing will be focused on the tank, especially if you only have ranged DPS defending. Just be prepared to work a bit extra to overcome the -25% healing debuff.

Two other items of note: First, stay out of shinnies! Rockets will be coming over to your side and the big shiny circle on the ground is an indicator your in the path of said rocket. Be prepared to heal anyone who has yet to learn this golden rule of Warcraft. Second, keep an eye on your boarding party tank. They will be taking damage as they fly back over to your ship, and not every healer is as equipped to heal in the air as us Trees. I have seen quite a few tanks bite it on their way back over as they still have the aggro from the ranged mobs on the enemy ship. A well timed heal from you can be the thing that saves them.

Boarding Party

As the boarding party healer you got the short end of the branch (no, the bad tree jokes will not stop). You will be heading over to the enemy ship with most of the DPS and a Tank to take down the mage/sorcerer while fending off the general and adds. On your way over it will be a good idea to HoT up the tank, as things will be a bit chaotic when you first get over there.

The tank will be keeping the enemy commander busy why DPS take down the mage/sorcerer. Keep an eye out because the longer you are over there the stronger the enemy gets. This will cause everyone to take quite a bit of damage. As mentioned earlier, you will need to keep some heals on the tank as he will take some damage on his way back over. Probably a good idea to leave a Rejuvenation in case you need to toss an emergency Swiftmend on the return flight. Again, a fairly straightforward fight for healers.

Deathbringer Saurfang

Phew, here we are, the final encounter of the entrance to the Citadel. This is probably the most interesting fight so far. A lot of what you need to do as a healer will be determined by your groups strategy, but Druids have a few things to keep in mind both as a tank or raid healer, regardless of how you handle Mark of the Fallen Champion.

Raid Healing

First, you do not have any way to stop the damage people will be taking like priests do. So your main role will be to heal up the damage that does get through. There are three mechanics that will be causing you trouble: Boiling Blood, Blood Nova and Mark of the Fallen Champion.

The first ability, Boiling Blood, will be case on a random raid target. If you have a Priest, they will mitigate a lot of the damage to avoid Saurfang building Blood Power. Its still a good idea, whether you have a Priest or not, to toss Rejuvenation on the Boiling Blood target to keep them topped off. The damage isn’t too bad, and one HoT should be enough to keep them safe.

Blood Nova can be more troublesome depending on how much melee you have. If this gets cast on one, a good amount of people will be taking damage. The player that get Blood Nova should run out of the raid to minimize damage and blood power gain. However, if they don’t get out in time, be prepared to throw out Wild Growth and a couple single target heals.

Finally, there is Mark of the Fallen Champion. How you handle this (if at all) is going to depend on your raid strategy. A lot of guilds, mine included, will just let that player die. This minimizes the buildup of blood power and puts a lot less stress on the healers. If you do decide to keep that person alive you will want to give them full HoTs. Yes, you may have to dust off Lifebloom for this one. I usually put up Rejuvenation and Regrowth, with a Swiftmend if needed.

Tank Healing

There is not nearly as much to deal with as a tank healer. The tanks will be switching when they gain the Rune of Blood debuff, so as per most two tank fights you will need to be paying attention. You will also need to be concerned if a player gets Blood Nova near the tank, which could cause a nasty damage spike. Your final obstacle is at 30%, where Saurfang will Frenzy. This means you need to get your stump in gear and heal faster! Other than that, he is business as usual for a tank healer.

—–

And that’s it! You’ve Stormed the Citadel. Just in time for the Plague Works to open. Thus is the life of a WoW player. In the next installment we will be covering healing Rotface, Festergut, and Putricide, all while avoiding getting any goo on your leaves.

Disc Priest Tip: Professor Putricide

You know how on Professor Putricide, a player needs to inhale a potion and they turn into this Abomination thing which controls all the slimes, oozes and crap? In order for Abominations to do that, they run on something called Ooze energy (It’s basically like energy). The only way to get such Ooze energy is by (you guessed it) consuming Mutated Slimes nearby.

Actually, that’s not quite the only way.

You know that Discipline Priests have this talent called Rapture which feeds energy, rage, or mana back to the target if the shield wears off.

It turns out the Abomination works the same way.

In other words, if your Abomination needs a quick burst of energy, have a Disc Priest shield them and the Abom can just sit and chill in a slime pool for a second or two in order to trigger the effect before eating it for more energy.

putricide-shield

Note: This actually isn’t my parse. Someone sent this in anonymously.

As you can see, in the grand scheme of things, it doesn’t offer much. But it’s nice to have for an initial energy boost when starting out.

If Druids have that Revitalize talent, it also provides a really strong energy boost as well.

Conquest will be taking cracks at him later tonight once we take down Rotface on 25.

The Issue with Discipline Raid Healing

As Priests, we exist in two healing realms: Holy and Discipline.  Discipline and Holy.  I say that because one is not superior or inferior to its counterpart.  Each specialization has its own tree.  Each has its strengths and weaknesses.

We were told way back before Wrath of the Lich King that these two trees were going to serve different fundamental purposes: Tank-Healing or Raid-Healing.  Seems simple enough, right?  Once Discipline Priests got past the backlash of “Disc is PvP lol” malarkey, people started learning that Discipline Priests can actually function as Tank healers.  If all of our tools are used in concert with each other, we can be a damn good single-target healer.

Is Discipline, though, viable as a Raid-Healing spec?  That’s debatable.

As with most aspects of this game, everything is going to be viable as something other than it was intended, depending on the situation.  For Discipline, Loatheb is an awesome example.  Although our talents are angled towards single-target healing, a combination of PW:S, Prayer of Healing, Penance, and quick Flash Heals (all powered by Fungal Creep) make us a formidable Raid Healer in a short amount of time. 

Another example is Deathbringer Saurfang, the last boss in the first wing of Icecrown Citadel.  It seems widely accepted now that a Discipline Priest shielding the raid helps reduce the amount of Blood Power that Saurfang gets via Blood Link.  The sooner Saurfang’s energy reaches 100, the sooner a Mark of the Fallen Champion gets put on a random raid member.  Absorbs from PW:S, as well as Divine Aegis, reduce the amount of Blood Power he receives.  Thus, fewer Marks on the raid, which means you can obtain I’ve Gone and Made a Mess with ease.  Not to mention, you get the boss down faster and easier.

Beyond the Situational Awesomeness

I’ve seen a trend of Discipline Priests insisting that they only raid heal.  They seem to hate the idea of being locked onto one or two tanks and will choose to “bubble spam” the raid.  An occasional spell other than PW:S might be used, but it tends to be a one-button spam from players like this.

I have no problem with people trying something different or off the beaten path, just so long as they’re smart about it and demonstrate a mastery of their choice.  I’m sorry to say, but playing Whack-a-Mole with Weakened Soul hardly shows mastery.  In cases like Saurfang, it’s a conscious and strategic choice.  In other cases, it’s a waste of mana.

Power Word: Shield / Rapture – Through Borrowed Time, we’ve received a nice scaling talent as a Discipline Priest.  It’s a valuable spell to the Discipline Priest, but it’s not the only spell we have available.  Since Rapture returns mana to you (ideally equal to or greater than the cost of PW:S), it increases your longevity as a healer, making PW:S one of the front-runners in our arsenal.  Notice, though, that Rapture only triggers when a shield is “completely absorbed or dispelled.”  Yes, partial absorbs are better than no absorbs at all.  However, in quite a few cases, the raid won’t take damage for a while.  Any shields that are put up on raid members that aren’t even touched is a total sacrifice of that mana.  Let’s say your PW:S costs 666 mana (yes, mine does).  If you cast it consistently, and 10 of them don’t even get touched, you just threw away 6,660 mana.  How much damage did you prevent?  Zero.  If you’re casting PW:S consistently, Renewed Hope will be up the whole time.  Since it doesn’t stack, those 10 shields mitigated no extra damage.

Grace – This fun talent, at the start of WotLK, used to be allowed on more than one target at a time.  Once Blizzard thought that was a little bit overpowered and was steering Discipline away from it’s original intent, they restricted Grace to one target at a time.  As a single-target healer, Grace is a great tool to have (though I wish it could be on up to three targets for fights like Marrowgar and Goremaw).  As a raid healer, it’s a wasted three talent points.  I find it particularly hard to assist with raid healing without using either Flash Heal or Penance (or the occasional hasted Greater Heal – all three of which activate Grace).  In most cases, you’ll be snipe-healing multiple targets.  If not, you’ll use a couple heals to top someone off, then off to the next target.  Grace isn’t given the chance to shine.

Where To Go From Here

Spec – I currently rock out a 57/14/0 spec.  I’ve tried various versions of it, but this spec just seems to work really well with the way I play.  I like to use Renew to help pad the tanks, or throw some on the raid to help out.

Given what I wrote above about Grace, I would choose to sacrifice those points and put them elsewhere.  I threw together a 52/19/0 spec if I were to try to re-work myself into a raid-healing Discipline mode.  I also took the points out of Focused Will (sacrifice some crit) and switched Spell Warding to Divine Fury.  I topped out Divine Fury (taking one point from Inspiration), and grabbed all three points of Improved Healing.  The goal is to hopefully rotate Greater Heal more into your rotation and make it (and Penance) cheaper to cast.  You still get powerful shields and good utility, but it’s not the end of the world trying to keep Grace up. 

Spells – As I pointed out above, I’m not a big fan of the “bubble spam”.  Sure it may look good on World of Logs or the estimated “absorption meter”, but I think it’s impractical.  I’m not in a raid to top a meter, I’m there to keep the whole raid alive.  With the alternate spec I suggested above, sniping Flash Heals and Penances is a great way to keep the raid up, as long as you’re also utilizing Prayer of Mending, Renew, and Prayer of Healing as well. 

If you choose to keep a variation of the first spec, then keep in mind the benefit of keeping Grace on your primary target.  You’re not going to be the most amazing raid healer, but you can certainly help out:

Prayer of Mending – I always keep this bouncing.  There are addons available to let you know when your charges have run out.  I tend to cast mine whenever it’s up.

Renew – If you put the points into Improved Renew, you can help out the other raid healers with this one.

Prayer of Healing – Although a bit of a mana drain, it’s amazing when it crits and each member gets his/her own Divine Aegis shield.

Binding Heal – ?!?!?! you say? I use this spell when I just need to single target someone.  Yes, it heals me at the same time.  Higher mana cost, the self-heal may be worth it, and I can keep the Grace stack on the tank.  I’ve tried both ways, and using Binding Heal has seemed worth it to me.

So there you have it!  I’ve always felt that Priests are incredibly versatile healers.  I don’t enjoy one-button spams or anything proved to be “easy-mode casting”.  We have an amazing arsenal of spells available, and using all of them can make us unstoppable.  There’s no reason you can’t take the intricacies of our class and harness them to do what you need them to.

My point is that if you’re going to go off the beaten path, think about what you’re doing before you take that step.

How do you feel about Discipline raid healing?  What other tricks have you figured out over time?

**Image credited to the Elitist Jerks forums**

Email: Elder.Thespius@gmail.com | Twitter: @Thespius