Introducing the Mayron UI Compilation

Mayron UI is a fully fledged interface compilation for DPS, tanks, and healers. You can grab the whole package on WoW Interface. It centers around  Grid and ShadowedUnitFrames.

I chose the MayronUI because of the way it looks. Everything is centralized. It allows me to easily switch modes between Shadow and healing at anytime. It even has it’s own custom installer. Mayron UI is  really easy to install. The instructions involve you extracting the addons into your addons folder. There’s another set of files that you have to load within your WTF folder as well. Once you fire it up in game, you’ll get an installation screen. Veterans that are already familiar with custom UIs will have an easier time with it. Newer players just getting started with custom UI elements need not worry as the instructions are detailed enough.

As for memory usage, it comes in at around 40MB+ for me (but will spike upwards to about 60ish due to Recount).

WoWScrnShot_070813_095215WoWScrnShot_070813_095224

It’s built for widescreen resolutions (1920 x 1080, 1680 x 1050, 1600 x 900, 1440 x 900, and 1366 x 768). You need to play at full screen out of the box. I typically play in windowed mode and sometimes there’s a slight disruption on the bottom right with Recount (see third image below) but that can be solved by simply unlocking and moving it over slightly.

5 man view

WoWScrnShot_031013_195307

Not much really changes between healing and DPS mode. The above screenshot shows what it looks like when I’m healing. Frames are nice and centralized and they go horizontal. Those three circles in the middle are a different addon (NugComboBar for Archangel stacks or Shadow Orbs). Buff and debuff tracking on you appear in the top right next to your map. Action bars can be shown or hidden based on your needs. There’s some nifty tabs in the top left that allow you to access various panes (Spellbook, character stuff, etc). There’s a convenient area in the top left where the chatbox can go. I added another chat pane to mine and placed it on the bottom right to help filter and sort through the various channels.
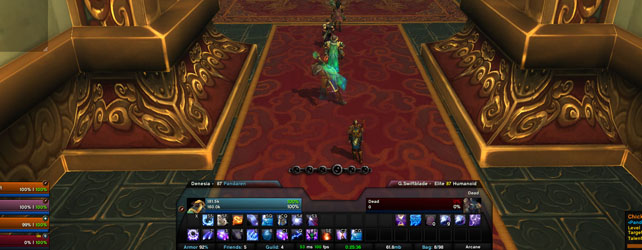
Healer mode

WoWScrnShot_062813_111859

This is what the healer side of things looks like. The Grid raid frames are slightly off center. It might take some getting used to for players though as the bottom row is considered group 1 while the top row is group 5. I know many players prefer columns instead of rows for their groups. It continues to stretch upwards in order to accommodate 40 man raid groups. Your target’s buffs and debuffs appear just to the side of the action bars below. Raid debuffs continue to appear on Grid itself and you can customize and add certain ones as needed. Your peripheral vision will come in handy in case any offensive dispels need to be cast.

There’s a slight catch with the healing frames. The focus frame is the larger frame on the right. The target frame is the smaller one in the middle. You can keep the tank focused while healing other players in the raid. Let’s be real here, I don’t think many of us actually look at the target frame when we’re raid healing anyway. We can eyeball health bars and percentages off our raid frames fairly easily. Having that focus frame in such a prominent area is handy because it becomes plainly obvious if our tank is afflicted by something or has suffered a large amount of damage coming in.

DPS mode

WoWScrnShot_052413_092937

Switching between modes is simple. There’s a little button on the left side of the chat box that lets you toggle your views.

This is what DPS mode looks like. Raid frames are in the bottom left. Unlike healer mode, your target of target appears in the middle between your unit frame and your target unit frame. I don’t have anyone focused but they would appear just above them. Like healer mode, notable buffs and debuffs for your target appear just to the right side of your bottom action bars. One of my concerns as a Shadow Priest is ensuring that all my DoTs stay up. Tidy Plates helps with that here as there’s no other addon that lets me track multiple DoTs on multiple targets (ClassTimer is included and helps with timers from target to target but doesn’t do well with multiple targets like Council f ights). Activate nameplates and track them manually.

All in all, Mayron’s is certainly a clean UI to work with as a base. I customized mine slightly by adding other raid related addons like TellMeWhen to alert me when certain abilities were available.

Configuration

There’s no “master” window to configure addons from. It would’ve been nice to have a central panel but it’s easy enough to access the options you need to get to anyway.

/install – Opens up the Mayron Setup Window
/bonus – Opens up the Bonus Features Window
/rl – Reloads the UI
/ltp – This opens up Leatrix Plus which contains very useful general settings. Worth looking through.
/suf – Settings for the Unit Frames (Shadowed Unit Frames)
/bar – Bartender Settings (Action Bars)
/kgpanels config – Settings for all the graphical art panels being used – Can become very technical.
/classtimer – Settings for the timers on the top of the palyer and target frame – You can remove and add additional timers through this.
/align – Places a Grid over the screen so that you can align UI elements easily.

Full list of addons
  • ACP
  • BankStack
  • Bartender4
  • Broker + Plugins
  • ButtonFacade + Masque
  • Chatter
  • ClassTimer
  • ColorPickerPlus
  • Bazooka
  • Doom_CooldownPulse
  • DragEmAll
  • eAlign
  • ErrorMonster
  • Grid
  • ImprovedOptionsFrames
  • kgPanels
  • Leatrix_Plus
  • nibChatTabs
  • OmniCC
  • Parrot
  • Postal
  • Quartz
  • Recount
  • Reflux
  • ShadowedUnitFrames
  • SLDataText
  • Simple Power Bar
  • TipTac
  • Tidy Plates
  • Who Framed Watcher Wabbit
  • XLoot
  • XLootGroup

Notes:

You need to get your own boss mods. It won’t come with DBM or BigWigs. Pick the one you like. In addition, certain classes may want to pick up additional class specific addons. All in all, I think it’ll help provide many solutions for players looking for a clean UI that’s universal across multiple characters and roles.

It’s the first post I’ve done in a while that looks specifically at compilations. Leave any questions below, and I’ll answer them as best I can (and incorporate them in future UI compilation review posts and notes).

buy zelnorm online
Synthroid no prescription
http://buywithoutprescriptionrxonline.com/premarin.html

Patch 5.4 Preliminary Priest Thoughts

General

  • Leap of Faith no longer has a facing requirement.

Say hello to the no-look life grip! I promise, I will only use this power against trolls. In all due seriousness, it’s a minor quality of life change. I can move and face the direction I want to go and not have to whip my camera around mid movement to pull a fellow player away from danger.

Talents

  • Angelic Feather now increases allies’ movement speed by 80%, up from 60% and the feathers have a duration of 10 minutes, up from 5 minutes.
  • Divine Insight for Discipline Priests now has a 100% chance to activate its effect after using Penance, up from 40%.
  • Twist of Fate’s damage and healing threshold to activate has been increased to 35%, up from 20%.

Angelic Feather change? Neat, I guess. Still not quite attractive enough in a raid setting. Too much effort, I think. Harder to work with on 25.

Power Infusion is the primary staple in the fifth talent tier (in most cases, anyway). Divine Insight triggered quite often for Holy Priests but not very often for Discipline. It should make it a little more lucrative. It’s essentially an extra Prayer of Mending Power Word: Shield on targets.

Twist of Fate change is agreeable. An extra 15% buffer means more frequent activations. Should come in handy in large, multi target ad fights for Shadow (like Primordius). It’s good news for raid-assigned healing priests (whack the mole with the lowest health first).

Shadow

  • Shadowform no longer reduces all damage taken by 15%.

Now I’m going to get two shot by Rogues instead of three. Sad smile

Class Armor

  • Restoration PvP 4-piece set bonus is no longer an area-of-effect and only affects the character that dispels Vampiric Touch.

Aaaaah, this might’ve been too strong in PvP. It was fun while it lasted, at least.

Tier 16 bonuses

  • Priest T16 2P Bonus (New) Serendipity also increases the healing of your next Greater Heal or Prayer of Healing by 50% per stack. While Archangel is active, your critical chance is increased by 10%.
  • Priest T16 4P Bonus (New) Circle of Healing and Prayer of Mending casts increase the effect of your next Holy Word spell by 50%, stacking up to 10 times. While Spirit Shell is active, you gain 10% haste and 3,500 mastery.
  • Priest T16 Shadow 2P Bonus (New) Shadowy Recall effects have their critical damage bonus increased by 100%.
  • Priest T16 Shadow 4P Bonus (New) Each Shadow Orb consumed for Devouring Plague increases the damage of your next Mind Blast, Shadow Word: Death, or Mind Spike cast within 12 sec by 20%.

Not sure if the two piece bonus is going to stay. But the Holy side of it is incredible. Increased potency of Prayer of Healing alone with just two Flash Heals (and the Serendipity effect)? However, the 10% crit is nothing to completely sneeze at. I think maybe it should go up slightly. 15% seems like a good number. If you’re not automatically triggering Archangel, this better be a good enough incentive for you! As for the four piece, I can see Circle of Healing and Prayer racking up some big time Holy Word charges. Nice for Blizzard to sneak in a pseudo-buff to Sanctuary and Serenity. The Spirit Shell bonus is no joke either. Try to time Archangel and Spirit Shell together for extra Divine Aegis proccing fun.

The Shadow bonuses are certainly cool on their own. I think Shadow Recall refers to our little Shadow copies that periodically run into the boss. The four piece is good in the sense it doesn’t really need us to change anything in our rotation significantly. We should still be using them at a full charge of Shadow Orbs, I think.

Don’t think this is going to be final just yet.

Zocor no prescription

Zone Healing

Ever play Ultimate (or Ultimate Frisbee)?

The rules are quite simple. You have two teams starting at opposite end zones who attempt to advance the disc to the other team’s end zone. Once the pull (like a kickoff in football) is initiated the teams can start jockeying for possession. A team that advances the disc to an end zone secures the point.

Kicker: The person with the disc can’t move. They can pivot on one foot but they can’t move. The opposing team gains possession whenever any pass is incomplete, intercepted, or received out of bounds .

Teams will employ different strategies to prevent the other team from scoring. One of the common defensive strategies is zone defense. Players are pre-assigned to sections of the field as they attempt to intercept and stop opposing players from advancing towards their end zone. It’s used to stop the offensive team from making really long passes. There’s usually one or two players that will close in on the disc handler. There’s different variations of it, but the key concept is that the defenders have their own sections to work with (not to mention that covering a small area instead of advancing up and down the field all the time is great at minimizing fatigue — I would know).

Gosh, I can’t wait for summer to get here.

Zone healing

Now the concept of zone healing works the same way and is used in situations where not every player is within range of the healer or where players are constantly shifting in and out of range. Sometimes there are raid mechanism place preventing you from moving or that keep you constantly away from each other. Zone healing is an approach that directs the healers to only heal the people that are within range of them. They must trust the other healers to cover the players near themselves in other areas. If you’re assigned to the blue beam of Durumu’s platform, then you can heal anyone that comes in range as the other beams are being moved around. Most raid frames have a function where the individual frames turn transparent if a player isn’t in range. As the healer, this makes your job easier. Any frames that are opaque (or solid) are the players that depend on you to live.

I understand, I have trust issues too. For the officers, zone healing is a great way to isolate which healers are true rock stars and which ones are struggling.

It’s a simple and effective healing strategy to use if the encounter demands everyone to be spread out. Let me give you some examples:

Ji-Kun

Ji-Kun has an ability called Caw. It’s a common raid mechanic where she’ll send sound waves at a player and damages anyone nearby within 8 yards. This calls for people to be spaced out around her main platform. Depending on which Ji-Kun strategy you use, you’ll have groups clearing out nests and may not have the same, consistent number of players on the main platform at all times. Be flexible.

Dark Animus

Healers will have to generate threat on the little anima golems at the start of the fight to hold them in place. If the golems are brought together, their attack speed greatly increases and will quickly snowball into a wipe. This requires everyone to stand in place. As the little golems are gradually killed near the Massive Anima, players will be freed up and can move around the room consistently. In addition, Matter Swap will switch players with their most distant ally forcing healers to react accordingly and dispel or heal any teleported players.

As a healer, you’re not going to be able to hit everybody. DPS and tanks will come and go through your area of the map. It won’t always be a set group of players all the time. Keep the players in your zone healthy!

Buy Neurontin online
http://buywithoutprescriptiononlinerx.com/cytotec.html
http://theimagearchitect.com/media/editors/tinymce/templates/new/buy-flomax.html

Challenge Gold: Scarlet Monastary

We’re down to one.

After several heartbreaking nights, my group managed to get Scarlet Monastary down on gold and went back to help finish out Scarlet Halls for me. The Monastary is arguably the hardest challenge mode in the game!

We’ll see though as we still have Stormstout Brewery to blast through before we collect our full suite of Challenge Mode rewards.

The main issues with Scarlet Monastary isn’t the bosses. It’s actually the insane trash pulls. Cooldown and ability usage must be pinpoint. We actually screwed up slightly on Whitemane and pulled extra trash when we didn’t have to but finished 7 seconds away from the Silver mark.

There’s a few pressure points in Scarlet Monastary, so I’ll walk you through the toughest ones. Make sure you come into Scarlet Monastary prepared with the 18 second Invisibility Potion. You’ll need it. The most frustrating part is that if you wipe shortly in the cathedral area, you’ll have to wait several punishing minutes until your potion cooldowns are available for usage.

Right as the Challenge Mode timer finishes counting down, you can activate your Spirit Shell to grant your party additional shi elds as they get through that first pull. Spirit Shell should be off cooldown around the time you pull the Frenzied Spirits before the boss.

cm-sm-fs

You’ll want to have a Death Knight handy. You can charm one of the Frenzied Spirits as it it gradually builds up a buff (also called Frenzied Spirit). Our Death Knight rounded them all up and applied a slow and gradually kited them around while our Shaman and Monk chained AoE stuns back to back. Now the buff increases the Spirit’s damage and attack speed by 15% and it stacks. Our fastest kill on Thalnos the Soulrender was around 31 seconds. I think the Spirit had around 40+ stacks coupled with Heroism.

In the first pull in the hallway shortly after taking down that first boss, I suggest yanking the two yellow mobs and taking them out. Odds are you’ll pull them and the big pack around the corner. As a healer, try to be the first one in so you can start drinking before the rest of your group initiates. Light off and chain your AoE stuns one after the other. You can use a Barrier here if you’re struggling, but it’s not quite necessary.

cm-sm-hall

Burn the Invisibility Potion and break out into a run across the courtyard. Go up the right stair case and hop onto the fountain walls. Make sure you don’t come out of stealth near the 3 monks sitting on the right part of that fountain. Our tank pulled Brother Korloff when he was in the middle of patrolling between the 6 monks that flank that entrance to the monastary.

Brother Korloff will charge the furthest player and unload Firestorm Kick. Be really wary of where you stand. You want to position yourself just in the area in front of the fountain so that you don’t pull the aforementioned trio of monks. As the healer, don’t be the furthest one away. Shouldn’t have too many problems with this one at all. It’s just a little long.

Once you defeat the Monk, your next task is to try to penetrate the Monastary without pulling the monks on either side. The margin of error here is extremely small. Even a quarter step in either direction is enough to pull the pack and destroy your group. Now if you pay close attention to the positioning of the monks, you’ll notice they’re not exactly lined up perpendicular to the entrance. They’re actually angled inwards. What we ended up doing was using a hard CC (like Hex) on the back right Monk. This helped increase our margin just large enough that we could get through safely.

We tried CCing both the back Monks but the back left Monk managed to aggro on to us while we were inside the Cathedral so we ended up CCing the back right one only.

Anyway, take a hard left when you’re inside the Cathedral and start working on the pulls. There’s three major multi-mob pulls that can annihilate your group. Space out your stun cooldowns and healing cooldowns. For example, our Monk and Shaman used their stuns on the first pack. I used a Barrier and our Death Knight used Army of the Dead on the second. Use the pillars to line of sight pull them. Your interrupters should just pick a Purifier and lock them down while AoEing.

If you can get within striking range of Whitemane and Durand with 4:30 left, you should be in good shape. Stay close to each other so that Durand doesn’t get too far off. Assign specific interrupts for Mass Resurrection and Dominate Mind for Whitemane. You can let Smite go off unchecked as it’s easily healable. We screwed up here and accidentally pulled a Scarlet Zealot in addition to Durand. Use your AoE cleaves and single target abilities to get rid of that Zealot fast. Make sure he doesn’t cast Heal on the boss.

Good luck! I know I made it sound easier than it actually was. Scarlet Monastary will end up being one of the longer ones your group is working on just due to the difficulty of the trash and the potion cooldowns.

5.2: Returning to Wrath level Shield spam?

Okay, that’s not actually going to happen. As much as I miss the days of 1 button Circle of Healing during Burning Crusade and non-stop shielding in Wrath, it was largely so I could keep watching my NHL games without having to compromise my performance too much.

In a recent thread about PTR class and set bonus issues, Ghostcrawler mentioned the following:

We are going to nerf Divine Aegis for Prayer of Healing, but also lower the cost of Power Word: Shield (for Disc only) and increase the healing and damage of Penance. In 25 raids, Disc is using Prayer of Healing almost exclusively and we don’t think the Spirit Shell change will be sufficient to change that. We actually want Disc to get back to using PW:Shield a little more, along with Penance. Disc’s throughput is overall too strong in PvE, not even counting the fact that absorbs are often more beneficial than heals.

The Divine Aegis aspect on Prayer of Healing gets tuned down but we get cheaper Power Word: Shields instead.

I don’t know what it’s like at the 10 man level, but at the 25 man level, Disc Priests are predominantly using Prayer of Healing. It’s just that effective! More tactical usage of Penance and PW: Shield needs to be done clearly. Right now, we have the ability to run two Priests in our composition. You’d think that 2 Disc priests would limit the amount of shields being thrown up because of the whole Weakened Soul debuff and the fact that shields cause a dent in mana.

But realistically at the 25 man level, two Disc priests sharing the burden isn’t going to shoot the raid in the foot. There’s lots of targets to go around. There’s damage coming from all over the place (in most cases). Those shields provide an extra buffer and can buy players an extra second or two. Bonus points for cheaper shields.

Remember when Discipline sucked back in the day?

I just hope it doesn’t go too far in the other direction and we find out massive quantities of shield spam are back in season. I don’t think it is because we learned how that was in Wrath and while it was strong, it wasn’t fun.

What other clarifications?

The Golden Apparition from the Healing 4pc heals the lowest % health friendly target within 40yd. Note that it has no visual yet, but will not work like Shadowy Apparitions. It is a simple missile, not a summoned unit.

Good to hear. I’m getting annoyed at my Shadow Apparitions sometime just sitting there. Glad to know my healing priests won’t have to suffer from that. Cant’ wait to see this bonus in action though. I hope the missile isn’t as slow as the Shadow Apparition. Wouldn’t it be embarrassing if, you know, by the time your holy guardian activated and healed your ally they were already at full health because your healers were already doing their job?

Angelic Bulwark and Spirit Shell can no longer be dispelled.

On the one hand, this sucks because I can’t offensively get rid of these buffs on people in PvP. On the other hand, this is awesome because now I won’t lose them during PvP.

We are going to redesign Shadow Word: Insanity.

Can’t wait to see this. There’s something about this ability that strikes me as off whenever I try using it. I’ve mainly stuck with From Darkness, Comes Light. Honestly, 4 seconds isn’t that small of a window to get Insanity off on a boss.

So then why do I feel so awkward using it?

Our current though on Solace is that it will provide damage and healing for both Disc and Holy. So Holy could use it for some Atonement-like healing, as could Disc, but Disc won’t double dip and shouldn’t feel like it’s mandatory. That could change (all of this could change) as we try it out and iterate more.

Took a look at this on the PTR. Holy Fire gets changed to Power Word: Solace so it’s one less button that takes up your spell book.

Neat! I think we’re approaching that point where we’re starting to have too much crap in our spellbook so I do like the fact that we’re condensing something. Unlike Holy Fire, Solace is instant, offers you 1% mana back, but has a 10 second cooldown.

The current version of Solace is a 1.5 second cast time which restores 0.7% maximum mana but has no cooldown.

Doesn’t the new version of Solace seem a little too low in the mana return area?

Khendra, we have no objection to using Prayer of Healing when you need to heal a bunch of people. That’s what it’s for. But when you’re using Prayer of Healing in preparation for future damage because DA and SS make your AE heal better at shielding than actual Power Word: Shield, then that even further reduces your options. (In 10s, Disc tends to use Atonement more, so they’re doing something more than just PoH spam. In 25s, we see some Atonement use, but it’s fit in when possible and healers in 25s are just always going to be able to specialize more.)

We might in the future add another AE heal for Disc (I think you can make a compelling argument that in this day and age, healers need a variety of interesting AE heals and maybe only a couple of ST heals, while healer design for years went in the opposite direction) but that’s not the sort of thing we want to drop on you in the middle of an expansion. In the meantime, if Disc uses Penance and PW:Shield some more (and Flash Heal in PvP) and doesn’t trounce all the other healers, we will be satisfied and hopefully so will priests.

Won’t be seeing that until 6.0 is my guess. We’ve got a ton of single target healing. Having Divine Star, Cascade, and Halo access were all great because we could customize our AoE healing based on the task at hand.

Another baseline AoE would be interesting though. You’d be hard pressed to find a method for AoE absorbs that isn’t already covered by what Spirit Shell can do.

Okay, I’m guessing it’s an AoE absorb. They think it’s a little excessive to chain cast Prayer of Healing in advance of a Bonestorm even though that’s the best method in countering incoming damage (even if every player’s at full health).

Can’t wait to see what they’re thinking about doing though though!

As for me, I’m still rolling around in Shadow. We’ll be challenging Blade Lord tonight. We’re getting picked apart by Wind Step and Unseen Strike combinations. Not quite sure how to counter that. It’s not like we’re losing half the raid. But each time an Unseen Strike hits, we always lose a player. I’m sure we can battle through it and add another heroic notch to our belt but if anyone has any pointers or suggestions, I’d be grateful.

Are these changes going to cause you Disc Priests to consider reverting back to Holy? Or no change at all? What do you think about the proposed Solace change?