In the beginning… there was stock. And it was okay, but very limited. Thankfully, Blizzard designed the game to be almost infinitely customizable by players. I started out just wanting to show you the view from my chair, but then I realized that I’ve never found “standing around a major city” screenshots useful. Instead, I’ll be posting some “action shots” of my UI, the mods I use, how, and why. You’ll get a better idea of how I heal, and how I’ve gotten my UI to help me do that. There’s a lot of explanation involved, so I’ll do this in a couple of parts.
Personally, I don’t like a lot of crap that I don’t use sucking up power or my attention. I also like mods that pack a LOT of information into tiny packages. That said, I use a lot of add-ons, and I’m constantly auditioning more and deleting the old ones. Your eyes would bleed if I marked each one and told you what it was, so if you have questions, feel free to leave them in the comments.
Intro to my UI:
I had this idea in the middle of Black Temple, so I waited to get a nice, basic shot. Things will get a little more complicated when it’s in action. Personally, I want the middle of my screen as clear as possible. Priests have a bad reputation for dying, and I’ve found that keeping my field of vision very clear helps me move out of the way and stay alive. The mods I look at the most are right below my ‘toon, with those less relevant during combat further from that point.
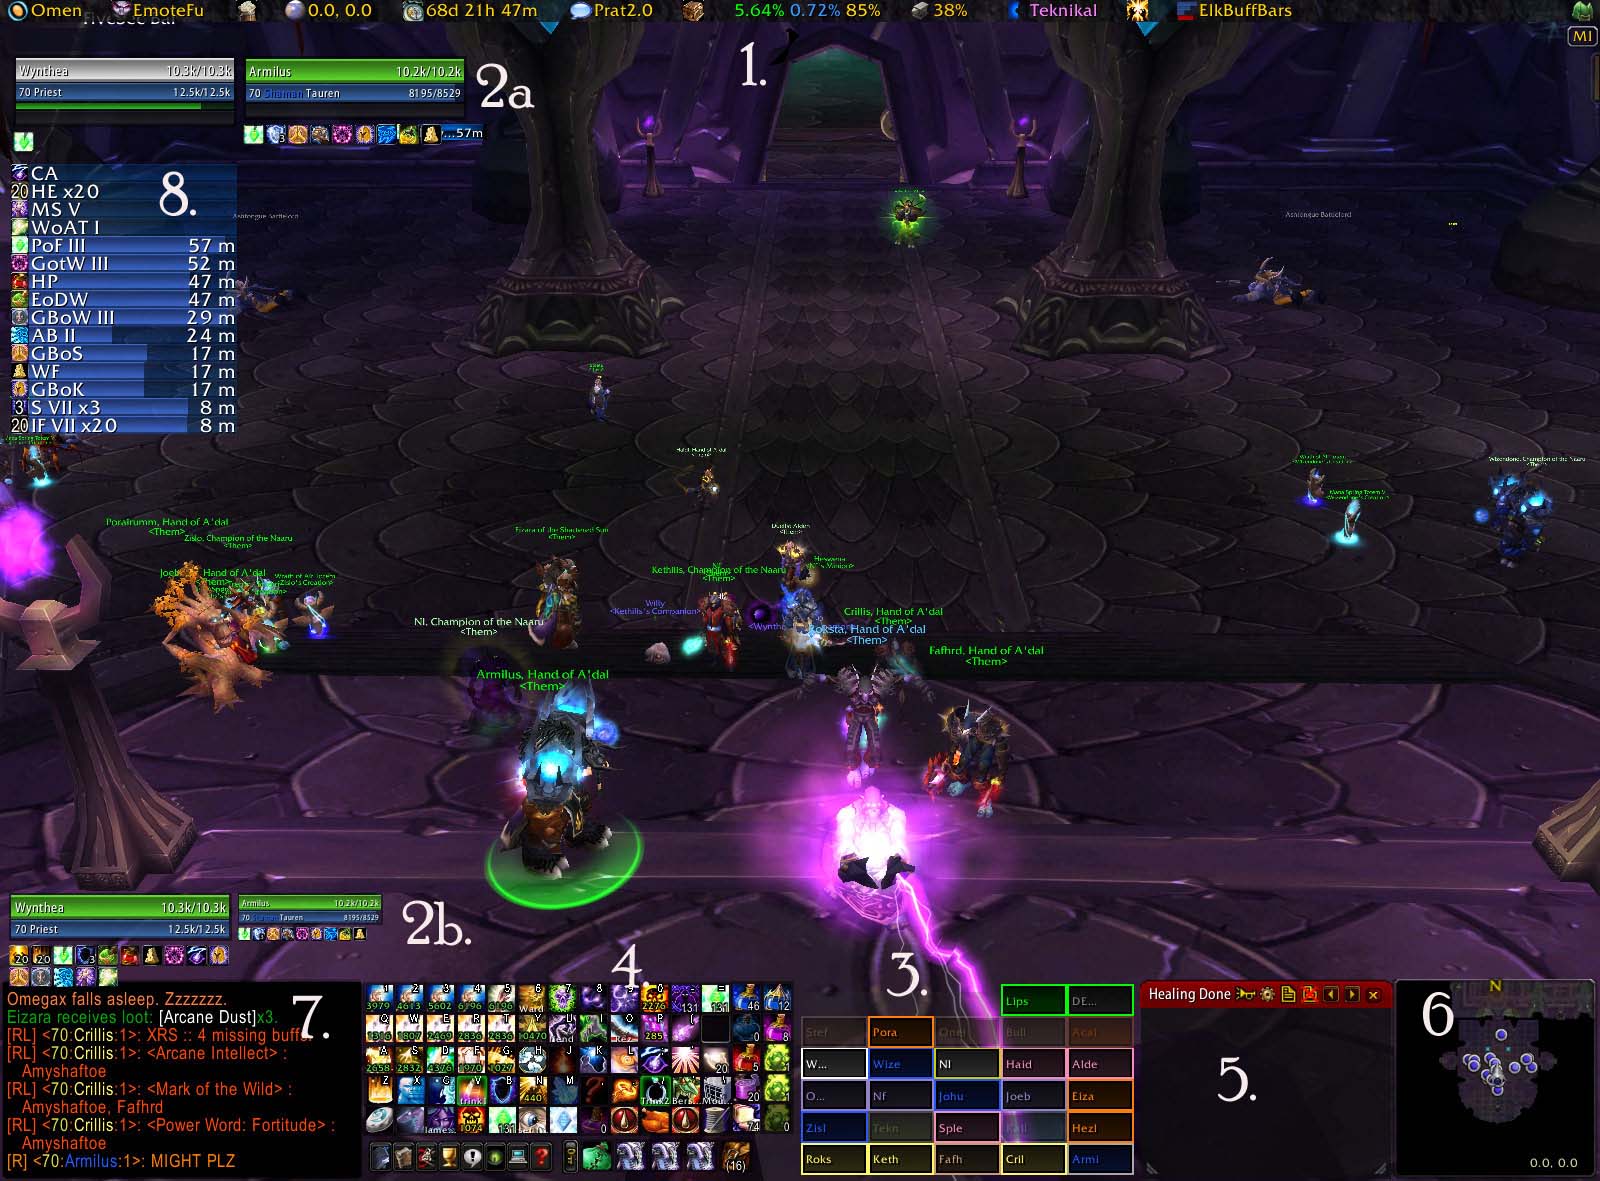
1. The bar across the top is FuBar. Lightweight, with lots of modular plug-ins, FuBar makes it really easy to access and customize your mods. Keeps buttons off my mini-map, too. My personal favorite is RegenFu. This little gem tells me my int/mp5/spirit ratio on the fly, and how much time I’m spending in the 5SR; (85% on last fight). It also has a timer bar (which is faint, over my raid frame) that shows when I’m in the 5SR. Over time, I know if spirit or mp5 food or elixirs are more appropriate for a given fight, and I can better control my mana-consumption rate.
2. AG_UnitFrames. Before I used grid, I used AG for my basic Raid Frames. I still use it for 5-mans and a couple of other things because it’s lightweight, and very customizable. I’ve tried Pitbull, but found that it couldn’t do anything AG couldn’t do, and I already had AG the way I wanted it.
(2a) My frame and my target are at the top of the screen, and just above my chat box
(2b) you can see my focus frame and their target (in this case, I’m focused on myself for
some reason, so it’s just a miniature of what’s going on upstairs. Sorry about that.)
3. Grid took some getting used to, but it’s now my favorite mod. It shows a LOT of information in a very elegant and minimalistic manner. My groups are arranged horizontally, and the player names are cut off at a max of 4 letters. They are also colored according to class. That “W…” is me, and my group includes Wizendone (resto-shammy), Nl (s.priest), Haidi, and Alden (both healadins). Those that are greyed out are simply out of range.
A word on targeting: Obviously, you can see my target up at the top of the screen. One of the best rules of being an efficient healer is to maximize your reaction time. Minimizing the distance your eyes need to travel to get the information you need helps. Part of my solution has been to set Grid to have a white border around my target’s square. (Since I have myself targeted, and priests are denoted in white, it’s not showing properly.) Also, I use Quartz for my casting bar, and have it set to show the name of my target in the cast bar. Like this:
This makes it easy to avoid healing the wrong target, since my quartz goes right above grid.
4. Your spells have to go somewhere, and I use Bartender3 to keep mine organized. There are a LOT of mods that do this; find one that you like. You’ll notice that nearly all of them are hotkeyed – I navigate and target with my mouse, and cast with my keyboard. (That blank spot is for my Spirit buffs when I spec disc on the weekends.) You’ll probably notice a lot of icons you don’t recognize – I use macros very heavily. You’ll also notice how many ranks of Greater Heal and Flash heal I use. 4 of each. The fifth (5 and T, respectively) are stopcasting macros with the max-rank of the heal. (T is a little special, but I’ll get to that in the upcoming post on macros.) You may also notice that the only offensive spell I have hotkeyed is Pain. This is because I’m a healer, not a DPSer. Don’t worry, my offensive spells are easy to access (hold shift and scroll the mousewheel up once), it’s just that in the average raid, I don’t need them taking up space. I tend to click pots and such, so I don’t hit them accidentally while typing. The average amount per heal (or offensive spell) on each icon is from Dr. Damage. It helps me down-rank without having to read tool tips and do math in my head.
5. Recount. Use it. Love it. I have some great shots of how to use it for self-coaching later on. I have it running, set to “current fight” AT ALL TIMES. (Which is why it cleared once the boss was dead. Sorry about that, too.) See my previous post for why.
6. Simple Mini Map. I like it because it interfaces well with cartographer, it’s light, and it is very customizable.
7. Prat. A chat mod that lets remove you those damn arrows, and scroll with your mousewheel. Has a bunch of other nifty features I find useful. You’ll notice I don’t keep a combat log open. Recount substitutes for that.
8. ElkBuffBars. Matt made me get this one, and I’m glad he did. Montiors buffs, debufs, and everything else you need to know in a (say it with me!) Lightweight, customizable format.
Essential mods that you can’t see:
Deadly Boss Mods. Don’t leave home without it.
Omen Threat Meter. KTM was great. Omen is better. If you haven’t upgraded, do it now. Omen interfaces with KTM, too, so just because your Tank lives in the stone age isn’t an excuse for you to do the same.
Instant Health. This is a combat log parser that updates the health of your party or raid, with any raid frames, without waiting for the information to be sent to the server and back. It saves insane amounts of time (up to 3 seconds!!), and buys you time to react. As people keep stacking more and more Spell Haste, this kind of thing is going to become more popular.
(Edit: As I’ve been using this, I’ve noticed it messes with Recount and other combat-log parsers. Please be aware that it may interfere with any other mod you have reading this information; it is a known issue with the beta.)
More on Quartz. This has been around for a while, but I wanted to point out that it does more than allow you to change the look of your casting bar. The tail end of a given cast comes up in red (or any color you pick), and alerts you to your latency. What’s more, it allows you to begin a new cast before your computer has finished communicating with the server. This means you’re less at the mercy of Blizzard and your ISP to get those heals off in time. Pre-2.3, Quartz and a stop-casting macro were indispensible for quick heals. I still use stop-casting, although now more for mana regen purposes than global cooldown.
PoM Tracker – I found this after I took these screenies. I used to use Mending Minder, which stopped working at 2.4. This tells you who has your ProM, how many bounces it has left, and how much it’s healing. Nice.