Sindragosa. Even the bravest amongst us shiver or spit when they say her name. There’s a lot of hatred for her but not much in the way of a definitive How You Deal With Sindy. So today I’m doing just that for raiders needing advice on Sindragosa 10. I’ll follow up in a few days with tips specific to healing here.
Though the encounter can seem easier than others in ICC Sindy will turn you and yours into foiled adventurer sandwiches. I believe some encounters can be harder on 10 man than 25: this is one of them.
You’ve just redecorated Sindy’s ledge with the trash and your group is pausing to do crucial things like buff up and get coffee. Then a giant ribcage full of blue gas lands on your tank and you’re all in combat. What to do?
Sindragosa: quick facts
– Don’t Panic! Tactically If you know any combination of Garfrost, Sapphiron and Any Other Dragon at all, you already have a good idea of the tactics for Sindragosa. The encounter’s also nicely paced – it starts off gently.
– She’s a dragon. That means standing behind her will get you tail swept and standing in front of her will get you cleaved. This particular dragon also has a Frost Breath which hits anything in front of her.
– Sindy uses a lot of auras and debuffs. Most of them affect every member of the raid. Here’s what you need to know:
- PERMEATING CHILL will stack on all meleers as they attack. They should stop attacking Sindy when it gets to 5-6 stacks, until it falls off.
- INSTABILITY will stack on any caster who Sindy casts UNCHAINED MAGIC on. To prevent stacks of Instability simply stop casting until UNCHAINED MAGIC falls off. Really, stop casting, it’s possible to kill yourself with these stacks.
- MYSTIC BUFFET will stack on everyone in phase 2. It increases magical damage taken per stack. More on that later.
- FROST AURA will deal 4.5k damage to everyone every 3 seconds any time Sindy is grounded That means healers need to be constantly healing.
In phase 1 Sindragosa has ground and air phases. The first air phase occurs at 85% health, and then every 90 seconds thereafter until 35%.
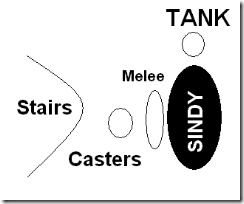
Threat: Sindy tests your DPSers’ ability to watch their aggro. As usual the tank will have to position an unwieldy dragon – oggle over my arty diagram for positioning. More importantly though, the tank will also get PERMEATING CHILL and will sometimes have to stop hitting for a few seconds to let the stacks drop.
Frostie: You might want to consider some or all of your raid wearing one piece of frost resist kit to mitigate some of the frost damage which is going to get worse as the fight progresses. At the very least I’d recommend your main tank picks up a piece of frost resistance.
Hokie-kokie: Sindy will pull the group in to her. Then she casts a 25-yard AoE called BLISTERING COLD. It has a 5 second cast time. Run away in a straight line as soon as she grips you in. Anyone caught in the AoE will either be dead on the floor or near-dead on their feet.
– Your tank should be aware that Sindy seems to move forward onto the tank after Blistering Cold, whether or not the tank moved.
Tip: DBM counts the BLISTERING COLD ability cooldown. Be ready to run as it ticks down. I also find it useful to turn on the spot to face the direction I want to run as the cooldown ticks. I also remind anyone with high debuff stacks to let them drop, in case they get caught in the AoE and their debuff might finish them off. Death Knights can use Anti-Magic Shell to null the effects of Blistering Cold.
Air phase how to:
The air phase is the first that requires co-ordination. It’s like Sapphiron’s air phase: you hide behind icetombs to line of sight (that is, put something between you and it so you can’t see it) an AoE.
Unlike Sapphiron, the AoE doesn’t come from Sindy herself but ice swirls she places on the ground. Those swirls are what you need to line of sight. 
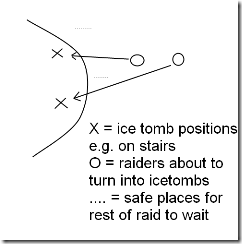
1. Two raid members will get target marks. They should run to pre-arranged ‘ice tomb positions as in the picture. These positions should be the same for every air phase. Everyone else should stay away from those two people until they’re entombed in ice.
2. As soon as they’re tombed up everyone else should gather round the tombs. You have a few seconds from the ice swirl appearing to the AoE occuring. Look for the ice swirls and line of sight them. There will be four swirls in total and they could be anywhere on the platform – including behind you.
3. As you avoid the AoE you also need to break the ice blocks to let your comrades out. Do this by slowly DPSing the iceblocks so they break just after the fourth swirl/AoE: try to avoid letting icetombs break. I’d recommend not getting below 25% health before the fourth blast.
Tip: remember I said this was a forgiving fight? We found it’s possible to live through breaking one or both icetombs early on air phases, but I recommend breaking them slowly for safety. If necessary assign your top two DPS a block each to solo and have everyone else focus on avoiding the AoE. DoTs such as DK diseases should not be used on the icetombs as they break too easily.
Phase 2 critical info:
Sindy is permanently grounded. She will still use Ice Grip and Blistering Cold and casts Ice Tomb on one player at a time. Meanwhile, MYSTIC BUFFET is a killer. It’s important not to let Buffet stack too high: hide behind an ice tomb until it drops off. Some thoughts on dealing with buffet:
– Sindy casts icetomb frequently in this phase and you really don’t want multiple tombs up at once. When someone is marked to be tombed they should run to a pre-defined space. Next to Sindy’s head is a central spot for this as everyone – including tanks – can get to it quickly.
– Have a second tank. Even if it’s a kitty druid. They just need to tank for a few seconds when your tank’s stacks reach 4-5 and need to be dropped
– Healers should remove stacks on a rotation basis so that at least one is not behind the ice block, so they can heal the tank. My healers and I set up some simple macros to tell each other what was going on – e.g. /p staying out – Pitil next
– DPS should be split into two groups. On the first iceblock group A removes their stacks, group B nukes Sindy. Visa versa on the second iceblock.
– Tip: You do need to break the icetombs. You could have all DPS do this, although it causes chaos and the potential for multiple tombs is high. I’d recommend assigning one, or even two, high DPSer to do nothing else but nuke icetombs for this phase.
That lot should be all the info you need to get through the fight – hopefully some of these tips will help it go smoothly for you. Remember she does have an enrage timer so unload the DPS as quickly as possible in phase 1. Skimp on healers or off tank if you want but be certain you can deal with phase 2 if you do. When you do take her down break out the screenshot buttons: you’ve just downed the Queen of the Frostbrood.
Now it’s your turn. What do you think? Have you got any tips to add here to All That Sindykillers Could Ever Need? Have any of these tips clinched the kill for you? How hard do you think this fight is – or looks if you’re not there yet – and most importantly, how fun? I’d like to hear if you think this is a hard or even an easy fight – but remember everyone is of a different skill level, so please no suggesting that a team of grannies could do this over afternoon tea!

