Discipline’s Tier 10 4-piece Joke

Haha!  Hey!  Hey!  I got a great one for ya! 

“What do you call a 5% buff to Power Word: Shield?”

“Insignificant.”

Wait!  I got another one!

“Name something fun, interesting, and awesome that gets replaced by something as mundane as a bowl of rocks?”

“The Priest Tier 10 4-piece Set Bonus.”

Let’s bring everyone up to speed.  Not all priests are at a place where they can experience, or even look forward to the set bonuses of the current tier.  The current Tier 10 4-piece is as follows:

Your Circle of Healing and Penance spells have a 20% chance to cause your next Flash Heal cast within 6 sec to reset the cooldown on your Circle of Healing and Penance spells.

Avalonna at talesofapriest.com has a great write-up of how beneficial this was to Holy Priests.  Now, I have very little knowledge of Holy, since I’m primarily (and almost solely) Discipline.

From a Discipline standpoint, this was amazing as a tank healer, or even a Discipline raid healer.  Follow me on this one, as it’s my first attempt at something resembling theory-crafting.  I apologize in advance if my numbers are off a little bit.

The “Math”

Penance is 16% of your base mana.  You get 3 pulses of healing.  I can crit all 3 for ~14k.  Flash Heal is 18% of your base mana.  With Glyph of Flash Heal and Improved Flash Heal, it’s less.  I can crit and get about ~9k (with a 3-stack of Grace).  Penance is relatively cheap, and heals more than Flash Heal.

With full raid buffs and the Borrowed Time proc, my Flash Heal cast is ~1 second.  With Glyph of Penance, the cooldown is down to 8 seconds (thanks to the lovely Penance nerf we had a while back).  So, you’re telling me I have a chance to reset an 8 second cooldown with a 1 second cast?  Yes, please! 

Not to mention that Avalonna also points out in her post that this Flash Heal! proc doesn’t have an internal cooldown.  It’s possible that you can have a string of Flash Heal -> Penance -> Flash Heal -> Penance -> etc. etc.  Even without worrying about Grace, this becomes pretty powerful. 

The Fun

When I was first looking at the likelihood of getting my Tier 10 set, I was salivating at the mouth for a cool and interesting 4-piece bonus.  Look at what we’ve had in the past:

Tier 7 – Reduces Greater Heal cost by 5%. (Discipline doesn’t really utilize this in most circumstances.)

Tier 8 – Casting PW:Shield grants 250 spellpower for 5 seconds. (Obviously useful for Discipline.  Kinda “meh” for Holy.)

Tier 9 – Increases Divine Aegis and the initial hit of Empowered Renew by 10%. (Blizzard gets the idea to involve both specs.  Still, marginal increase.)

So finally, we get a Tier bonus that’s interesting, challenging to work with, and it gets tossed under the bus.  If it was deemed overpowered, a simple fix would be to either shorten the window needed to cast the Flash Heal, or reduce the chance for it to proc to less than 20%.  I feel that completely redesigning it was a bad move on Blizzard’s case.  People need to understand that this game is organic.  I personally enjoy having to tweak my playstyle a bit to get more “oomph” out of my healing.  The Tier 7 set had me speccing into Divine Fury and utilizing a Borrowed Time-hasted Greater Heal for a while.

The Replacement

Our incoming Tier 10 4-piece set:

This bonus now increases the effectiveness of the caster’s Power Word: Shield and Renew spells by 5%.

Sorry, I just gagged a little while reading it again.  Blizzard has gone the “easy route” and just given us a static stat increase.  As far as Discipline goes, it’s a sad one at that.  Thanks to math from Zusterke, I’m able to whip out some numbers for you.

Let’s say you have 3000 spellpower, raid-buffed or not.  Your glyphed Power Word: Shield will total 8,813 (as of right now).  At 3200 spellpower, it’s 9,177. 

With this new “buff”, those numbers change to 9,254 and 9,636, respectively.  You’re looking at a 441 and 459 jump.  Even at 4000 spellpower, you’re only increasing your shield by 532 points of absorption.  With how bosses and mobs hit, this is hardly worth even considering. 

Even if you’re able to keep up PW:S on the raid the WHOLE time, you’re preventing only ~11,500 extra damage every 15 seconds. 

Hence, this bonus is far from worth it to me.  Dawn Moore wrote up on WoW.com her initial thoughts on the changes.  She writes:

“Still, the buff is exceptionally good. The only problem with it is that so many priests who turned their back on the tier gear for other badge items (such as shadow’s tier gear) with better itemization are now going to be screaming bloody murder.”

I disagree with the phrases “buff is exceptionally good”, “only problem”, and….well, hell, I disagree with her.  I really don’t know any Priests that I game with or interact with in the blog/twitter communities that were against the original set bonus.  If anything, those that were on the fence about the bonus were quick fans once they actually acquired the bonus.  This news of “4-piece hatred” came out of nowhere, as far as I’m concerned. 

Then again, I’m just one person.  It looks like I’ll be going the route of dropped loot, crafted pieces, and off-set badge gear.  This particular Priest isn’t too thrilled about the change.

Other Thoughts:

Lilitharien from Divine Aegis

Bati from Holy Nova NOW!

Miss Medicina’s “To Bonus or Not to Bonus”

How do you feel about it? How does this affect your gearing strategy as you make your way through the content?

Email: elder.thespius@gmail.com | Twitter: @Thespius
 

Focus Casting: Macros And You

I had a revelation last week. It’s one I’m not afraid to share because I suspect there are a lot of players in the same position as me.

That position is peering out from round a corner with a bemused grin and crimson cheeks, watching the macro users of our raid do ten things at once while showering the raid in light and laughing at the boss. We’re cautious because they’re clearly performing some kind of common folklore which all players should know, right? And we shouldn’t even consider asking about macros?

Wrong.

If you’re in that position of knowing nothing about healing macros then we have something in common, you and I. Maybe you’ve just started a new healing class and know nothing about it. Maybe you’re looking to improve your WoW playing generally. Maybe you’re a raid leader, like me, and have been getting into macros via raid leading and now want to see if this macro malarky can do anything for your healing. Whatever the case, read on.

If you do know something about macros then have a read anyway – some of these might be basic to you, but you might pick up something that saves your skin, bark or cow-printed hide.

Paladins

1. Buffs up quicksmart

/castsequence [target=focus] Beacon of Light, Sacred Shield

  • This macro will put both of your essential healing buffs up on your focus, which is likely to be the tank.
  • TIP: you can use the addon Need To Know in conjunction with this setup. It’ll give you permanent timer bars for those buffs regardless of whom you’re targetting.


2. Easy judging

/cast [target=focustarget] Judgement of Light

  • Casts your judgement of light which both does healing and gives you a powerful haste buff
  • It won’t cause you to overaggro when casting your judgement as you’re using it on the tank’s target
  • Means you don’t have to mess around with tab or mouse targetting a mob to cast it on. You may need to re-target your tank but that’s less trouble than having to target everything manually.
  • TIP: you could use the addon Clique, which will allow you to set up mouse and key bindings for anything you could wish. Want to heal the tank? Sure, click the <insert mouse button here> and you needn’t retarget them after using your JoL macro.


3. Catch-all Holy Shock

/cast [mod,target=player] [nogroup,target=player] [target=mouseover,help,nodead] [target=targettarget,help,nodead] [] Holy Shock

  • If you have an enemy targetted it will automatically holy shock you
  • If you have *anything* else as target and a friendly unit as mouseover (or target) then it will holy shock that friendly unit


Priests – holy and discpline

1. “oh noes” button

/console Sound_EnableSFX 0
/cast [combat,@player] Power Infusion
/cast [combat] Inner Focus
/cast [spec:1,@mouseover] Penance; [spec:2,@mouseover] Greater Heal
/console Sound_EnableSFX 1

  • It works for priesties of both healing flavours. Yep, you read right, It’ll work by casting one of the spells, based on whichever spec you’re in. This saves you having two separate macros for holy and discipline
  • You could also add commands to pop your trinkets (/use 13 and /use 14) but be careful of the macro character limit.


2. Holy single target “oh noes” button

/cast [target=focus] Guardian Spirit

  • For you holy priesties. This is an “oh noes” button if you’ve been focussing on the raid and see that your focus, probably a tank, is wilting a bit and needs help now.


3. Discy Pain Suppression management

/cast [target=mouseover] Pain Suppression
/sw 8
/script Stopwatch_Play();
/say Pain Suppression Up!
/in 8 /s ***Pain Suppression depleted***

  • This is most useful for keeping track of PS cooldown and alerting you when it’s ready again – useful in fights where you need to time cooldowns and don’t have time to keep an eye out for them ticking down
  • TIP: this one may not work off the bat for you. The ‘in’ command is said to be provided through an addon, possibly the Ace3 library, though various people with various addon setups have got the macro working.


4. Discy raid-healing insta-bomb

#showtooltip Divine Hymn
/cast [target=player] Power Infusion
/cast Inner Focus
/cast Divine Hymn

You’re a discy priest so you’re probably healing tanks most of the time, right? That might be so, but sometimes you’ll be on raid anyway, and sometimes you’ll be on tanks watching the raid take heavy damage – and we all know how comfortable that isn’t. This macro will help you help the raid recover and soak up damage.

  • Try to have Borrowed Time proc’ed too for the (extra) haste
  • You’ve just given yourself power infusion which both reduces your cast time and mana costs
  • Bubbles! Bubbles everywhere! Your increased critical effect chance from inner Focus should mean more chance of divine aegis’ popping up.


Druids

1. Rolling Lifebloom
/target TankName/cast [modifier:shift] Rejuvenation ; [modifier:alt] Regrowth ; Lifebloom
  • Make a macro for each tank in the raid and you’ll be able to keep them all rolling on 3 stacks of Lifebloom, lag and catastrophe notwithstanding
  • This particular macro also has modifiers which give you flexibility in HoTs. Got a bit of extra time? Throw Tank1 a Rejuv. by pressing shift. Everything refreshed and got a couple of seconds? Stick Regrowth up by holding down alt


2. Quick response to tank death

#showtooltip Rebirth

/castsequence reset=600 Nature’s Swiftness, Rebirth

/run c=”Don’t release! I got ya.”if UnitInRaid(“player”)then SendChatMessage(c, “RAID”)elseif GetNumPartyMembers()>0 then SendChatMessage(c, “PARTY”)end

  • This is your “oh noes tank’s dead!” macro
  • It’ll immediately get him back on his feet and announce what you’re doing.

2a. Intuitive-res macro

#show Rebirth

/cast [@mouseover, combat, dead] [@target, combat, dead] Rebirth; [@mouseover, dead] [@target, dead] Revive

  • This is a similar one for other “oh noes” times – specifically when key people have dropped like lightbulbed flies. If you’re in combat it’ll try to use combat res, if you’re not it’ll use revive
  • Just be sure you’re out of combat after a fight’s ended before you use this, for fear of wasting your combat res.

3. Easy poison cleanse

#showtooltip

/cast [target=mouseover, help] [] Abolish Poison

  • This is a time saver anywhere there is a lot of poison kicking around. Its utility is simple: it allows you to cleanse your mouseover target without having to target them then retarget your healing target
  • TIP: I reckon this one works for all healing classes for their various cleansing duties.

Shaman

1. Earth Shield ease

/cast [target=focus] Earth Shield

  • Very, very simple way of refreshing earth shield on the tank, providing that your tank is your focus.
  • TIP: you can also get the addon Shaman Friend to support this macro by playing a sound when ES runs down. Alternatively you could have it in place of the macro: it can be setup to provide a focus button for earth shield refreshing, and a box which visually tracks ES stacks so you don’t miss it falling off.


2a. “Oh noes” button version 1

#showtooltip Healing Wave

/cast Nature’s Swiftness

/cast Tidal Force

/cast Healing Wave

  • Any resto shaman worth his salt has some form of this macro. Some shamans prefer not to attach a healing spell to it so they can choose whether to fire off a single target spell or a chain heal after nature’s swiftness. You could make both of those options achievable by altering the macro slightly, to this:

2b. “Oh noes” button version 2

#showtooltip Nature’s Swiftness

/stopcasting

/use 13
/use 14

/cast Nature’s Swiftness

/Cast Tidal Force
/cast [mod, help] [mod:shift, target=mouseover, help] Chain Heal; [help] [target=mouseover] Healing Wave

  • This version will cast healing wave after blowing your cooldowns or, if you hold down shift, it will cast chain heal. It also uses your trinkets (/use 13 and /use 14) for extra “oh noes” aversion value.

In both of these you could also add a command to tell party chat or a specific target that you’re averting catastrophe this time by blowing all your cooldowns, and so won’t necessarily be able to save the day again. At least for a few minutes.


External links:

There look to be quite a few sites out there with musings and help on macros, ranging from forums to class-specific blogs to macro specific-all class sites. Some of them are better than others. Here are the ones I found to be either most useful for digging these macros up or, in the case of the third link, just a Very Good Idea:

  • Arena Junkies – Arena Junkies macro forum – for your PvP macro needs
  • Elitist Jerks’ various guides, forums and threads have some useful macros squirreled away.
  • Macro Explain – does what it says on the tin. You paste in a macro, it explains each line of the macro. The website also has links to other macro resources and addons.
  • PlusHeal – plusheal’s macro forum – you’ll find good discussions and very helpful folks here.
  • WoWWiki – WoWwiki’s section on macros has links to class specific macro pages.


Most of these macros have been tested but let me know if any of them make things go boom. Or worse still, make nothing happen at all. I hope these do work and help you have more fun healing. Perhaps it’ll even bring about that myth us healers have heard whispered about – less stress while healing.

What do you think? Are you a macro-newbie and had been afraid to admit it? Feel free to do so! Share your tales of macro learning experiences. Also let me know if any of these prove really useful or otherwise. Likewise, if you’ve been hit by inspiration and have just spent thirty minutes writing some new healing macros or perfecting existing ones, do share them!

This is a post by Mimetir, an oversized owl of a raid leader on The Venture Co (EU). You can find my twitter feed here.

(Macro image created by Emrank @Flickr, used under CC)

Thespius and Matticus featured on “Power Word: Fail”

Image is courtesy of Brian Hough.

Kind of a fun title, no?  I’m ready to let the “fail” jokes ensue!  Mwa-ha-ha-ha!

In all seriousness, the folks over at Raid Warning (xSeven and Epiphanize) have assembled this special podcast (scheduled to be released March 1st) – a roundtable of some of the community’s most prominent priests.

Raid Warning’s last roundtable, Wild Shots, was a huge hit.  It was a roundtable of some very well-known hunters in the community.  You can follow links on their site to listen.

As for Power Word: Fail, I cannot be more excited for this event.  I’ve been recording with these guys for a while, and it’s always a blast.  If Wild Shots is any indication of the level of discussion we’ll have, then you’re sure to get some detailed insight into “The State of the Priest”.

Here’s who you’ll have the pleasure of hearing:

This podcast is going to center around questions you provide by emailing Raid Warning here.  We take your questions and discuss them throughout the podcast, as well as current news and speculation. 

I hope you’ll all submit questions, and check it out on March 1st!

Email: Elder.Thespius@gmail.com | Twitter: @Thespius

ICC Plagueworks: How Not To Die A Poisonous Death

So you’re standing in the heart of the citadel. You’ve just walked through fire to get here – quite literally. Before that you ran the gauntlet of the lower spire and left the Lich King’s doormen smattered over the walls. That place feels like home to you now.

But now you’re on the upper levels you’re choking on the Citadel’s hostility, which is no surprise given the fat ochre clouds seeping out of the Plagueworks nearby. You must conquer it – but how?

I’ve been there too, alongside nine others. Here are my tips for your group regarding the trash guarding the entrance, a strategy for Precious, and some healing advice for the Rotface encounter.


Getting your foot in the door – trash tips:

1. Bitesize the trash pull as it’s more dangerous the more you pull here. It’s very easy to get mobbed by everything lurking in the entrance to the Plagueworks. It’s also very easy not to do so.

From our experiments we believe that everything will pull if you set foot on the platform in front of the door to the Plagueworks, upon which the Blighted Abominations are standing. Have your group gather a bit back – at the blue brazier on the left-side platform perhaps – and have your tanks pull the abominations back to the group.

2. Healers! Be on the ball. When you engage the large trash group just inside the door in combat, be aware that it will be a hectic fight. Plague Scientists will be turning random group members into slimes, and those players will take the opportunity to bounce around playfully. Because it’s fun. Meanwhile (shackle-able) geists will be jumping on people and eating them alive. Not to mention the fact that the rest of the mobs will be inflicting various nature-based attacks on chunks of your group.

3. Be on your toes. That applies to everyone. The abominations will emit plague clouds. Yuck. Move whatever’s standing in it out, be that you as a healer or the mob needing a tank to kite him out.

Also, the Pustulating Horrors will start the 5 second cast of Blight Bomb when they’re nearly dead: a kamikaze move. Everyone should watch out and move away before it’s cast; it does a lot of AoE damage and DPS or healers may explode alongside the Pustulating Horror.

Precious tactic: Making the Dog Play Dead. Er.

When my group first met Precious we wiped. We’d stand and nuke him; sometimes we AoE’ed the zombies, sometimes we didn’t because our 10 man didn’t have many AoE options. Either way we died horrible deaths. So, we did a bit of research and brainstorming. This is the tactic we have adopted since.

1. Have your healers and ranged DPS stand halfway down the circular staircase. Pull Precious to the stairs. Kite him round past them (decide clockwise or anti clockwise beforehand). Have healers and ranged run ahead of you so they don’t become zombie chow later.

2. When Precious summons zombies, speed up the kiting a bit to get ahead of them. If you have any shamans or hunters – or both – then earthbind and frost trap really help to put some distance between you and the braaaaaain munchers. I’m sure other slowing effects work. Be creative. Don’t speed up so much that you lap the zombies.

3. Rinse repeat with kiting and earthbind/traps until the dog is dead. Turn round and deal with the zombies. AoEs you can run in, drop, then out – like consecrate – work well. Pre-positionable AoEs like shamans putting up earthbinds and fire totem/fire nova repeatedly while still running away also work. While we were perfecting this my guild had an attempt whereby the group’s several shamans finished off the zombies while everyone else ran in – er, I mean, recovered from temporary inability to help.


Rotface tricks for healers:

1. Surround him. Rather than clumping together in one huge mass, have your group stand in smaller clumps round Rotface’s…. well, I guess they’re feet. At least one healer to each clump. This has two benefits for healers. Firstly it reduces the number of people who may get hit by slime spray. Secondly it means that at least one healer should always be in range of the tank who is kiting the big ooze, wherever they are in the room, in case of problems.

2. GO team Heal! If another healer gets mutated infection and so has to run, heal him until it’s gone and he’s safe. This may sound silly but sometimes when the elephant hits the jet fan, healers assume that other healers can look after themselves. Yep, usually. But you should always remember you’re a team and work like one. Particularly here, where the infection ticks for a fair chunk and a lot of healers can’t heal and keep running at the same time.

3. Assume the worst. We all make mistakes: we’re human. But this is an encounter in which one person making a mistake can make things three times more hectic and it’s us healers who have to try to get the group through it. The retri paladin thinks he’s delivered his ooze to the big ooze but has actually dragged it into the melee and is standing there? Someone’s got two infections in a row and not realised?

Watch as much as you can. Watch for people making mistakes so you can go into overdrive. Watch your and other healers’ mana and pop things like mana tide or hymn of hope either early or at (an early) crunch time. Importantly, watch *your* positioning. You might think that concentrating on your own situational awareness might make it a bit harder to focus on healing when there’s a lot of damage. Instead, consider how doing so will make your job easier rather than if you get caught up in healing and, say, forget to move during an Unstable Ooze Explosion.


The Plagueworks is not a friendly place and only the bold set foot on its flagstones. Although, looking at Rotface I think Professor Putricide has other ideas about what feet should do. I hope your bravery is rewarded by victory, and that something here has helped if you were bouncing off those flagstones!

What about you? Have you got any tips, either general or class/healer specific, to add for any of these three encounters? Are you having trouble on any of them, or have been and are slowly getting better at dealing with them? Do you actively like or dislike these fights, given that they go in a different direction to the fights in the first wing?

Healer 101: How To Storm Citadels More Smoothly

ICCHealing1

Say you’re storming the Citadel on a fairly regular basis, massacring the Lich King’s advance nasties from Lord Marrowgar right up – literally – to Deathbringer Saurfang. You might be progressing through it at your own pace, or you might have it on farm and are running through weekly as a warm-up to pick up gear. Well, either way. Here are some general and some shaman-specific tips from my own experience on how to healing can help your group steamroller the nasties.

Lord Marrowgar:

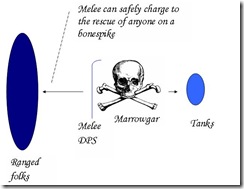
1. Bone Spike Graveyard: Pain. In. The. There are two things you can do to mitigate its effect on your healing. Firstly, make sure you remind your healing  Marrowgar diagram 3teammates to watch out for bonespike on each other. For example, if your tank healer is spiked then you need to pick up the slack for him and heal the tanks. Just til he gets back on his feet. Secondly, standing behind Marrowgar as shown in the diagram will help your DPS get you un-spiked as quickly and safely as  possible.

2. Coldflame is not cool. Really. Move out of the fire before it gets to you. Yep, I know it’s a pain and it seems to as soon as a healer has moved there’s more coldflame racing towards you. Standing at range will give you time to see it and move.

3. One shaman to another: people stand in fire. Us healers know it like we know the sky is (sometimes) blue. Bone Storm and Bone Spike Graveyard do damage. There’s a lot of it going round. So consider dropping mana tide early to have it ready again later if needed and using bloodlust after the first Bone Storm so that DPS get time to use it when Marrowgar’s not doing the tango.


Lady Deathwhisper:

1. Spread out. At least a bit. Deathwhisper’s room is just big enough that if you stand too far to either side you won’t be able to reach the people on the other side. Spread your healer team out so that tank healer A is covering the tank on the left, tank healer B on the right and raid healer in the middle. If you’re running two healers then they’ll need to be a bit closer to the middle for raid coverage. There’s also less chance you’ll all get caught in death and decay if you spread out.

2. Healer, cleanse… everything. This fight has some status changes which give Deathwhisper and her crew an edge. If Curse of Torpor is running amok on your raid then cleanse it, first on you then on other targets. If a Cult Fanatic casts Vampiric Might (magic effect) on itself then cleanse it in order to down it quicker. Or tell your mages to spellsteal it: they’ll love you.

3. Shamanic wisdoms: think about your totem placement; you might want to manually place them rather than drop all four in one place. Personally I drop stoneskin and healing stream well to the left with the tank I watch over. I then separately drop Flametongue and Wrath of Air nearer the middle/mid-back, depending on whether it’s 10 or 25 man. I re-place totems at Deathwhisper when phase 2 hits.


Gunship battle:

1. Welcome returning soldiers back. With a lot of healing. When the boarding party returns Muradin might well still be trying to kill at least one of them, probably with rending throw. In my opinion it’s best to play it safe: overheal them all as they come back over rather than waiting for them to take an unexpected damage spike they might not survive. If at all possible have one member of the boarding party announce when they’re returning.

2. You’re a field medic, not a pirate. I think healers should stay on their ship rather than boarding. Healing on the Edge ™ of the ship works just fine. Yes, you have to move out of the cannon fire patches but at least there is ample time to do that. Things can and do go wrong for the boarding party and the chance of that goes up exponentially according to how many people jet over. You don’t need to.

3. Shaman talk: Consider earthshielding a different target, particularly a DPS on the boarding party. My 10 man run usually has an enhancement shammy swinging over to swash some buckles, and full of health they’re not. If Muradin/Saurfang decides he doesn’t like her she’s the most likely to go splat quickly and she is aware of it. I put earthshield on her for this fight: not only might it help in a pinch but it also makes her feel a tad bit safer when jetting off to hostile territory. She hasn’t died here since I made that change.


Deathbringer Saurfang:

1. Healers need time to breathe. Mark of the Fallen Champion can make things hectic if everyone’s trying to deal with everything on this fight. Arrange for one person to deal solely with victims of the mark when it starts hitting. Personally I have our disc priest doing that while our shamans chain heal around the rest of the group. It just gives everyone enough slack to not turn into headless chickens.

2. Be prepared. You’d be forgiven for thinking this was a healing-easy fight based on the first couple of minutes of it. Remember that the longer it goes on the more healing-intensive it gets, and its length is dependent on your group’s general level of kit and knowledge of the fight. Don’t let boredom tempt you into overhealing early on. Manage mana well and be ready for it to be challenged.

3. If you’re a shaman: Earth bind is your friend. Place it near-ish the platform to catch blood beasts as they spawn. It’ll just give the ranged DPS some breathing time, which should give you breathing time with less potential for blood beasts tearing up your warlock. Keep it refreshed. If you have more than one shaman co-ordinate to have your earthbinds cover a greater area.


World of Matticus: helping healers storm their local citadels since 2010. As with many fights at present the thing to remember above all else is to be mobile and flexible if the situation requires. I’ll also briefly be extolling the virtues and citing an example of shamans retreating to advance, later in the week.

How about you – are you a healer with any tips to add for the first wing? Any widely held tactics you’d particularly like to discredit? Any questions been troubling you about the healing on wing the first, whether or not you’re a healer? Comments are very welcome!