Healing Crusader’s Coliseum: Faction Champions

faction-champions

Back from Blizzcon and now well rested. Got some pretty cool announcements coming up. I’m working on a very special project right now that I’ll disclose later.

Anyway, I’ve gotten several requests for tips on Faction Champions.

And it’s just going to be that: Tips. The same day I touched down at Vancouver, it was back to business in the raid machine. After blitzing through Northrend Beasts and Lord Jaraxxus, it’s time to check out Faction Champions from a healer perspective.

Not a traditional fight

This is the key. There is no such thing as aggro management or threat on this encounter. This is an extremely chaotic, fast paced, arena-esque fight. Players that dual spec into PvP may even wish to consider doing so for extra survival or abilities. Your raid group is going to be facing off against 10 champions of the opposing faction (6 on normal). They’re selected from a random pool of NPCs.

  • Death Knight
  • Balance Druid
  • Resto Druid
  • Hunter
  • Mage
  • Holy Paladin
  • Retribution Paladin
  • Healing Priest
  • Shadow Priest
  • Rogue
  • Caster/Healing Shaman
  • Enhancement Shaman
  • Warlock
  • Warrior

Ones in bold are your raid’s targets of interest. Isn’t it rather odd that they’re all healers?

Execution

It’s difficult to provide an exact outline of what your group has to do. The best I can provide is a general guideline. Go ahead and move your group under the Alliance (or Horde) section first before activating the NPC. It’s a good idea to take stock of what class combination you’re group is going to be facing so that crowd control can be used accordingly.

In most cases, our raid group initially crowd controls every NPC as much as possible other than healers. For example, this week we had a healing Priest, the caster Shaman along with the Holy Paladin. We opted to zero in on the Shaman first. Our Warrior tank started working on the Holy Paladin just by keeping him locked down and interrupted. Placing a Rogue or 3 on the Priest is also a nice idea.

Our basic mentality is that if we run down the healers first, then the other NPC’s are a cake walk. The next dangerous Champion after healers is the Rogue based on the speed at which it can kill a target.

This is an endurance fight. Expect to invest around 10 minutes from start to finish. Each NPC has around 2.4 million health (some have 1.9 million).

Communication is extremely important here. If you’re being pursued, say something. Someone might be able to jump in and snare or CC a Champion.

General class tips

  1. Keep the melee NPC’s busy as much as possible.
  2. Death Knights should defensive Death Grip Rogues, Warriors, Ret Paladins, and Death Knights away from the raid and slow them down. Minimize their movement with slows and stuns
  3. Typhoon and Thunderstorm intelligently. Again, use them defensively to keep NPCs away from your healers.
  4. Drop a Fear Bomb if multiple NPCs are closing in on someone.
  5. Crowd control incurs diminishing returns. Example, after casting 3 Polymorphs on one Champion, it’ll become immune to Polymorph. Spread that CC out.
  6. Offensive Dispels are a virtual requirement. Shamans should be Purging, Priests should be Dispelling. Things you want to get rid of are Druid HoTs and Shaman Earth Shields.
  7. If you have a PvP Trinket, consider equipping it for the fight.
  8. Heroism/Bloodlust on the initial pull. The sooner you kill an NPC or 2, the easier it becomes.

For Priests

As a Priest, my limited arena training has taught me two important skills: Running and healing. If you can manage to run and heal at the same time, you’ll be in good condition. I mainly stuck to firing off blind Mass Dispels (targeting an area with a lot of traffic and hoping it connects) and specific single target Dispels. Keep Shields active on players who get focused and are soft. Don’t bother with mana burning or mind controlling.

Use Psychic Scream everytime it’s available. Just run into a crowd and drop the fear bomb.

Your first priority is to keep yourself alive. If you have to run, drop what you’re doing and run. This isn’t exactly a fight where you can sit there and just grind heal your way through.

Use your defensive cooldowns liberally. Pain Suppression and Guardian Spirit will save lives. After I see a big spike on someone, I’ll drop a cooldown on them. If I see 3 Champions close in on a player, I’ll drop a cooldown on them. If I get death gripped, I’ll crap my pants then use a cooldown on myself (No joke. That Death Knight is a pain).

For Druids

This is just from me watching Sydera. Hopefully she’ll chime in here at some point. I’ve seen Druids use their Cyclone in between healing on various NPCs. Reserve Roots for melee NPCs if they’re chasing after people. Go cat form to put distance between you and Champions. If you’re out of tricks, it’s bear form until the Champion gets peeled off you.

For Paladins

Platewearers are usually durable in this one. Have the Hammer stun ready and use it when the cooldown is up. Hand of Sacrifice or Divine Sacrifice and follow it up with a Paladin bubble to help out the raid. The Champions are smart enough to occasionally focus fire on one target.

For Shamans

I reconfigured my totem setup to include Earthbind, Cleansing, and Grounding totem. Every so often, I’d run into a crowd and drop them all down again. Really aware Shamans will know to keep a healer focused and Wind Shear to help with the interrupting process. Bonus points if you can squeeze off Frost Shocks on a Champion who is chasing someone. Do all that while healing, and your raiding group will love you.

Hope this helps! Feel free to comment below with any extra tips or tricks in general or against specific Champions.

Good luck!

Priest Guide: Part 3 – How to Build Discipline

Building-your-spec

Okay, you waited patiently for this, and a few of you kept poking me to make sure it got done. I hope I made you proud!

Part 1 gave a brief overview of each talent.

Part 2 went through my Holy spec, and how you can customize it for your needs.

This installment will review my Discipline spec, which is NOT a cookie-cutter build.

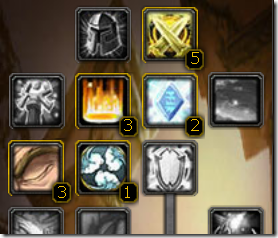
Step 1:14-mandatory-points

To start, plug in those mandatory 14 points:

  • Twin Disciplines – 5
  • Improved Inner Fire – 3
  • Improved Power Word: Fortitude – 2* **
  • Meditation – 3
  • Inner Focus – 1

*PvEers: If you are 100% certain that another Priest in your raid will have Imp:Fort, and not mind buffing, and you REALLY feel the need for threat reduction, you can move these two points into Silent Resolve. I don’t think it’s worth it, but it is an option.

**PvPers: Choose Martyrdom rather than Imp:Fort.

Step 2:

Decide whether this is a Holy build, or a Discipline build. For this example, I’ll walk you through my Disc spec and my reasons for each point. This will be a bit different: because I usually raid Holy, my Holy build is very utilitarian. My Disc build, on the other hand, is specifically for General Vezax Hardmode – the only 25-man fight where I use it. (I do use it in 10 man content for things like Iron Council hardmode, but due to gearing levels, the spec doesn’t need to be perfect to handle the fight.)

Step 3:

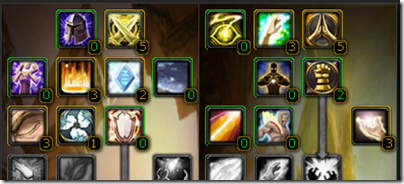
Inspiration-done Because this is a Disc build, and Disc builds focus on single target or tank healing, after plugging in the mandatory points in the Disc tree, we should flip over to Holy, since we KNOW that we will want Inspiration, and get those points out of the way. This will give a better idea of how many points we have to work with when we are making either-or decisions deep in the Disc tree itself.

The first step is to max out Holy Specialization – I do this in Holy to allow more Haste on my gear, but in Discipline because of how Crit is heavily favored by deeper Discipline talents. Next, because I personally use Renew rather heavily to even out spiking tank damage, I max out Improved Renew.

I do not use Greater Heal often, so I only put 2 points in Divine Fury for now – I prefer that my Greater Heals be slightly faster when I DO need them (and, remember, I’m very used to a LOT of haste – I generally have over 15%). I have considered removing these points from Divine Fury altogether and moving them into Healing Focus – But, again, because this build is specifically for General Vezax, none of the damage causes spell pushback. You could make a case for putting these points into Spell Warding, but because of how Saronite Vapors works, as you decrease your taken damage, you will also decrease your mana received. (Note: Saronite Vapors are only available on regular mode) If you have trouble getting out of the vapors before the 8th tick, or want some cushion for the 7th, 2 points in Spell Warding might be a great idea. Whether you decide to put these points into Healing Focus, Divine Fury, or Spell Warding, leave it at two – that’s all you need to get to the next tier. If you find yourself with extra points after we’re done on the Disc side, you can always come back and plug them in.

Getting to the next tier is critical, since that’s where Inspiration is. Max it out, and go back to the Disc tree.

Step 4:

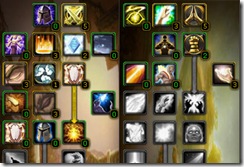
Tier-5-DiscSo far, with the exception of limiting the points in Divine Fury to two, this looks exactly like a Holy build. Which makes it time to plug points in down the Disc tree. We already took the Mandatory 14 points in  Step 1, so we’ll move forward from the 3rd tier. We already maxed out Meditation and Inner Focus, so just pick up all 3 points in Improved Power Word: Shield the bread & butter spell of a Disc Priest – now even better!

In the 4th tier, 3 points in Mental Agility is all you need to move on to the 5th tier. Many, many Priests who take Disc as a career option will also want to pick up Absolution invaluable on fights that involve crazy amounts of dispelling like Hodir Hardmode, Thorim Hardmode, and Yogg Saron. Because my disc build is for General Vezax specifically, and Vezax involves zero dispelling, I skip it.  You do not, for any reason, need Improved Mana Burn in a PvE build.

Tier 5 gives us Mental Strength, a must not only for better mana pool and increased regen from replenishment, but you have to max this out in order to access Power Infusion. To the right is Soul Warding, your reward for maxing out Improved Power Word: Shield. Since Reflective Shield, on the left, only causes damage to those attacking you, the Priest, it’s pretty much useless for PvE. (It reminds me a bit of the old Human Priest racial Feedback – I never used that, either, but at least this doesn’t cost extra mana and only last for 10 seconds.)

Next, max out both Focused Power (to increase your healing done), and Enlightenment. For Vezax, you could actually skip Elnlightenment – the Spirit isn’t going to give you any regen, and without Spiritual Guidance from the Holy tree, you won’t see a bonus to your spell power, either. But, personally, I appreciate the increase to haste, so I take it. (You have to have these points somewhere, anyway, to be able to unlock the next tiers.)

Tier-8-DiscTier 7 allows you to skip Focused will – the increased crit chance notwithstanding, this is primarily a PvP talent, and the bulk of it is useless for PvE. Power Infusion, on the other hand, is a brilliant talent. I don’t use it on myself on Vezax HM, since the mana cost isn’t offset by my own casts (I’m not chain casting.), but I’ll toss it on a Mage or Ele Shaman if I have spare mana. Having this talent allows my very specialized spec to do double duty in 10 mans. I do max out Improved Flash Heal – especially now that they cooldown on Penance is longer, I find I sometimes need Flash Heals to top off the tank.

Tier 8 gives us one of the greatest talents in the Disc Priest arsenal – Renewed Hope. I had a Disc Priest try to tell me that PW:S wasn’t worth the mana on Vezax – that it didn’t absorb enough. (I know, right?) Even if it didn’t, the increased crit to Penance, Flash, and Greater Heal, and the chance to reduce damage on this tank by 3% is unbelievable.  Rapture is where my spec gets a little strange. I only take 2 points here. 1 of them is to open the next tier, and the other could be moved somewhere else. The thing is that Rapture, while amazing on fights that actually allow regen, doesn’t work on Vezax. I’ve heard conflicting reports that it DOES work on your target, but not you, the caster. Either way, my tank is far, far, far from rage /runic power starved, and if I can’t get any mana back, who cares. I’ll show you what I do with the extra point later.  Aspiration is useful for lowering the cooldown not only of Penance, but of Inner Focus. Max max max.

Tier-9-10-11-DiscMax out the whole of Tiers 9, 10, and 11. Not that you need specific reasons, but on tank-damage-heavy fights like Vezax, an additional shield, external, tank-saving  cooldown, and additional healing received are HUGE. Ditto for a 40%-of-your-spellpower-bigger PW:S, spellhaste, and the grandaddy Disc Healing spell of them all, Penance. Nom, Nom, Nom.

Okay, so you can see that we now have 53 points in Disc, and if you’ve been following along in the holy tree, you’ll have 13 spent there. This leaves 5 points. Go over to the Holy Tree. In the middle of tier 4 is Improved Healing, which reduces the mana cost of Greater Heal, Divine Hymn, Penance, and some junk we don’t care about. For a fight like Vezax, this is huge. To get there, I take Desperate Prayer, mostly because I’m so used to having it (and bad things seem to happen to me when I don’t.) and I add one more point into Divine Fury. Again, these are purely based on my personal playstyle, and you could pack those two points into Healing Focus or Spell Warding – I just haven’t found either of those talents as useful as extra haste for my biggest heal, and an “Oh Sh**!!” button for myself.

Once those points are assigned, traipse down to Improved Healing and max it out – this reduces the mana cost of your Penance by 15% – roughly 93 mana saved, per cast. THIS is why I shaved the point out of Rapture, and why my Disc spec is considered pretty unorthodox. I wouldn’t spec this way if Disc were my primary spec, but for Vezax, Vezax HM, and any 10 man content (where my gear can compensate for a non-ideal spec), it’s brilliant.

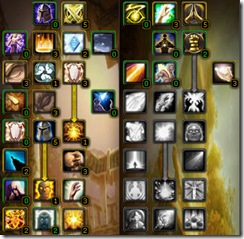
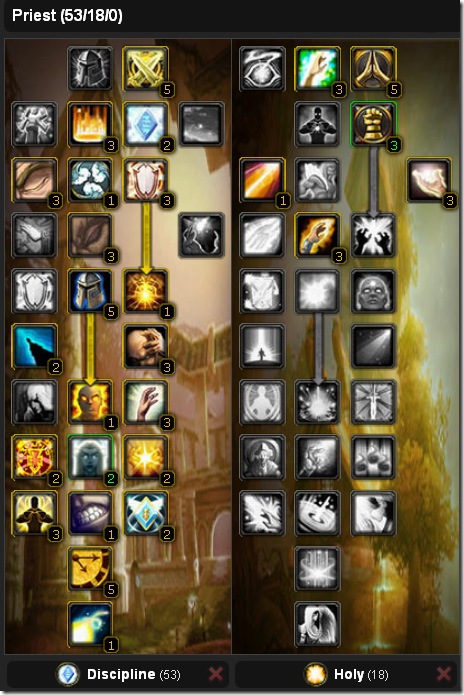
This is my completed spec:

Disc-Complete

Which, again, is very, very specialized, and not at all what I would call a “typical” Disc spec. Part of my hesitation in writing this post is that I know most of our commenters and community are very vigilant about watching for things to be “best” and also about making a very strong case for their own quirks – but that’s the thing about WoW as it stands currently – “best” is dependent upon playstyle, which is itself dependent upon available content/equipment. That said, sometimes there really IS a “better” if not a “best” way to do something, and the fastest way to figure out what that is is to throw yourself into the lovely group of people that make the healer community.

I hope this look at a non-standard build helps you feel more comfortable stepping outside the box and tailoring your own spec to your specific needs – feel free to discuss what you’ve found helpful in the comments.

Next Post: Helpful Macros (keep me honest on this one – I’m terrible about posting most of the time, but I always read your emails, and your encouragement makes a huge difference!)

Luv,
Wyn

State of Chain Heal 2:”Hail to The King, Baby!”

ash2es_phixr

Alright you Primitive Screwheads, listen up! You see this? This… is my boomstick! The twelve-gauge double-barreled Remington. S-Mart’s top of the line. You can find this in the sporting goods department. That’s right, this sweet baby was made in Grand Rapids, Michigan. Retails for about a hundred and nine, ninety five. It’s got a walnut stock, cobalt blue steel, and a hair trigger. That’s right. Shop smart. Shop S-Mart. You got that?

I simply can’t resist making Army of Darkness references, especially with all the WoW movie talk  and everything circling Sam Rami. This also mirrors a conversation I had with a guildie the other night on the current state of Restoration Shamans and where we are after this most recent patch. For some reason it always makes me think of Army of Darkness and Bruce Campbell, each time I chain heal I feel the urge to yell “THIS. IS. MY. CHAIN HEAL!”

Patch 3.2 brought with it not only a new instance in the coliseum, but a slew of Restoration Shaman changes that helped bring our healing up a little bit. Back in May I responded to a very lengthy thread with my own thoughts on chain heal, and in truth shaman healing as a whole. A lot of people thought we were broken in a bad way and were QQing about how it was time to re-roll. I stood up for us and said, yes we need tweaking but we aren’t broken. Patch 3.2 brought us that tweaking. In 3.0 and in 3.1 Shaman were given a slew of other spells to round out our healing and move us further away from the Haste / MP5 Chain heal spamming model of the Sunwell days. Blizzard did an amazing job doing that… but swung a little too far and inadvertently took Chain Heal down a few pegs to the point that we were having a very difficult time keeping up with AE damage in hard modes. Many Shaman were getting passed over to bring in other healers, that was bad news and quite frankly made me a sad Shaman. Then the man himself Ghost Crawler chimed in and said that changes were coming but they had to ride the knifes edge to not over power Chain Heal and make it the only spell we cast. Congratulations sir I dare say you guys did a fine job!

Lets take a look at what made the cut, First let’s look at Chain Heal.

Chain Heal: First of all, the Range between target was increased. 12.5 yards between targets is pretty good. It’s better when you consider that this is a smart heal and directs itself to a healing priority list and makes sure those who need it get it. This gets even better when you add in the Glyph of Chain Heal which lets it hit another target for a grand total of Four at a time! Now add in the change that between jumps the amount healed only is reduced by 40% (down from 50%) and you have yourself one sexy heal again.

But wait, there’s more!

Chain Heal was made very attractive again, but there were some other changes that compliment this as well.

Improved Water Shield: Not only does this give mana back on crit heals from LHW, HW and Riptide, but now it includes Chain Heal! The other good thing about this, is when you gain the effect, it doesn’t burn an orb. This is great news because that means it’s one less GCD you have to burn, which means that much more healing. This helps fix a lot of shaman mana problems, and ensures we can hang with paladins and disc priests for that near infinite mana.

Tidal Force: Another change that included chain heal. This now gives, HW, LHW and Chain Heal 60% additional critical strike rating. This also goes well with the next change

Nature’s Swiftness: The major change here is the Cool down. It’s been reduced to 2 minutes down from 3. This is huge in fights where you’ll need a fast chain heal or a fast healing wave more often (Hodir comes to mind). Having this available 1-2 more times a fight is a big boon to us.

Tidal Waves: Again this was changed to give a different bonus to LHW. When you cast riptide or chain heal, this bad boy procs. Before it gave a haste rating to LHW, now it gives it an additional 25% crit chance. That again is pretty huge considering everything we have that procs off of critical healing.

Healing Way:  This change was bigger then a lot of people I believe have noticed. Prior to the patch it placed a buff on your target that increased healing from Healing Wave. No other target benefited from it except for the one with the buff. This made the spell primarily a nuking tank heal spell. Now however it adds a flat increase to the healing output of the spell. A 25% bonus is nothing to scoff at. This allows you to work it into your spell rotation and make sure everyone you hit with it gets the added bonus of the talent

Ancestral Healing: This used to add armor. Now it adds a 10% physical damage reduction on any person you critically heal. This procs off of every crit, including Earth Shield crit heals. Look at the other above changes. The increased crit rate, the talents that add crit and make your heals faster combined with this? You could be rolling that 10% reduction over almost the entire raid with some smartly placed chain heals and liberal use of your talents. This is huge because it helps take environmental damage and even it out for the rest of the healers. This means less mana consumed trying to catch up and top people off and overall greater raid survivability.

Putting it all together, you get a rather complex and complete toolkit with which to heal your raid. We solidify our position as one of the games best swing healers, we can put out some very very good AE healing, or can spot heal on the fly. We can take over tank healing duties, or simply roll between them all. The changes to the spells make sure we are competitive in hard mode raids, but aren’t limited to casting a single spell over and over again. Personally I think the devs did a great job with us this patch. I feel they did a great job balancing Chain Heal out while not letting it overshadow all the other spells we have at our disposal. The synergy our class has always enjoyed is still there. Personally I’ve seen somewhere between a 350-450 hps increase in throughput, which puts us on par with the other healers, I’ve been able to keep up better with area effect damage and have been able to nuke heal a tank as needed. Healing is still challenging and fun, but I don’t feel underwhelmed by the shaman’s ability to keep up.

How about you? How has your healing been since the patch? Do you think they did a good job with the changes? What would you change, add or remove that the devs didn’t? Do you feel confident to head into a hard mode encounter and give it your all?

That’s it for today, Until next time Happy Healing

Sig

Image courtesy of Universal Studios

Feel free to follow me on Twitter

Healing Crusader’s Coliseum: Lord Jaraxxus

jaraxxus

Lord Jaraxxus is the second boss that will be available this week for Coliseum raiders. Take a look at the video below. Be advised that it’s in German. Couldn’t find any other ones around (if you manage to find one, please post it in the comments below). The video shows the Lord Jaraxxus fight from a an off tank perspective. It looks to be a very healing intensive fight.

Breaking down abilities, execution, and healing below.

Abilities

Fel Fireball
Inflicts 18038 to 18962 Fire damage and an additional 7800 to 8200 Fire damage every 1 sec for 5 sec.
Fel Inferno
Periodically inflicts Fire damage to allies within 15 yards for 6 sec.
Fel Lightning
Strikes an enemy with Legion Lightning that arcs to another nearby enemy. The spell affects up to 5 targets.
Fel Streak
Inflicts 8288 to 8712 Fire damage.
Incinerate Flesh
Burns the flesh off your bones! Absorbs the next 70000 healing received and decreases damage dealt by 50% for 15 sec. If Incinerate Flesh is not removed before it expires it will cause a Burning Inferno.
Burning Inferno
Burning Inferno inflicts 3120 to 3280 Fire damage every 1 sec for 5 sec to all friendly targets. The Burning Inferno is caused by Incinerate Flesh not being removed before the duration expires. Incinerate Flesh is removed after absorbing 30000 healing.
Infernal Eruption
Lord Jaraxxus summons an Infernal Volcano which causes Infernals to spawn.
Legion Flame
The Legion Flame inflicts 3900 to 4100 Fire damage every 1 sec, also you are creating a Legion Fire every 1 sec for 6 sec.
Legion Flame
Inflicts 6825 to 7175 Fire damage.
Nether Portal
Lord Jaraxxus summons a Nether Portal.
Nether Power
The Power of the Nether increases magic damage dealt by 20% for 30 sec.
Touch of Jaraxxus
The Touch of Jaraxxus inflicts 3900 to 4100 Shadow damage for 12 sec and causes nearby players to be effected by Curse of the Nether.
Curse of the Nether
Inflicts 4388 to 4612 Shadow damage every 1 sec for 15 sec.

Mistress of Pain

Mistress’ Kiss
Next spell with a cast time interrupts that school for 8 sec and causes 8288 to 8712 Shadow damage.
Shivan Slash
A whirling attack that deals 75% weapon damage and pierces through armor.
Spinning Pain Spike
Leaps towards an enemy, grabbing them and inflicting significant Physical damage.

Execution

You’ll need 2 to 3 tanks for this. Have your main tank set up shop directly in the middle of the arena. The ranged and the healers will need to fan out to help mitigate Touch of Jaraxxus.

Melee DPS will be interrupting Fel Fireball. If it connects, it needs to be dispelled.

It looks to be a fairly simple tank and spank encounter.

But wait! There’s more!

You thought Black Temple was the last time you’d see these lovely ladies. Your off tank needs to keep his eyes open for a portal. A Mistress will emerge from one and it will need to be picked up. The video shows the Mistress being tanked on top of Lord Jaraxxus. Presumably so that melee DPS will be able to add extra damage from AoE hits and the like. The pain strike move appears to be random. Casters (healers especially) need to keep their eye out for Mistress’ Kiss. I’m assuming it will wear off after some time. Don’t cast if you’re hit by one.

There’s also Infernals that need to be tanked. I’m not sure if it’s possible for Infernals to appear at the same time a Mistress of Pain is up. It’s always a possibility. The 10 man video shows 3 Infernals that spawn. Not sure how the 25 will be like. The Infernals could have more health or there could just simply be more of them.

I suggest melee players divide themselves up in two groups not exceeding 3 players. Put 1 group on each leg of Jaraxxus to help mitigate the Fel Lightning attack (Chain Lightning).

One more mechanic is the Legion Flame. If a player gets it, they will be generating flame patches on their position. Whoever gets it needs to get clear of everyone else and just start doing circles to get the patches away from the rest of the raid. Luckily it only lasts 6 seconds.

Healing

I’d suggest stacking 6-7 healers the first time through.

2 healers on the main tank, 1 on the off tank and have the rest on the raid. Advise even placement of healers across the room: 2 on the left, 2 in the middle, 2 on the right.

I think the melee players are going to need a dedicated healer but I’m confused by the wording of Fel Inferno (damage to Jaraxxus allies or to us?).

There is a lot of raid damage coming in. It looks to be a brute force healing type of encounter.

The biggest threat to the raid is largely going to be from the Incinerate Flesh + Burning Inferno combination. Whoever gets affected by Incinerate Flesh needs to be healed up. 30000 damage. Shields won’t count I don’t think.

Healers, you are going to need to do some think-healing on the go. It’s very difficult to set up healing assignments for a fight like this as there’s so many sources of damage coming in. Play it by ear. Take initiative and don’t be afraid of healing the wrong person. It doesn’t matter what the name of the spell is since they’re taking damage anyway.

Good luck in there! Again, post any observations you see in the comments below (corrections are good too)!

Healing Crusader’s Coliseum: Northrend Beasts Encounter

Image, abilities courtesy of MMO Champion

The Beasts encounter consists of three separate fights within 1 encounter. Consider the strategies here in beta. The information is pulled from watching various videos and reading further into datamined abilities. Feel free to make any adjustments or corrections in the comments below. Once I knock out the fight myself, I’ll update this with further information.

Watch this video here. I’ll be referencing it.

Phase 1: Gormok the Impaler

25 man health: 8.92 million

Abilities

Staggering Stomp

Deals a staggering stomp that inflicts 9263 to 9737 Physical damage to all enemies within 15 yards and interrupts spellcasting for 8 seconds.

Impale

Inflicts 150% of weapon damage to an enemy and causes it to bleed for 3500 to 4500 damage per application every 2 sec. for 30 sec. (10 second cooldown)

Your tank is going to position Gormok in the middle of the room.

The raid is going to be assaulted by Snobold Vassal. They come from the boss. Various raid members are going to be attacked by them. Seems like they jump onto players individually and prevent them from using abilities or spells. The only way for them to be removed is for your raid members to target them and kill them.

/target Snobold Vassal

I’d suggest adding that to your macro list and having it bound.

Watch out for patches of fire on the ground. Just stay out of them. No idea how much damage players take. No reason to stand in them.

You will need two tanks to handle this. The cooldown on impale is every 10 seconds. Your tanks have to switch and taunt every 30 seconds before the stacking debuff overwhelms them.

Healing Gormok

Start off with 6 healers.

Assign 2 to the tanks who are switching back and forth.

You may need 1-2 healers on the melee as they will be affected by the Staggering Stomp.

Put the last healers on raid to take care of any Vassal or fire damage. They should also help support the tanks if they’re idle.

Once he dies, you have about 15-20 seconds before the twin worms appear.

Phase 2: Acidmaw and Dreadscale

25 man health: ~6.97 million each

Abilities

Acidmaw Dreadscale
Paralytic Bite

Inflicts 12950 to 15050 Nature damage on an enemy and injects them with a paralytic toxin.

Burning Bite

Inflicts 11100 to 12900 Fire damage to an enemy and coats them with burning bile.

5 yd range, Instant

Paralytic Spray

Sprays acid at an enemy and nearby targets, dealing 8325 to 9675 Nature damage and applying a debilitating paralytic toxin.

Burning Spray

Sprays fluid at an enemy and nearby targets, dealing 8325 to 9675 Fire damage and coating them with burning bile.

100 yd range, 1.1 sec cast

Acidic Spew

Deals 2775 to 3225 Nature damage per 0.25 sec. to enemies in front of the caster.

100 yd range, Instant

Fire Spit

Deals 9250 to 10750 Fire damage to an enemy.

100 yd range, 1.1 sec cast

Slime Pool

Inflicts 5088 to 5912 Nature damage to enemy targets within the Poison Cloud.

Molten Spew

Deals 3700 to 4300 Fire damage per 0.25 sec. to enemies in front of the caster.

100 yd range, Instant

You can see the similarities between the 2 snakes. One snake will be grounded at a time while the other will be above ground. They alternative every so often.

First thing you’ll notice is that the tanks immediately face them away from the group. This helps offset Molten Spew and Acidic Spew. Make sure the tanks aren’t near each other either. You want to avoid overlapping spews.

Take note that all DPS is focused on the snake currently above ground. The snake that’s grounded probably has some sort of damage reduction modifier.

Snake above ground

Kite him in a clockwise fashion. He has to be kept moving. Around the 3:25 mark, you can see poison clouds being left. Think of Grobbulus. Have a traditional tank kite whichever snake is up. What we’re seeing is a caster tank (presumable a Warlock) on Acidmaw and holding aggro (or whoever snake is grounded). You can probably keep one healer on it.

When the snakes switch, keep an eye on the ground. Look for dust particles. Get clear of them as that’s your cue as to the snake positions.

IMPORTANT!

When Acidmaw is grounded, he’s going to be able to hit any player with Paralytic Spray. Targets nearby will be hit with that as well.

Applies a paralytic toxin that inflicts increasing Nature damage every 1 sec. and reduces movement speed over time until the victim is entirely paralyzed.

This is what Burning Bile does:

Coats enemies with burning bile, inflicting periodic Fire damage to them and their nearby allies. The burning bile of a jormungar is known to neutralize paralytic toxins.

So one of these toxins is going to cause your raiders to slowly become paralyzed and take increasing nature damage. The burning bile can clean that crap off. The raiders affected by burning bile have to run towards the toxin affected players. Make it easy and have both players run towards each other to speed it up even more.

If you wish to make it even easier for yourself, just have affected raid members run towards the main tank. It won’t matter who has what buffs as they’ll be able to cancel each other out.

Be sure that you kill Acidmaw first. If you kill Dreadscale first, you won’t have a way of removing the Paralysis.

Acidmaw above ground

The situation is going to be reversed. The main tank is going to be hit with the paralytic poison. Designate a player to run in periodically and stand near the tank to wipe off the poison.

Healing Acidmaw and Dreadscale

2 healers on the main tanks, 1 on the caster tank, and 3 on the rest of the raid. Remember that raiders will take damage from Burning Bile so they have to take care where they stand.

I’m not quite sure when they switch. I don’t know if its time based or percentage based.

Phase 3: Icehowl

25 man health: 13.3 million

Abilities

Ferocious Butt

Delivers a ferocious headbutt to an enemy, inflicting 69375 to 80625 Physical damage and stunning for 3 sec.

8 yd range, Instant

Arctic Breath

An icy breath that freezes targets in a cone in front of the caster, inflicting 20000 Frost damage over 5 sec.

100 yd range, Channeled

Massive Crash

Leaps into the air and crashes down with massive force, dealing 11000 Physical damage to all enemies, stunning them, and knocking them back.

1 sec cast

Whirl

Whirls around, dealing 9250 to 10750 Physical damage to all nearby enemies and knocking them back.

15 yd range, Instant

Frothing Rage

Increases Physical damage and attack speed by 50%.

Instant

No downtime between snakes and Icemaw. He’s tanked near the middle of the room.

Artic Breath doesn’t seem to be controllable. He’ll just turn and spray. Think to those big Sons of Hodir trash mobs in front of Hodir. Have an off tank ready to pick  him up just in case. The Breath is a channelled. As long as hes channeling the spell, players caught in the breath can’t do anything.

Dealing with Ferocious Butt

Okay, fast forward to 7:36. Icehowl leaps in the air and knocks everyone towards the wall (Massive Crash). The boss mod will announce that Icehowl is glaring at a player and lets out a bellowing roar. A quicker way is to see if the boss is facing your direction. If he is, RUN TO THE SIDE AND GET OUT OF THE DAMN WAY. At this point, Icehowl gets stunned for several seconds allowing the raid to get back into position. It seems like he takes extra damage during this stage. Looks like the stun lasts 15 seconds.

After his stun wears off, his Whirl kicks in (spins around and knocks back everyone). Your tank needs to haul ass back in range fast.

Icehowl gains an enrage and it must be dispelled. It’s called Frothing Rage. A Hunter’s Tranquilizing Shot should negate that quite nicely. Look at 8:29 for a better idea. I think this happens if Icehowl manages to connect on a player with Ferocious Butt and kills a guy or manages to hit someone. Note that the Enrage appears to wear off after 10 – 15 seconds if you’re not able to Tranq Shot it.

Healing Icehowl

Same thing as before. 2-3 healers on the main tank (I recommend a Disc Priest). Everyone else is on raid healing.

Keep tanking him centralized. When he nukes the ground, get the heck out of the way. Resume DPS. Rinse, repeat, link loot.

I hope this helps you guys out! Again, any other observations or corrections, please post in the comments. Strategies here were pulled from watching the video and from reading the datamined stuff. I’ll probably end up modifying this later depending on how off I am or if there’s a better idea.