Healing Icecrown from a Druid’s Perspective – Part 2

This is a guest post by Epiphanize, a Resto Druid, and co-host of Raid Warning.

Now that we got all that out of the way, it is time to get down to business. You didn’t really show up just to listen to me go on about glyphs, did you? No, you came to heal your branches off! One quick thing: Be sure to check out the comments in my previous article; there were some good suggestions for alternative point distribution.

Lord Marrowgar

So here we are, Lord Marrowgar, a very interesting challenge for healers. However, it does give Druids a chance to show off their ability to heal on the run. This can be a relatively hectic fight, so regardless of whether you are tank or raid healing, you will need to be tossing HoTs at some points during the fight.

Tank Healing

This is the easier of two roles against Marrowgar.  During his initial phase and all the ones where he is not spinning all over the place, it is essentially a one tank fight. Since the nerf, Marrowgar does quit a bit less melee damage. So the damage your meat shield will be taking will be fairly minimal. This is pretty manageable for Trees, as we can keep the tank pretty well topped off with our HoTs.

One ability you need to be prepared for though is Saber Lash.  Saber Lash is an ability similar to Koralon’s Meteor Fists, in which two tanks will need to stack in order to distribute the damage. Your healing priority will be the Main Tank followed by the Off-Tank after a Saber Lash. As a tree, you have the added benefit of hitting both with Wild Growth before topping off the Main Tank. Other than dodging the occasional slow-motion blue flames, there is not much to deal with during this phase.

Raid Healing

As stated above, this fight can be quite hectic for a raid healer. During the first phase you will have quite a bit to manage. In 10-player, one random player will be Bone Spiked. DPS will be turning to focus on getting the player down as quickly as possible. This presents two things for you as a raid healer. You obviously will need to be focusing on healing the spiked player. I’ve managed to safely keep them up with Rejuvenation and Swiftmend, though this can also be accomplished with a few Nourishes as well. The other thing is people taking Coldflame damage, as they will often be ignoring the flames to get the person off the spike. Again this is usually handled by tossing some Rejuvenations and Wild Growth, saving Swiftmend for anyone who stands in the fire just a bit too long.

The last thing you will be concerned with during the pre-Bone Storm phases is the aforementioned Coldflame. As the raid healer, you will be responsible for topping off anyone who doesn’t get out of the way of the flames quick enough. The damage it does is not too horrible as long as no one just stands there. Its actually more of a nuisance avoiding it yourself, as you will often need to decide between standing their long enough to finish casting a heal, or cutting it short to avoid taking too much damage yourself.

Bone Storm

This phase is pretty similar for Druids regardless of your role. Marrowgar will become untauntable and spin around the room doing relatively minor AOE damage. It is still good to avoid him if possible, as it makes life a bit easier on all the healers. The big thing you will be dealing with is blue flames (of ice?) again. Only this time he drops 4 at a time. This phase is all about survival. Since you will be on the move during this, Druids will be arguably the best healer for this phase. This is where glyphs like Rapid Rejuvenation and Wild Growth start to shine in ICC. Just keep HoTs on everyone and toss Wild Growth on cooldown and you should be fine. Make sure to keep Swiftmend and your NS-HT macro at the ready in case anyone gets into trouble.

One last thing that the Tank Healer needs to consider is the position of the tanks during all chaos. The tanks will be sticking close to Marrowgar during Bone Storm in order to pick him up at the end of the phase. Not only will the tanks be taking a bit extra damage, but you will want to be nearby to keep the Main Tank healed up while everyone gets back to some semblance of order.

Lady Deathwhisper

The next boss in The Citadel is quite a bit easier on the healers than Marrowgar. If your group is good about staying out of Death and Decay and interrupting Frost Bolts, you won’t have to mash the keyboard nearly as much. For Druids, this fight is all about situational awareness and keeping in range of the players taking damage.

Phase 1

The key to Lady Deathwhisper is getting through her first phase. During this phase she will be behind a mana shield that DPS will need to burn through in between dealing with adds that spawn from either side of the room. After that, the fight is pretty much tank and spank. In my experience, this is the fight where you are most likely to only use 2 healers.

The mechanics of the adds are pretty complicated at times, so it is good to familiarize yourself with them. There will be times the tank and raid will be taking increased damage based on these mechanics. There is a lot of movement involved, so there will often be times you will have to drag your stump across the room to toss a heal or two.

There are a few other considerations during this phase. First,  Adherents will place Curse of Torpor on random raid members that increases the cooldown of their abilities, so you will want to make sure you are decursing as often as possible. There will be a bit of randomness from the Death and Decay and Shadow Bolts, so be on the look out. Again, there is going to be some bouncing back and forth because of adds, so communicate with the other healer(s) to make sure you have all your bases covered.

Phase 2

Congratulations, you have made it through the hard part. After her shield is down she becomes tauntable, only has 3 million hit points, and the adds stop spawning. Since this is often 2-healed, you will more than likely be both on raid duty and tank duty. While this phase is pretty much tank and spank, there are some things going on that affect the healers.

The tanks will be swapping as Deathwhisper places a stacking debuff on the tank that reduces their threat. So you will want to keep an ear out for who is tanking her and focus your healing accordingly. She will still be dropping Death and Decay, as well as random frost bolts that should be interrupted. Finally, she will summon on non-targetable Vengeful Shade that will follow a player around and explode if it catches them. You will need to do your best to avoid them if they follow you, and be prepared to heal someone if they get caught (if they don’t get one-shotted).  It’s a pretty quick phase though, and you will be on your way up the elevator in no time.

Gunship Battle

This is a gimmick fight through and through and is a lot of fun. There aren’t really a lot of important mechanics here for healers. Your gunship has two guns that you use to attack the enemy’s gunship.  Occasionally, the opposing ship will summon a mage/sorcerer that will freeze your guns. You will then need to send some raid members over to kill it in order free up your cannons. Back on your own ship, mobs will appear through a portal that will need to be killed, while avoiding incoming rockets and axe-throwers.

Defenders

This is the easier of the two healing roles. Usually one tank and some ranged DPS will stay behind to deal with the enemy boarding party.  The portal will spawn a Sergeant and some Marines. The Sergeant is the only one that really poses any threat, as he has pretty nasty Bladestorm and Wounding Strike abilities. Most of your healing will be focused on the tank, especially if you only have ranged DPS defending. Just be prepared to work a bit extra to overcome the -25% healing debuff.

Two other items of note: First, stay out of shinnies! Rockets will be coming over to your side and the big shiny circle on the ground is an indicator your in the path of said rocket. Be prepared to heal anyone who has yet to learn this golden rule of Warcraft. Second, keep an eye on your boarding party tank. They will be taking damage as they fly back over to your ship, and not every healer is as equipped to heal in the air as us Trees. I have seen quite a few tanks bite it on their way back over as they still have the aggro from the ranged mobs on the enemy ship. A well timed heal from you can be the thing that saves them.

Boarding Party

As the boarding party healer you got the short end of the branch (no, the bad tree jokes will not stop). You will be heading over to the enemy ship with most of the DPS and a Tank to take down the mage/sorcerer while fending off the general and adds. On your way over it will be a good idea to HoT up the tank, as things will be a bit chaotic when you first get over there.

The tank will be keeping the enemy commander busy why DPS take down the mage/sorcerer. Keep an eye out because the longer you are over there the stronger the enemy gets. This will cause everyone to take quite a bit of damage. As mentioned earlier, you will need to keep some heals on the tank as he will take some damage on his way back over. Probably a good idea to leave a Rejuvenation in case you need to toss an emergency Swiftmend on the return flight. Again, a fairly straightforward fight for healers.

Deathbringer Saurfang

Phew, here we are, the final encounter of the entrance to the Citadel. This is probably the most interesting fight so far. A lot of what you need to do as a healer will be determined by your groups strategy, but Druids have a few things to keep in mind both as a tank or raid healer, regardless of how you handle Mark of the Fallen Champion.

Raid Healing

First, you do not have any way to stop the damage people will be taking like priests do. So your main role will be to heal up the damage that does get through. There are three mechanics that will be causing you trouble: Boiling Blood, Blood Nova and Mark of the Fallen Champion.

The first ability, Boiling Blood, will be case on a random raid target. If you have a Priest, they will mitigate a lot of the damage to avoid Saurfang building Blood Power. Its still a good idea, whether you have a Priest or not, to toss Rejuvenation on the Boiling Blood target to keep them topped off. The damage isn’t too bad, and one HoT should be enough to keep them safe.

Blood Nova can be more troublesome depending on how much melee you have. If this gets cast on one, a good amount of people will be taking damage. The player that get Blood Nova should run out of the raid to minimize damage and blood power gain. However, if they don’t get out in time, be prepared to throw out Wild Growth and a couple single target heals.

Finally, there is Mark of the Fallen Champion. How you handle this (if at all) is going to depend on your raid strategy. A lot of guilds, mine included, will just let that player die. This minimizes the buildup of blood power and puts a lot less stress on the healers. If you do decide to keep that person alive you will want to give them full HoTs. Yes, you may have to dust off Lifebloom for this one. I usually put up Rejuvenation and Regrowth, with a Swiftmend if needed.

Tank Healing

There is not nearly as much to deal with as a tank healer. The tanks will be switching when they gain the Rune of Blood debuff, so as per most two tank fights you will need to be paying attention. You will also need to be concerned if a player gets Blood Nova near the tank, which could cause a nasty damage spike. Your final obstacle is at 30%, where Saurfang will Frenzy. This means you need to get your stump in gear and heal faster! Other than that, he is business as usual for a tank healer.

—–

And that’s it! You’ve Stormed the Citadel. Just in time for the Plague Works to open. Thus is the life of a WoW player. In the next installment we will be covering healing Rotface, Festergut, and Putricide, all while avoiding getting any goo on your leaves.
Healing Icecrown From a Druid’s Perspective – Part 1


This is a guest post by Epiphanize, a Resto Druid, and co-host of Raid Warning.

So you’ve just shaken the frost off of your branches and are staring down the entrance to Icecrown Citadel, the final raid of the Wrath of the Lich King expansion.  You and nine of your closest guildies (or 9 random pugs if your unlucky) are ready to face the challenges that await you in your quest to take down Arthas. The first of these will be the bosses of the entrance to the Citadel. Before we get into strategies, let’s discuss a few things you should think about before trotting into The Frozen Throne. There have been some major changes to how Druids approach healing that are worth taking a look at.

Most trees are in the process of making the swap from crit-laden gear to stacking haste (or at least you should be – Bad tree, bad). This, along with the introduction of Glyph of Rapid Rejuvenation, has given us some new and interesting options. The goal of this article is to help you understand the changes to Druid healing and how it affects you prepare to confront the Lich King.

In addition to these changes, 10-mans can leave a lot of uncertainty, and raid composition will often force Druids to fill rolls they may not be best suited for. Your choice of glyphs and spec will depend a lot on role, personal preference, and playstyle. However, there is some general advice you can follow when making these decisions. I’ve done my best to try to gives options for popular playstyles and specs.

I’m Still a Crit Machine

If you are still very early in the process of swapping gear from crit to haste, you are probably using either Nourish or Regrowth as your main spell. Nourish is a slightly better spell in most realistic situations where you aren’t sure you will keep Regrowth’s hot up on at all times (Thats a discussion for another article). However, at this level of raiding, either spell should serve you well regardless of role. So use whatever your little wooden heart desires, just make sure to bring the appropriate glyph.

Next, I would recommend Glyph of Swiftmend. This is especially helpful in situations where you are spot healing the raid or attempting to 2 heal. It allows you to quickly save a DPS that may be taking sudden burst damage, or catch up on a tank you may have neglected for a moment. It is also a nice way to save on some mana. Plus a global cooldown wasted refreshing a HoT can often be the difference between life and temporary, virtual death. If mana is not a concern and you are comfortable relying on some of your other emergency options, you can go with both of the choices for your third glyph.

Your third glyph is really up to personal choice and should be based on your role as well as the encounter. Glyph of Wild Growth is always a safe bet, especially if you are helping raid heal. There are lots of scenarios where the whole raid is taking damage in ICC, and that extra target is a welcome buff. Glyph of Rejuvenation is also good but slightly weaker option, as there won’t be large chunks of time where the tank is under 50%. Thought this can shine in some encounters, especially with the 4 piece tier 9 set bonus. One thing to keep in mind is that the small amount Glyph of Rejuvenation can play in helping catch up, can easily be replaced by a Swiftmend, Nature’s Swiftness/Healing Touch, or even a Regrowth.

When it comes to talent choices with a Crit build, not much has changed since 3.2. Living Seed is a must in my book if you are going to be tank healing, and is also handy when dealing with Saurfang’s Mark of the Fallen Champion. This especially holds true due to Nature’s Bounty increasing the amount of Living Seed procs.

Another option that is good for tank healers, but is especially strong for raid healing, is Revitalize. While not a complete replacement for Replenishment, it is better than the complete lack of a regeneration buff. You should end up with something similar to 11/0/60 (full build here) with either 3 points in Living Seed or Revitalize depending on what tickles your fancy.

Crit Is So Last Month

If you are at or approaching the soft haste cap (856 without Celestial Focus, 735 with) Rejuvenation is now your baby. Blizzard has really made this our new bread and butter spell. With two strong glyphs, 4 piece tier 9, and the last two idols granting you spell power based on rejuvenation ticks, it is clear you should be using Rejuvenation liberally. This being said, Glyph of Rapid Rejuvenation is a must in my opinion. This is obviously slanted towards raid healing, though I’ve seen instances where it has come in handy as a tank healer. It also comes in useful for mechanics like Mark of the Fallen Champion where a glyphed Rejuvenation with 4 piece Tier 9 can often alone keep up the marked target with minimal management. ICC encounters seems to have been tuned to encourage the use of Glyphed Rejuvenation, as there are lots of dots and healing on the move.

If you plan on focusing more on your HoTs, the original Glyph of Rejuvenation is a good companion for the new Rapid Rejuvenation. It will take time for you to get used to how quickly you can heal up someone with this combo. Once your haste gets up there and you get down the timing, this combo is a very powerful option.

Glyph of Nourish is your other option for your second glyph. Some would even argue that Nourish is the main reason to stack haste, not Rapid Rejuvenation, as you will have a 1s cast time on Nourish. This, combined with a reduced global cooldown, should allow you to direct heal your stump off. This is also a perfectly viable options, especially at the 10-man level. I think its safe to leave this decision up to personal preference. 

Of course you could always just use the above three glyphs and have the best of both worlds, which is what I have ultimately done. But if you are indecisive, Swiftmend will save some mana when you need a big direct heal. In the same vein, Wild Growth will give some HoT power to go along with those quick Nourishes. There really is a lot of flexibility here.

There is however, not so much when it comes to spec. For most people, you will be stuck going deep enough into the Balance tree to get Celestial Focus, that you will not have much of a choice but to go 18/0/53. Now as you progress through Icecrown you will be able to move those points out of Balance and back into the more useful Resto talents. Revitalize being a priority in my book due to the amount of Rejuvenation’s you will be tossing around. Where you go from there will depend on how often you decide to use you direct heals. Your build should look more like the crit 11/0/60 build..

 Phew…Who knew when you signed up to heal as a sapling, you’d be in for so much homework? However, as long as Blizzard keeps being bipolar in regards to Druid healing mechanics, you better get used to it. Who knows, maybe if we cut back on the QQ they will give us new Tree Form models before the end of Cataclysm. Well, we can dream can’t we? In the next part of this article we will cover specific strategies for healing the first 4 bosses of Icecrown as a Tree.

The Hyjal / Sunwell Effect

sunwell

I use PUGs to gauge a lot of player response to content, the new LFG tool has made it that much easier and given me a broader spectrum to poll. A lot of times I’ll bring it up in random banter and ask people what they think of the current content and such. Occasionally I’ll join a PUG raid on my Hunter in an attempt to gear her up outside of the guild’s assistance, but also to see how the pugs are doing on raids and ask questions without “Lodur” around. I’m guessing you’re wondering what this has to do with the “Hyjal / Sunwell” effect, and indeed what is the effect anyways? Well, I’d like to share some recent and past observations with you.

Let me explain to you what the Hyjal / Sunwell effect is.

map_hyjal

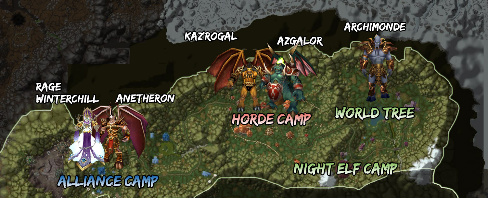
Back in BC when end game raiding was all the rage, you had Black Temple, Hyjal and then the culmination of all things raiding for that time Sunwell. Hyjal Summit was an interesting raid instance. You sat in one of two camps and waited for trash waves to come to you. After you were done killing the trash waves a boss would spawn and come for you. The zone had 5 bosses. 4 of those bosses could be broken down into tank and spanks after their various tricks were discovered. Aside from the last boss it was a very easy instance and at the very least on my server, the zone up to the Archimonde fight was easily PUGable and there were many many Hyjal PUGs weekly. I know because I used to go to them on my hunter. So we can assume a level of ease at least for the first 4 bosses, with one boss that was a PITA but still killable.

Then came the Sunwell, and everything changed. People ponied up and the PUGs surged forth expecting to roll over some trash and get some trash drops and maybe even down a boss or two along the way. Then they encountered the first pulls, and it was like watching a charging bull hit a steel wall. Giant arcane powered robot wiped the raid in nothing short of what could be called a spectacular explosion of brightly colored bodies. I heard stories of established raiding guilds having to work hard on some of the trash and in some cases still wiping, let alone hitting the bosses. Trash required solid use of CC and careful maneuvering. The bosses were complex and required coordination in order to succeed. I never saw a PUG get past Kalecgos, and the ones I heard got there, only barely beat trash. That is at least how it was on my server. There were PUG / Farming groups that would go and kill trash, then run out and reset and lather rinse repeat in order to farm gems, gold and trash drops, but those groups required a certain level of gear (and they did check) before they would consider you. And that’s just for trash farming! People pissed and moaned that Sunwell was “soooo hard”, my argument was that Hyjal made people complacent.

WoWScrnShot_092309_232622Enter Wrath of the Lich King. The raiding scene in wrath mirrors pretty well that of BC but builds upon it. Naxxramas became our new Kara. Ulduar provided us deep lore and some decent challenges. and then came ToC (25). Trial of the Crusader offered an easy loot system (the tier available for badges alone), an instance with NO trash only bosses, and to be honest fight mechanics that weren’t terribly difficult. While it did require some coordination, I have seen more PUG groups successfully complete it then any other raid instance. The 4 bosses leading up to the final boss are gimmick fights like Hyjal was, with the final boss being a tank and spank get out of the way healers just heal fight. I’m not saying they aren’t fun, and as much as I hate to admit it Faction Champs is a blast watching my raiders run around like chickens with heads lopped off, but it just mirrors Hyjal a little too much as far as it’s placement in raid progression, content and general feel of the zone.
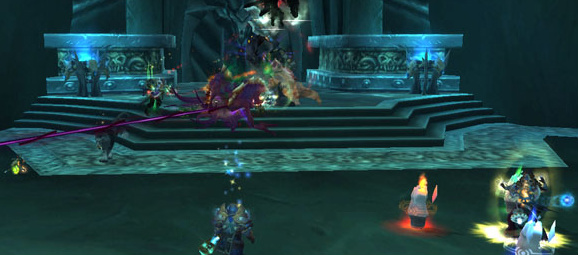
Now in Wrath we have Ice Crown Citadel. It mirrors Sunwell almost perfectly as well, especially with Chill of the Throne being so very similar to Sunwell Radiance. The fights are markedly harder and the trash is capable of killing a raid. The trash pulls require use of CC like priest shackles and paladin fears / stuns as well as requiring careful positioning of the raid. Random triggers cause giants to spawn that can interrupt spell casting and saber lash a tank into nothing in no time. The bosses while not overly complex, still require a certain amount of raid awareness and coordination and use of abilities such as CC to win. Lady Deathwhisper is a pain when not done right and it requires a lot of coordination to get all the components down pat. Saurfang is a beast of a fight currently and while people have beaten him I have yet to find one strategy that doesn’t call for at least two people to be sacrificed. That says something right there. What amuses me the most is the people who were pugging ToC (25) went rushing headlong into ICC (25) and in most cases hit the trash on the first landing and splatted. On my server I can’t find a PUG for ICC (25) on my Hunter, as a matter of fact she has an easier time finding ToGC (25) pugs. And while the argument can be made that the 10 mans are puggable, I say that while I’ve seen some pugs do ICC (10) the players almost always out-geared the 10 man tuned version. I also hear it from some of my raiders. We’ve been having fun with Saurfang. Random things like moonkin’s pushback randomly not working, Tanks dcing, starting the fight and immediately having 8 raiders get Mark of the Fallen champion. These are things that make new instances fun for me.

But IWoWScrnShot_092309_232622 hear the murmurs in the crowd. I have some raiders in my group that think ICC is too hard, I’ve been in pugs with my hunter that people have done nothing but complain about the difficulty of the new fights. This is what I call the Hyjal / Sunwell effect. ToC gave us a certain level of apathy. Sure Heroic Faction Champs is a hell of a fight, but once you get the basic concepts down for it is it really that hard? ToC spoiled us with easy loot and fast content, and as such continued the cycle of Hyjal / Sunwell. The effect is in the disparity between two level of content on such a level that it is noticeable among the general population. So now I hear people complain that Marrowgar hits too hard, or Saurfang is tuned too high. Personally I love it. I love content that makes me think and re-evaluate my raider assignments. I love actually having to go through trash to get to that boss and fight mechanics that while they may not be new are interesting in the way they are combined and presented. I love going through cut scenes and NPC conversation and hearing the lore behind the raid zone and feeling like I’m in epic content. The difficulty will only go up as each wing and each new boss and it’s mechanics are unveiled, and personally I can’t wait. I’m also excited that the vast majority of my raiders feel the same way and not everyone is suffering from the Hyjal/Sunwell effect.

What about you guys? Have you noticed people complaining about the difficulty? Raiders or PUGs? How do you feel about the new content so far?

Until next time,

Sig

Images courtesy of Matticus, My own screenshots and mmo-champion

How Our Guild is Handling Primordial Saronite

3-3-spills

Primordial Saronite is the item that’s required for the next level of crafting gear out of Icecrown. There’s all sorts of methods of picking up this stuff and our leadership’s been hard at work figuring out what our approach should be. There’s a few things that are high on the priority list.

Shadowmourne, for one, requires over 20 of these. While going for another Legendary isn’t required, it makes a statement about the guild (not one but TWO Legendaries after all).

Our tanks can get an early boost to their gear and not have to rely on random drops from the different bosses. The better those guys get, the easier time we’ll have moving forward.

As we’re packing a number of sharpshooters in the raid (4 hunters), they’re also going to need some heavy artillery. The recipes for bullets and arrows will cost one Primordial Saronite to learn.

There’s lots of different ways we can go about spending Primordial Saronite to maximize raider utility.

Our approach

In a recent thread on the WoW forums, Ghostcrawler was clarifying a question regarding Shadowmourne. At the same time, he wanted to know this:

We’re also interested to see how various groups handle the Primordial Saronite issue. We designed it so there isn’t necessarily a right way to handle the material and we don’t want to over-prescribe your social dynamics anyway.

I found out over the weekend that Blizzard devs do read this blog. Wyn and Lodur kept bugging me and insisting that they did, but I remained a disbeliever until one of their guys pinged me on Twitter about it. That was too cool!

So here’s our answer:

Prioritizing Saronite to the tanks – Our tanks will get first crack at the Primordial Saronite that they need. The better their gear gets earlier on, the easier time we’ll have heading into Icecrown. I think they’re shooting for the boots first, but I can’t be sure of that yet. I’ve created a queue list on the forums where the tanks put down what they need (not necessarily what they want). I’m not sure how the legs are. If they beat the tier legs, then I’ll devote more Saronite to it. Until then, the queue list is just for the tanks and once they have all that is requied, the list will be opened up to the rest of the guild.

Ammo recipes – This is another one for us but it won’t happen until later on. Not only do you need the Saronite, the engineers need the reputation to purchase the recipe. It’s Goblin and Gnomish right? One crafts bullets and the other does arrows? Once our engineers have the requisite reputation, we’ll send one their way as well.

Shadowmourne – The Shadowmourne quest line is fairly extensive. The last step involves taking down Sindragosa which isn’t going to be anytime soon. Not only that, you have to perform a variety of tasks at different bosses (like standing in fires while surviving for a prolonged period of time). This step can wait a little longer before we invest.

On the other hand, there is some speculation that you need to be on the opening quests before you get the Shadowfrost Shards from the bosses. We don’t know how often the drops are and there is no confirmation.

Getting saronite

To that end, we’ve decided to increase the chances we have of obtaining Saronite. Sundays have been opened up for a new alt raid. We’ve been doing this for a while now, but we’ve decided to lay down some ground rules for it.

Why an alt raid?

For one, there’s many players with nothing to do on Sunday nights. We could either jump on our alts and join a pug with a 50-50 shot of succeeding, or organize our own with a higher chance of it working out. We like having multiple geared characters!

Our alts are almost as geared as our mains and it gives us a nice “break” from our normal duties that we have to do on our main characters. It’s nice for me to randomly destroy stuff on my Ret Paladin or my Elemental Shaman.

As I said earlier, extra Primordial Saronite is a plus. We can channel the results of those into the main raid. Not only that, since they’re alts, the players that are comfortable with it can spend their Emblems of Frost that they have to purchase Saronite for their mains if they need to.

Our main raids are overstaffed. We do this in order to ensure that we have enough players to raid. This inevitably means that some players are going to sit out during the week.  I don’t want them to fall too far behind us in gear. So any main raiders that don’t get to come in during the week are able to come in on Sunday in order to use up their lockout period. At the very least, they’ll get some Emblems.

We’re still working out loot systems for the time being. Last Sunday, when we walked into ToC 25, we had 23 alts in total. The other 2 were friends of the guild. The one thing that we’re lacking is another tank for our alt runs. If we can field a full crew for 25, then I can definitely apply loot council rules and prioritize main readers who need loot and balance it with the alts.

If you’re a tank out there with nothing to do on a Sunday night, come and check us out. Of course, anyone who feels that they are exceptional healers and DPS are welcome to apply regardless.

Let’s take down Arthas and move on to Deathwing already!

Handling Icewell Radiance

Props to this guy for coining the term.

Daelo announced earlier in the day the implementation of raid wide buff called Chill of the Throne. What does it do?

The spell, called Chill of the Throne, will allow creatures to ignore 20% of the dodge chance of their melee targets. So if a raid’s main tank had 30% dodge normally, in Icecrown Citadel they will effectively have 10%.

Similar in concept to Sunwell Radiance, the reason it was implemented was to lessen the overall spikiness of incoming tank damage. Spikiness refers to something like a tank taking constant streams of 15k damage here, 14k damage there, and then suddenly plummet after a 44k hit of some sort. Sometimes it was predictable and in other cases it was not. It’s a large and often unpredictable hit that is capable of flooring a player.

I call it the Chuck Norris effect.

For present healers, the current way to deal with this is to use defensive cooldowns in tandem with tanking cooldowns. If tank avoidance isn’t high enough or if cooldowns aren’t used, they can easily get 2 shot in a manner of seconds.

With luck, this will be the last time we’ll ever see a buff like this in the game. Going forward into Cataclysm, the idea is to raise the health pool of tanks. Right now our overall approach to healing is to spam really fast heals, really large heals, or AoE heals depending on the situation.

While tank health pools go up, healing spells will scale up but not as sharply. The ratio of healing done on a tank vs tank health won’t appear to be the same as it is now. Let’s say a Greater Heal can cover 60% of a tank’s health right now. When Cataclysm hits, Greater Heal might only heal for 35% or something. The approach is to make overhealing a real risk to the point where healing spells can’t be spammed just to get through the boss fight.

That’s going to present an interesting change. It feels as if it’s going to be a hybrid between Vanilla-esque healing and TBC-era healing. I daresay those were the two extremes. In Vanilla, you had to rotate out with other healers and regen for a minute before tagging back in. In Burning Crusade, you could get away with Circle of Healing spam. It looks like in Cataclysm, they just might make overhealing mean something again since we can’t spam heals nor can we switch out with other healers to come in for us.