Part three of a series. Please read Part One & Part Two.
Okay, finally a real action shot like I’ve been promising. Welcome to Mother Shahraz. There’s a LOT going on in this fight, but you do get to stand still for most of it (unless you get Fatal Attraction, but that’s another post altogether.) I picked this shot because it catches a few things – good mana-regen cycle, a solid fight with only one real phase, and me making a pretty big mistake.
Typical Bossfight:
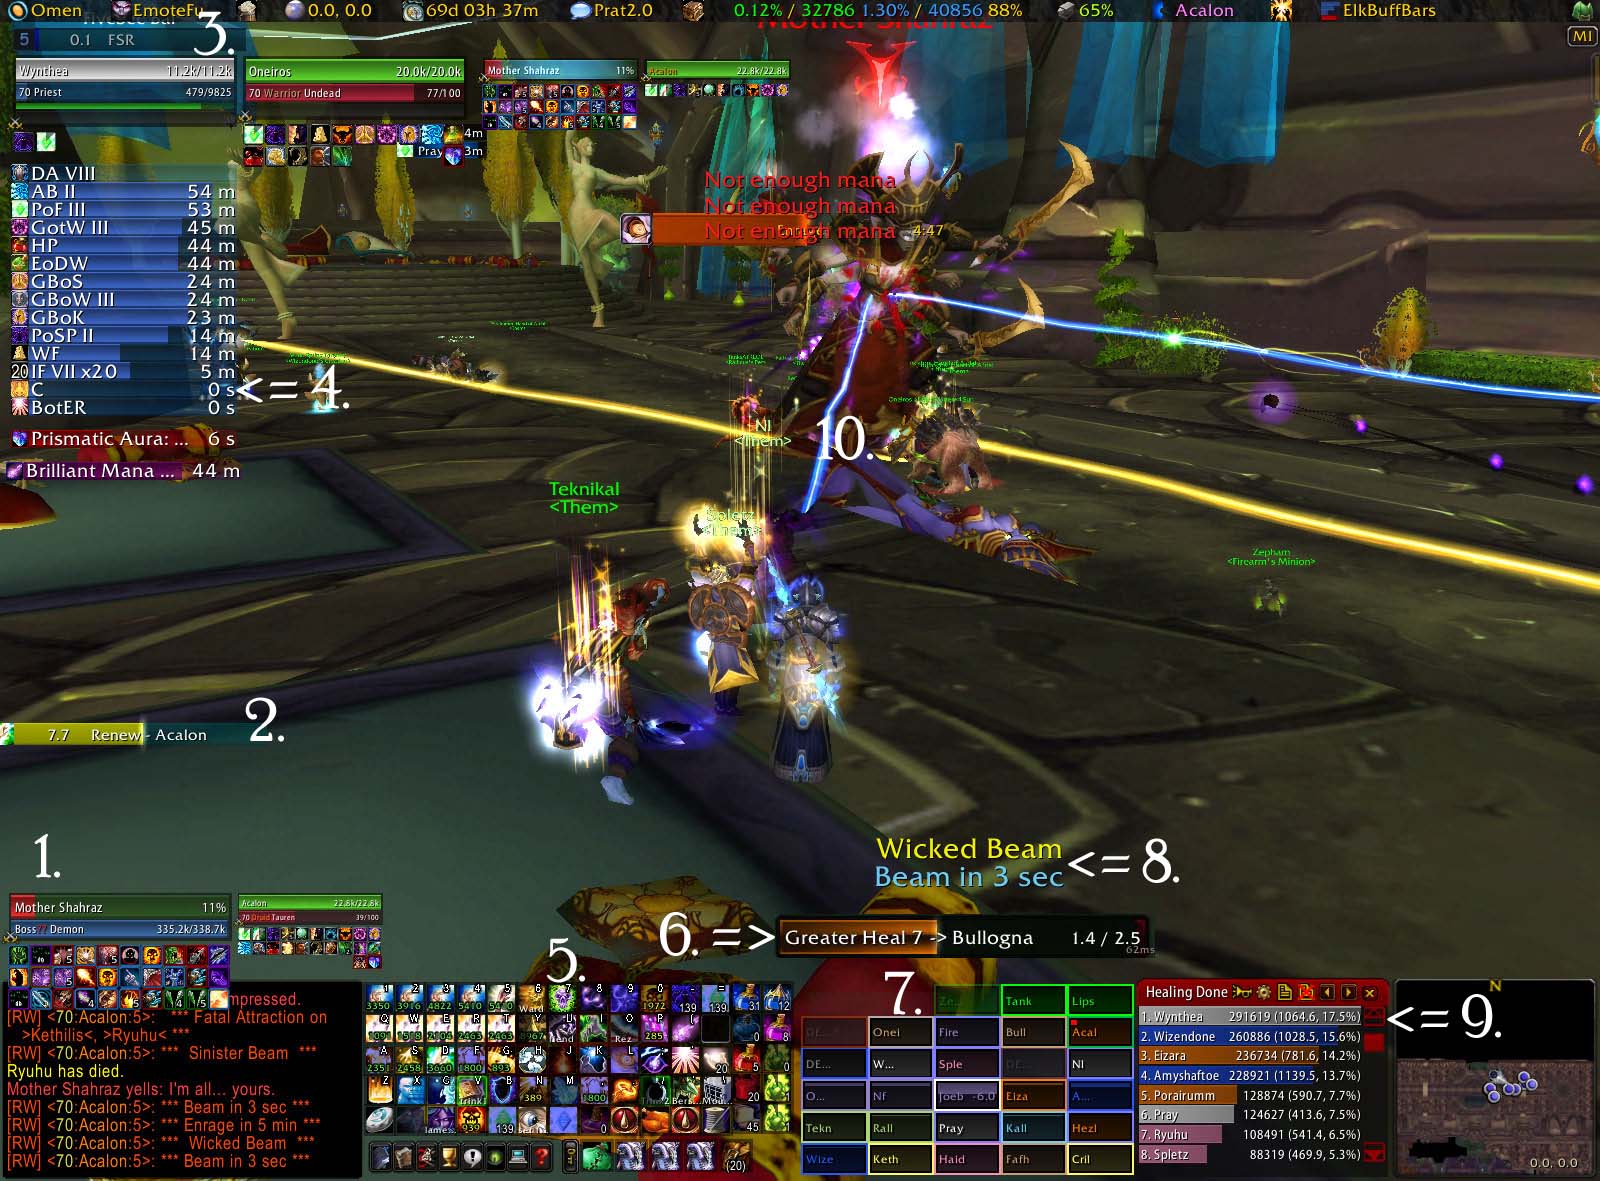

1. I set the boss as my focus on this one, so I can more easily watch for what aura she has and which tank she’s targeting. Different fights call for different focii; just set it to whomever you need to babysit. If you’ll look at the bottom row of myBartender you can see an icon that’s an eye with something pointing at it.
I’ve macro’d that button to set my focus just to make it a little faster and easier. I’ll post about the macros I use at the end of this series.
2.HoT Candy keeps track of everyone I’ve Renewed. Right now, it’s just the MT, but that’s because my mana’s about shot. (No worries, my pot CD finished as I took the SS.) Resto-Druids especially take note: HoT Candy is your friend.

3. This is part of RegenFu. I’m just about out of the Five Second Rule, and will hit some serious mana-regen goodness. Fully buffed, my non-casting regen is over 900, but in full shadow resist, it takes a big hit. So I’ll burn Inner Focus before my next big heal, to maximize the mana I get back without stopping casting. I also wait until I’m out of the FSR to burn my Earring of Soulful Meditation. (If you don’t have it, find a way to get it. The Bangle of Endless Blessingsfrom Botanica is a substitute, but only about half as good.) I rarely make it the full 15 seconds without casting something, but at least I get the full benefit at the beginning.
4. Here’s where this shot catches me not paying close attention. Look here on my ElkBuffBar – Clearcasting is just expiring, but you can see at the top of my screen that I didn’t have enough mana to cast the Circle of Healing I was trying to cast. On Grid, you can see that group 3 was taking pretty even damage – I was spam CoH-ing them to patch them up. I should’ve thrown a G.heal on Joe in the middle, there. I’d’ve been finished with the cast by the time I had enough mana to CoH again, and been able to burn Inner Focus more appropriately, or let one of my Shammies top off the rest of the Warlocks while I regenned a little more.
5. On Bartender, you can see which of my cooldowns are available. Mana management is absolutely critical for these kinds of fights. My Pot CD finished as the SS was taking, Fiend is down, Inner Focus is available, and my Earring is down.


As healers, our mana-rotation is as critical as a DPSers spell rotation. Learning to be efficient is one of the best things you can do to become a better healer. For me it looks something like this:
- Start: 12.5k mana

- First Pot – 9k mana
- Pop Earring – 9k mana again
- Inner Focus – When expensive heal is needed
- Shadowfiend – 6k mana
- Second Pot – 7k mana
- Earring again – ASAP
And so on.
Mana is a lot like gasoline in your car – it’s just as easy to keep the top 1/4 of the tank full as it is the bottom 1/4. And the earlier you pop those cooldowns, the sooner they’ll be available for you to use again. Once you’ve used them all, just rotate through as soon as they’re available. I tend to Inner Focus for Prayer of Healing, but will use it for G.heal or Binding heal, if necessary. A tip for Mother – don’t wait to Fiend. Your mana will drop faster than you’ll believe, and when that CD comes up again, you’ll be very thankful. Also, watch for the auras that increase or reduce shadow damage. You don’t have to wait for the increase-aura to Fiend, although it will help you, but you will want to avoid the one that will nerf your little guy.

6. Okay, I’m going to highlight that mistake a bit more here. Since I didn’t use my Clearcast to throw a heal on poor Joe, I pasted this copy of my casting bar in from another screenshot so you could at least see where it goes and how it works. You can see from my toon’s posture that I’m not actually casting anything. Quartz tells me what I’m casting, what rank, shows a timer, and who I had targeted when the cast began. I change targets almost constantly, so that’s a very handy feature.
 7. This is one of the best shots to show how Grid works; most of the raid is at full health, and it’s obvious who needs heals. If you look at the top-right square, you can see Acalon – our MT for this fight. The Red dot in the upper left of his box means he has aggro. There will be any number of those little dots when there are multiple mobs targeting people. That dot, rather than damage taken, is my cue to take action in most cases. A working knowledge of the mobs involved helps me know if I should start casting a heal, or just shield/renew the people with aggro. The groups are a little jacked right now – my raid leader moves Shammies into the melee group in a rotation for Bloodlust (Heroism) purposes. You can also clearly see who is dead, and who is out of my range.
 8.Deadly Boss Mods lets you move where your raid warnings pop up. Back to the concept of reducing eye movement to maximize reaction time, having them right where you can see them helps you know who’s about to need a heal – especially if it’s a fight like Void Reaver or Illidari Council where the boss targets random raid members to take damage.
9. Here’s Recount again. Pray is a shadow priest. He’s beating the Paladins on heals, because they both died early-on. It’s important to note that just like any other statistics, the data is only as valuable as its interpretation. This particular shot tells you very little without knowing the set-up. Por was assigned to heal up those people who get Fatal Attraction. Not very glamorous, and it limits his ability to cross-heal. Wize and I are both on raid-heals, so we’re pretty much neck-and-neck. Eizara is generally assigned to the Tanks, but her mana-efficiency is so excellent that she helps a lot with hotting the raid. She is an absolute BEAST of a resto-druid.
10. Scrolling Combat Text isn’t that important, as far as I’m concerned, for my incoming heals or mana regen – I’m watching bars, so I can see that. The important thing is that it tells you when you gain a buff or debuff. Clearcasting, Diabolic Remedy, Deep Meditation, Band of the Eternal Restorer, Berserking… all that stuff pops up over my head, and keeps me from having to watch my buff list. There are mods that do this, and will personalize it any number of ways, but the stock UI also has this feature now. Unfortunately, I didn’t catch it showing in this ss, and it looked funny ‘shopped in. The “10” is where it would go.
Bossfight Breakdown
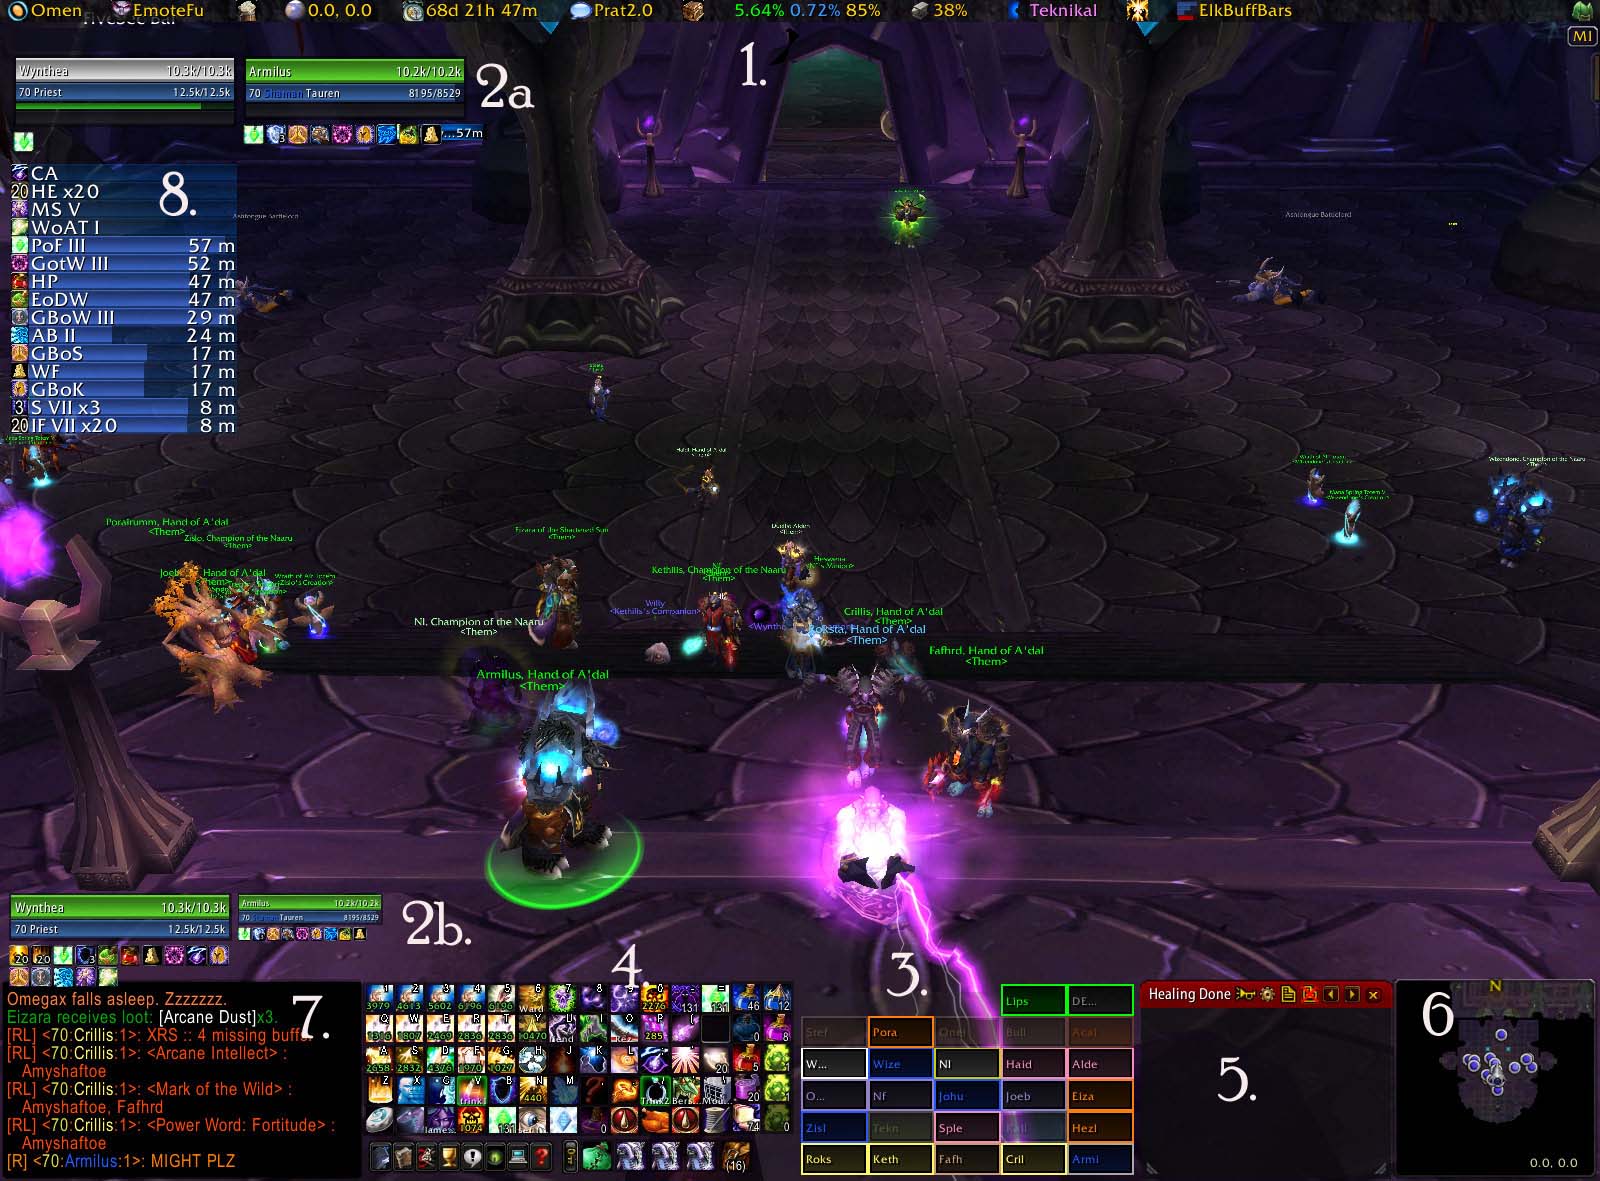
These shots were taken during a trash-pull right after Mother. I’m very self-critical, and have found a lot of value in analyzing my own performance after a given boss fight. I wanted to walk you through my personal stats after a fight.

This is a pretty typical boss-fight mix for me. I’m usually assigned to raid healing, and expected to help out on the tanks when they’re taking extra damage, or their healers are in some way incapacitated. Notice how MANY times particular heals were used: 17 Greater Heals compared with 14 Flash heals. 57 Renews. Clearly, I love me some Circle of Healing. It is my bread-and-butter for raid healing, but be careful not to fall into the trap of spamming it for everything. I have seen priests with upwards of 90% CoH – I cannot stress how inefficient that is. CoH is a great tool, but it is not in any way a substitute for good decision making.
A few examples:
- My CoH costs approximately 400 mana to heal 5 people for about 1k each. I can patch up a group with roughly 3k damage each for 1200 mana. Not bad, but if that group happens to be my actual group, my ProH heals for about 2.5k per target at a cost of around 900 mana. Time-wise, the 3 second cast is the same as the time it would have taken for me to cast the three CoH’s. It’s actually a faster option, because my GCD won’t be up by the time the ProH is done, so I can move directly on to my next target. ProH also gets cheaper because of how well it lends to burning Inner Focus.
- CoH is perfect for a situation where a group is taking moderate damage across the board – assuming you throw out about 3 CoH’s on the same group, you just healed 5 people for about 3k each – much better than the time it would have taken to Flash Heal the same people (7.5 seconds) for that amount… but if a single-target is down by even 5k, you’re much better off throwing a rank-5 Greater Heal than spamming 5 CoH’s.
Note: If you are taking damage yourself, and so is the Tank, don’t be afraid to Binding Heal. Once they nerfed the mana cost (it used to be about 1k, and now it’s around 700), it became very viable to heal the two most important targets you have – yourself, and the guy keeping the bad guy from flattening you. It costs about the same as two Flash Heals, and saves you the casting time, and the decision.
This shot is the report for WHO I healed during the same bossfight.
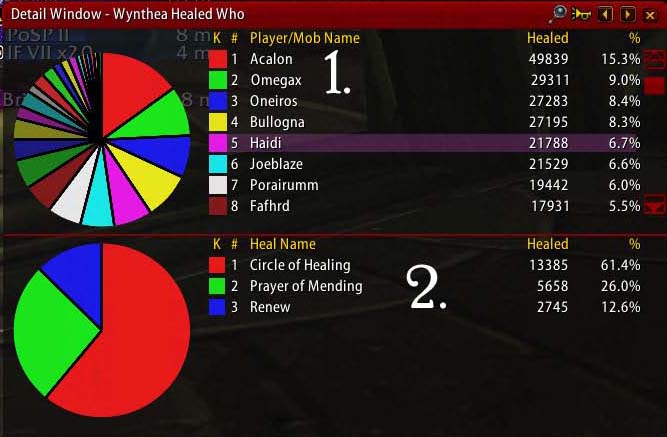
1. Remember, my assignment was to raid-heal, and supplement on the tanks when their assigned healers needed help. (Usually from getting the Fatal Attraction debuff.) Acalon was our MT, and he got the bulk of my raw heals, usually in the form of ProM, Renew, and Greater Heal, with a few Flash Heals thrown in if I got nervous. I forget where I read it, but a good rule to follow is to Flash Heal if your target needs a heal NOW, Greater Heal if you think you have time, and just Renew them if you KNOW you have time. That said, I keep Renew on the MT at all times, and ProM him as much as possible. My #2 target is Omegax – a warlock with a fondness for Life Tap. His heals are mostly Renews. Oneiros and Bull were our OT’s, their mixes look a lot like Acalon’s.
2. This second area of the screen shows a break down of what heals I used on a particular target. Haidi is one of our healadins, and the first example of my typical raid-healing mix. You can see that he didn’t require any special attention. Working through the rest of the raid heals, this is pretty much typical for everyone, maybe with a Flash Heal thrown in.
To Be Continued. . .


