Matt’s Hodir Impressions

hodir

First, check out this awesome video by Siha. Some great teaser footage regarding the Hodir encounter. You can see me around the 22 second mark. I’m running away to the bottom right corner of the screen. Great choice of music, to boot!

To all the players who said Blizzard didn’t know how to create challenging content.

You guys are in for a treat.

At around 3 PM Pacific, it was announced that Hodir would soon be available for testing. In fact, he would be open at 4 PM. That left me an hour to scramble the players necessary to give it a shot. I knew there was no way I’d be able to field a full 25 man raid group. Conquest managed to bring in 6 players to jump in. I posted on Twitter looking for volunteers. No avail. I checked my GMail for online contacts. Apathy was free. Quick glance on AIM? Siha was free. After 90 minutes of struggling with UIs, server crashes and the like, we were one of the first groups that were able to zone in. The entire zone is quite breath taking. Check out some of the shots I sent into WoW Insider.

WoWScrnShot_022609_171253 After my making my way through most of the instance where we pass through the exterior lightning charged towers (where the Flame Leviathan is, no doubt) we enter a door that takes us into another part of the area. It looks like we hit the inner sanctum. The main chamber branches off into a multitude of rooms which takes your party to different bosses. Naxxramas has four wings. Ulduar has many different wings. I was’t able to get a count. But I think there were at least 5 or so hallways that led out. We managed to find Hodir with little difficulty in a circular cavern.

And we were joined by Daelo! Poor guy! He’s the lead encounter designer for Blizzard. General chat exploded the moment he announced his presence. People were asking him to unstuck them from various areas inside the instance. It got to the point where he had to bring in his alter ego (Daelotwo) to help with the unsticking process.

omgdaelo

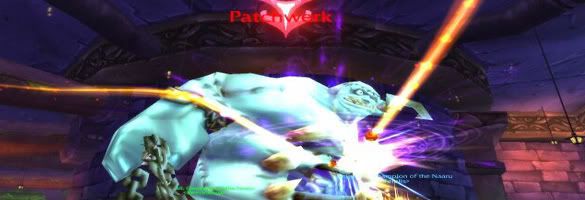
What you’ll find is a large, oversized blue Dwarf-like individual. He’s got four NPCs encased in ice in front of him. Looks like they are integral to the encounter somehow. Our Death Knight tank starts the dancing process of kiting him around. We kind of deduced there was a Keristraza like ability where players had to keep moving. Siha and I were the only healers. We danced around. She covered the main tank (our Death Knight) while I tried to handle the rest of the raid.


For the past several years, we have all been conditions to aim the camera toward the floor. Illidari Council especially taught us to get out of fires. Blizzard has thrown us a curveball. This time, the raid need only look up. If you see snow, look out below as a chunk of ice is going to fall from the sky!

We barely lasted 2 minutes. But oh my was it such a blast!

WoWScrnShot_022609_171939I have to say something on a side note. It’s an exhilarating feeling to come to a new boss for the first time with zero idea of the boss does. It’s interesting in the fact that as players one of the first things we have to do is figure out what abilities and attacks the boss uses. Once we iron that out, we isolate what we can do or what the environment around us can do to help counteract boss abilities. I’ve never really been at the forefront of progression before. Literally. Bosses in the past have been done with explanations from other players or strategy guides or videos. For the first time, everyone is more or less on an even keel because no one knows what the heck is going on. There’s a huge rush after the fact where everyone chimes in trying to deduce what just killed them. Then theres a myriad of suggestions on how to go about preventing or adjusting for it. We don’t actually know what works. I mean testing raid content is like a big giant algeba problem: It’s literally guess and check.

As far as healing goes, we didn’t last long enough to get a good handle on healing. This instance feels like Zul’Aman: Reloaded (in terms of relative difficulty from Karazhan up).

Notes and observations

4 frozen NPCs in the middle of the room. Of the 4, you can break up to 2 on Normal and all 4 on Heroic. They assist the raid and hand out buffs.

Breaking out the Moonkin offers a haste buff to the raid (Unsure if its spell haste, haste, or both types of haste). You currently have to stand on the circle of light in order to use it.

On Normal, Hodir has 10 million health. On Heroic, around 30 million.

His attacks are melee and frost based.

Frost novas are dispelable. I believe they are cleansable as well. Hooray for magic effects.

This encounter is inspired by Keristraza in the sense that players have to move around to reset the damaging frost aura. It starts off at 200 initially and then continues to double to 400, then 800, then 1600 and so forth.

After the initial 45 seconds, Hodir does an ability called Flash Freeze. It’s a 9 second cast capable of nuking everyone in the room regardless of line of sight. It is possible to fully resist it. If it connects, you get encased in a chunk of ice for 5 minutes. The only other way out is to get busted out by DPS. Don’t forget that when you’re frozen, the aura is still on you.

Frozen Blows: Physical damage reduced by 70% but attacks deal 17750 additional Frost damage.

Special thanks

I’d like to extend a hearty thanks to the brave players who were willing to wipe with me.

Eridan – WTB more soulshards *grin*
Siha – Being online at the right time. Probably would not have gone in without her healing presence.
Wukki – Helping me with the notes and boss observations (and doing some research on her own)
Apathy Inc – I forgot your blog address again
Superkathoid – For offering her services as DPS even though I was already full on DPS 🙁

I plan on leading another team back in there tomorrow (Friday) at around 3 PM PST. We’re setup on Broxigar. Iron Council is scheduled for 4 PM PST. If you’re interested, I’ll on the PTR around then to get my present guild organized. I’ll most likely need an extra set of hands. You’ll recognize me on my character (Matticus).

If you’re interested, follow me on Twitter. Or else bookmark my Posterous (or subscribe). I’ll be updating my Posterous more often with screenshots and a live braindump of everything going on.

In hindsight, I shouldn’tve formed the group the PvE server. Way too many people.

Raiding and the Bench

bench
Deciding who raids and who sits out on any given night is the second-most unpleasant task any raid leader or organizer has to face. (The most unpleasant, of course, will always be loot distribution). From a player’s perspective, it really sucks to ride the pine pony when you had been expecting to raid. However, maintaining a healthy bench is necessary for both raiders and guild masters alike–your bench players are the people you count on to get you through the bad times. As we all must know by now, in any human enterprise you cannot expect to succeed if your plans hinge on achieving a best case scenario every time. There will be ups and downs in any competitive activity, and the game plan has to account for that.

The Bench and Sports

I know I personally have bad memories of sitting bench from high school sports. During my sophomore year of high school, I was allowed to play on both the junior varsity and varsity volleyball squads. This meant that I got two sets of ill-fitting, 1970s-era uniforms, double the practice time, and, guess what? Almost no playing time on the varsity team. Whenever I hear the word “bench” now, I shudder, remembering that experience. However, high school athletes sit the bench faithfully, hoping that someday, somehow, next year, their turn will come. As for volleyball, mine never did–I didn’t even try out the next year. That’s always a risk with the bench. You may never move up.

Raiding with a Bench

In theory, high-end raiding guilds are run by grownups, and sitting bench doesn’t have to be the humiliating experience that many of us remember from high school. We can all share and share alike, right? Wrong. Perhaps because of our high school traumas, many raiders feel territorial about their raid spots, and people may not always volunteer to sit when too many players log on to raid. What you have to do, in the WoW context, is overcome the idea that only inferior players sit bench. That’s not true. Players sit bench for many reasons–class balance, space, attendance, etc. It’s usually not just a question of who’s better, as it almost always is in high school. How can a GM or raid leader manage this situation? The following tips should help a guild master or raid leader keep the bench under control without bruising too many feelings.

1. Have Thoughtful Recruiting Goals

The first line of defense against bench trouble is a thoughtful recruiting plan. You do have to recruit more than 25 players for a 25-person raiding team. A good goal is approximately 15% more, or 4 extra raiders. These 29 players should all have equal ranking and equal access to raid spots. In a guild with typical attendance (75%), most raids will be exclusively composed of these 29 people, and only rarely will any of them have to sit bench. Make sure that sitting bench is part of your guild culture. Your raiders should expect that their number will come up once in a while. If you have far too many raiders at present, I have a piece of advice that doesn’t seem particularly proactive–just wait. Don’t gkick a bunch of your players or tell them there isn’t room. In the virtual world, balance changes in the blink of an eye, and there are always people leaving raiding, or the game as a whole. Any time you’re not recruiting, your guild is shrinking, and you can can just wait until the numbers come into balance.

2. Institute a Substitute Rank

Typical raider attendance, which I ballparked at 75%, can drop much lower in hard times. We’re in a difficult spot right now in WoW, with the Wrath content feeling stale to many high-end raiders and Ulduar still many weeks away. If your guild hasn’t had any roster shakeups in the last few weeks, you’re highly atypical. In order to get through the bad times, you may want to institute a substitute rank in your guild. In Conquest, Subs are players who are well-qualified to raid all content but typically joined at a time when we weren’t recruiting their class for permanent spots. Some Subs simply have more time constraints than our raiding policy allows for–often one or two raids per week is just fine for them, and they remain very happy at this rank. Many Subs joined Conquest for social reasons, but some became members of the guild hoping for an opportunity to move into the Raider rank. This has happened for very many of our Subs over the last few weeks as people’s interests have taken them in different directions. I am always happy to see a dedicated Sub get promoted. Of course, sometimes a Sub will move on to a different guild that has a permanent spot for them–to me, that’s great too, because it means that the player is closer to meeting their in-game goals.
If your guild uses a Substitute rank, it offers you a sort of pre-recruiting option. You will be able to promote from within when vacancies occur. After all, you never know when one of your players will disappear without a word. In the anonymous virtual world, this happens all too often. Thus, it’s in your best interest as GM to keep a list of subs and keep them happy. How to do this? Invite them on farm raids, 10-mans, Vault of Archavon, etc–whatever your guild’s more laid-back events happen to be, and give them a prize for their efforts. Most Subs will get loot naturally as many drops from farm content will go uncontested.

3. Have an Attendance Policy

My experience with attendance policies, both as a professor and as a raider, is that people tend to ignore them. They’re only usually enforced in the limit cases. I may have a policy on my books that says I lower a student’s grade after 3 absences, but I’m not likely to actually do it until they have 7 or 8. Despite this tendency, you need to put some kind of attendance policy on your books. It is true that it is not practical to demote someone who has 72% attendance when your policy says they need 75%. Yet, attendance figures should factor into some of the tough decisions that you might make as a leader. For example, if you need to bench one of your 29 raiders for an Obsidian Sanctum 3 drakes raid, and your choice comes down to two dps players, one with 70% attendance and one with 90%, let 90% guy have the spot. If your guild uses loot council, let attendance factor into the decision-making process. If you do enforce your attendance policy in any way, you ought to track it via your guild’s website so that people can see how they stand relative to each other. Matticus recently found a great way to do this for Conquest through EQDKP plus. As a raider, it’s a good reality check. I can see that I have 83% attendance, which is actually lower than I thought I had. I had forgotten that I took time off at Christmas. These sorts of selective blindness can have raiders thinking that decisions are unfair or arbitrary. It’s always good to see the actual numbers.

4. Keep Your Members Educated

The degree of success your guild has with the bench problem will depend almost entirely on how you communicate the matter to your raiders. Make sure that players know how attendance will be assessed and what will be expected of them. If you have a raider rank, get those players used to the idea of sitting out once in a while. In Conquest, those decisions are made based on the advantages/disadvantages of certain classes and specs in specific encounters. However, we try not to bench the same person too often. Sitting the bench is a responsibility everyone–even officers–should share. Another good policy is to ask for volunteers, especially if it’s a farm raid and class balance isn’t so crucial. Sometimes there’s a player who really just wants to go to bed. If so, be sure to thank them when you move a player into their spot. To me, a thanks from the raid leader or guild leader means a lot.

Conclusions

As the GM or raid leader, you can never entirely eliminate the bench problem. You can never recruit the exact perfect number for all situations, and you can never enforce any attendance policy so strictly that you will never fall short of filling a raid. I think it’s far better to have too many than too few show up to raid. If you’d like to keep your raiders healthy and happy, on bench and off, make sure to have clear policies that you enforce fairly. Make sure that many different players share the bench burden. When people see this happening, for the most part they will accept an occasional sideline, knowing that it won’t happen to them every raid, every time.

Guardian Spirit Works on Kel’Thuzad

Derevka from Tales of a Priest asked me to issue a World of Matticus all points bulletin:

8:50 PM Derevka: word to the wise, Kelthuzzad CAN be buffed with Guardian Spirit while you are MC’d. We had 10 seconds of “OMG DONT KILL HIM!”

For those of you unaware, if you kill a subject with the Guardian Spirit buff active, they gain 50% of their health back. For most of us, 50% is no big deal. But if you’re sporting a bajillion health, 50%’s a pretty honkin’ big deal that would make Howie Mendel proud.

So if you’re on the last legs of the encounter and a Holy Priest get’s MC’d, make sure you CC him like crazy. If he gets the wings off, try to break it with a Purge or Dispel.

As Wyn always tells me, you can’t spell success without CC!

Malygos Phase 3 Made Simple

malygos-p3

“Anyone have any tips for Malygos Phase 3?”

This is a common question I’ve seen on my Twitter that I’ve decided to address.

The phase 3 of Malygos is difficult for players the first time they run into it. It generally takes a number of wipes before players figure out what to actually do and how to do it.

When I explain this fight to pickup groups or other guilds, I try to keep things as simple as possible.

Setting up

As phase 2 ends, the entire instance is going to fill with bright, seizure inducing colors.

To make sure everyone’s in sync and starting in the right area, I get everyone to snap and move down to the southern side of the platform. Look on your minimap for this if you have to. I ensure everyone stays together as much as possible.

Note the red dot in the diagram above.

As the platform breaks apart and your raid falls, see to it that no one touches their flight controls. Let Malygos settle down and park himself. Once he does that, the raid leader cues the raid to climb.

Climb directly up until you’re at head level with Malygos. For the remainder of the fight, this is where you’ll be on the Z axis of things. You don’t have to worry about climbing or diving. You and your raid are only going to focus on strafing.

Movement

Note the four dark blue (navy) circles on the map above. Those are going to be the 4 points everyone will navigate to.

Now that the raid is head level and starting at the south position, you’re going to move towards the east, north, west, before heading back to the south.

In other words, fly counter-clockwise in 90 degree increments. You don’t have to do this constantly. Only move when the raid gets hit with a static field (30 yard AoE damage spell). See a static field? Move east. Another static field? Head north.

For the DPS

Even though I’ll have anywhere from 6 to 7 healers for phases 1 and 2 on Malygos, I’ll specifically jump into the play on phase 3 to help DPS. I like to get another healer to do it with me. This drops healing drakes down to 4 but increases attacking drakes by 2 (or having a net result of 20 firebreathing drakes).

Flame spike: Damaging fire attack that awards a combo point at the cost of 10 energy

Engulf in flames: Finisher that adds a DoT effect. The more combo points, the longer the duration of the DoT. Can stack.

As you can see, the more Flame Spikes you cast, the more DoTs you can add and the longer they last. It takes a while to build up momentum.

For the sake of simplicity and those doing it the first time, I suggest going for a 1-1-1-2 rotation.

On a side note, I think the guild best is currently at 22 stacks. Can’t remember if it was one of my Warlocks, a Hunter, or Kimbo (Ret Pally) who pulled it off.

For the healers

First thing’s first. What you may realize is that your raid frames are going to be useless! They don’t show the health of the drakes! There are a few addons that combat this, but I’m going to assume that you completely forgot to get them.

Press Shift V. This brings up healthbars on to the screen. At this point, you’re going to be relying on heads up healing. In other words, you’ll have to filter out the players with low health bars, target them, and heal them.

Revivify: 10 second HoT. Each application adds 1 combo point. This can stack up to 5 times.

Life Burst: This is an AoE healing finisher which increases your healing done by 50% (and lasts longer per combo point). If you have maxed out combo points (5 of them), the spell will heal around 15000 across all friendly targets within 60 yards.

This is like extreme whack-a-mole.

You may not have combo point indicators so you’ll have to keep track of it mentally in your head. And since Life Burst is a large AoE, you don’t always have to target the weakest drake. Just pick one and slam the key and it should engulf everyone.

For the DPS and healers

Lastly is the Flame Shield mechanic. Any spell that registers combo points will work (Revivify or Flame Spike). The more combo points, the longer the shield.

You’ll want to use this when he targets you with a Surge of Power. Having Deadly Boss Mods installed will cue a large warning on your screen that Malygos is looking at you.

Even though he looks at you, you still have time to build up points to survive. A lot of players will panic when this happens and feel helpless.

Get a grip on yourself and calm down.

When he looks at you, there are 3 seconds before he fires his laser beams. The beams will last 5 seconds. You just need to have the shield up for a portion of it to survive. With luck, your AoE healers can still catch you while the beam is going off to help mitigate some of the damage.

Let me reiterate, you don’t have to have your shield up the entire 5 seconds to survive. So if you’re caught with your pants down without any combo points and he’s looking at you, fire off 2 or 3 combo point spells and hit your shield. You should be able to survive it with slight scale damage.

Reminders

  • Run south going into phase 3
  • When Malygos levels up, climb up to him and reach head level
  • Strafe in 90 degree increments going counter clockwise
  • DPS: 1-1-1-2
  • Healers: 3-3-3-3-3-4 and press Shift V to toggle health bars
  • Don’t panic when he catches you with no combo points since you still have time

Good luck and good hunting!

Patchwerk through the eyes of a Resto Shaman

Image courtesy of Feralis.org

Lodur from Zul’jin here once again. This post I’d like to talk a little bit about healing Patchwerk as a restoration shaman. This will be a bit of a short post for me this week. Patchwerk for the longest time has been THE premiere check for your dps, your tanks and your healing. He is a perfect measuring stick for your raid if you think about it. He’s a straightforward fight, dps can sit and dps, tanks sit and soak damage and healers sit and heal. There’s no fancy gimmicks, no movement or fire to move out of , so it really is the perfect boss fight to check out your raids gear and ability.

You might ask youself “What is there to know? Don’t we just dump heals into tanks and call it a day? ” There are a couple different roles a shaman can play for healing through Patchy here. The two tried and true methods are Chain Heal spam and Lesser Healing Wave spam. Lets talk about the strengths of each for a moment here.

Lesser Healing Wave method.

  • Quicker heals
  • Using Glyph of Lesser Healing Wave allows the spell to hit for almost as much as Healing Wave
  • Lower spell cost for more heals per mana spent.
  • Quickly allows off tanks to be topped off to full health

Chain Heal Method.

  • More efficient heals (5.3 healing per mana spent)
  • Allows for both off tanks and main tank to be targeted and healed through the jumps of chain heal.
  • Smoothes out healing on the off tanks so second healers have an easier time keeping the tanks health even.
  • Allows for lag compensation due to added healing buffer.

Lesser Healing Wave Method:

This method is really straightforward. Simply put you keep Earth Shield up on your tank and continue to dump Lesser Healing Waves and Riptides into him constantly. Make sure to keep your Water Shield up for maximum mana regen and to make sure you have full charges available for Improved Water Shield. Using this method you have to apply healer tunnel vision. By that I mean you have to pay attention to your tank and only your tank, if you try to heal another OT or the Main Tank, your tank is likely to eat a large spike before you can top him off. This method allows for very little error but is very mana costly in the end.

Chain Heal Method:

Personally I prefer the Chain Heal method, let me explain a bit about why. Firstly, it is simply our most efficient heal. You get the most bang for your buck out of it and if you have your 4 piece set bonus from tier 7, or even if you’re still rocking a couple pieces of tier 6, you just get the most mileage out of it. Secondly it has a lot of synergy with some other talents that you will find useful for this fight.

Lets go ahead and assume you’re assigned to heal one of the two Hateful Strike tanks (I’m operating under the assumption you’ll be using the two OT strategy.) The tank you are specifically assigned to will be your the starting point of all your heals. He will get the most out of your chain heals. After that if the OT’s are situated right, it will bounce off of your tank and onto the second OT, thereby adding a buffer to that tanks healers. My experience has show that two restoration shamans placed on the OT’s produce enough of a healing buffer that the other healers have a light healing load, it makes sure to smooth out the spikes in healing you normally see. Think of it as like providing the driving baseline for a band, it helps set the framework for everything around it. There are a few more benefits to this. Lets say something goes terribly wrong and all of a sudden someone other then the OT’s takes a Hateful Strike, if you’re already chain healing you’ll be able to heal the person through the smart heal component without having to divert attention away from the OT’s in order to heal someone up. We can also assume you’ll be using a healthy smathering of Riptide it’s just going to pump your Chain Heal amount up that much more. Also, by using your chain heal you’re allowing for Tidal Waves to be up all the time so if you need to throw a LHW or a HW it hits for that much more.


All in all he’s not terrible for us, just make sure you have your Runic Mana potions and Mana Tide Totem ready to go to keep your mana up, and it should be smooth sailing for you. Both methods work (regardless of crit or haste gear =P ) and as long as you’re paying attention to your tank, you will easily succeed.

Now if you guys have a different way of doing it, please feel free to share =)

Till next time, Happy Healing!

~ Lodur