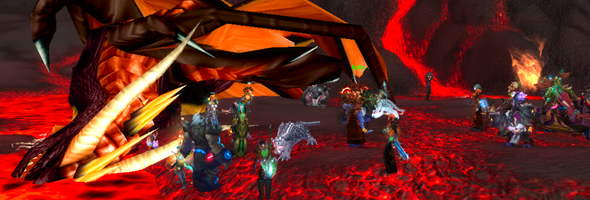
Dragon Slaying from a Healer’s Perspective: Onyxia

Dragonslayf2j

Every week I watch different players doing things in Onyxia encounters that could make healers spit flame. Not only that, I find myself reacting to and making the same mistakes every week. So what are these recurring things, and how can everyone make sure that healers don’t turn into fire breathing dragons?

Traditionally us healers don’t do much slaying of anything, especially dragons. We do something much more important. We’re the brave souls who sally forth calmly into the face of death to keep others in one piece, or at least standing vaguely upright. You know those others – the heroes who charge in bandying about a cacophony of curses. The ones who would get flamed into foil-packed toasted sandwiches or seared to a fowl-shaped frieze on the wall, or reduced to roasted bear.

But other heroes like to keep us healers on our toes. Hell, we like to keep ourselves on our toes. A dragon slaying party can make a lot of mistakes, and you’d be surprised how few heroes seem to know the Basics of Dragon Slaying. Many bands of adventurers charge into the dragon’s den without checking that everyone knows those basics, which I think is mistake #1.

So what are the most common and basic mistakes a do-gooder can commit while trying to saw Onyxia’s head off? And what can us healers, whatever class, do so we don’t feel like taking a deep breath and belching fire at people? Well, a long career of healing dragon slayers has taught me a lot.

Here are my top ten observations for both us healers and your actual slayer of dragons to remember while venturing into Onyxia’s den, especially if braving the fight with a motley crew of unknown quantities.

I always see tanks or DPS…

1. Getting cleaved. Obviously this is a hazard of the job for tanks. But every time I go to Onyxia there are some foolhardy melee DPSers who like to stand face to face with their foe. I always find myself politely telling them that if they stand behind the trash they will do more DPS and won’t die from cleave, which is something most monsters in the den do. This is always after at least two DPSers die once or one of them dies twice

2. Going out of Line of Sight. There is a hill on the path to Onyxia’s den. And just over that hill is – well, is your tank. And he’s found himself facing an angry dragonkin whom he can’t move for fear of cleaving the party apart. Positioned just right so that if you stay safely at range you’re over the hill and far away for healing purposes, but if you go in close you’re in danger of getting cleaved (see above)

3. Killing people by big-add AoE proxy. I’ve seen tanks pick up big adds on phase 2 and move to tank them next to healers and ranged folk. I sometimes don’t see this until the add’s AoE has fried me because I am looking at healing addons and frantically trying to keep everyone standing upright rather than watching the pretty pictures on the screen. Likewise, melee folks should run away from this AoE, but don’t always do so.

4. Panic-position Onyxia. This happens when she lands in phase 3. Things are hectic and every tank has a different idea where’s best to position a large angry dragon.

  • The tank might place her at the back of the cave: if he does then players are likely to get feared into a tail swipe and bring out many whelps. Handle it.
  • The tank might instead place her at the side of the cave: if he does that then players will get feared and tail swiped but probably not into the whelp eggs.

5. NOT dealing with whelps. Whelps are hungry when they wake up and there are a lot of them. If they’re not controlled and killed then they will quickly attach to a healer and start munching, or gobble up the mage they noticed AoEing at them. Hell, I’ve often seen tanks bashing away at a clutch of whelps all on their lonesome on phase 1, with no DPS bothering to go to them – unless you count those flying past into the whelp eggs and skulking back out again, leaving the tank to deal with more.

Tips for healers …

1. Watch where you stand. Particularly during phase 2. Make sure you’re not too close to the southern area where the big adds spawn, especially if the tank on big adds is a bit sleepy. Said big add may appear, set eyes on you and think you’re the tastiest target. It’s also easy to get out of range of people, especially ranged folk who are doggedly following Onyxia up and down the cave. Avoid all this by trying to strafe across the middle of the cave in p2.

2. Be on your toes during deep breath. Get out of the way of it, of course. Start heading back into the middle of the room as soon as it’s passed in order to beat fires out on anyone who didn’t manage to get out the way in time.

3. Never assume the tank is in safe hands. Healers get themselves tail swiped and cleaved too – I’ve seen it. Heck, even phase 2 is dangerous – deep breaths may mean that the tank and healers are separated. Last week I was in a run in which all the healers dove to one side of the room during deep breath and the tank went the other way – we all assumed one of the other healers would stay near him. Panic mode ensued. Try to stay in range of the tanks at all times but not too close. That way fried healers lie.

4. Run diagonally. Sounds weird, but look at the shape of the cave – very long, and the monsters tend to spawn or be tanked at diamond points. The tank’s making the pull? If you run in a strange line – and next to the tank – you’ll get cleaved or tail swiped right away. I saw a priest do just that last week. Run diagonally in and you’ll always be in range to top off the tank as he’s moving Onyxia and you’ll end up standing in a safe place. Likewise throughout the fight, diagonal lines will often get you near other players and away from fire and adds the quickest.

5. Be aware of your space. You will be moving around a lot – move your class specific tricks with you. As a shaman I move my totems to where the rest of the group moves for each phase, so people retain the buffs. As a druid I’ve run around like a rootless sapling trying to keep the tank alive in the north end of the cave and combat resurrect the top DPSer from the south of the cave. Assume in a reactionary fight like this that people will make mistakes: use your class to the full to make it easier on the whole group.

So those are the basics as I see them. They might sound simple – they are. But how many times have you seen some of the above happen? They’re intended to give dragon slayers and healers food for thought rather than offer strategies on how to heal; this isn’t a fight with challenging tactics, just one that needs everyone to stay aware of the situation. One last tip for free: if you want to get the bounty without repair bills, don’t assume everyone knows the tactics. They might not. Everyone has to start being a dragon slayer – maybe in a foreign tongue – sometime in their life.

I’ll be following up by talking about my observations and practical tips on healing Sarth3d in part 2 in the near future. Meanwhile – is there anything I’ve missed for Onyxia – any warnings about the dangers of dragon slaying? Or have you often committed one of these mistakes and just can’t help it? Are there any tips you can give to other healers in danger of frying out there? Any thoughts on how critical group make-up is in this situation?
2 PuG Raid Loot Systems: Performance Based vs Tichon System

I’ve had my heart broken again. You see, I was chasing after this cloak on my Elemental Shaman (yes I DPS too). It only drops from Sartharion with his 2 lackeys up. We were supposed to be together. After the buffs were set out and the strategy explained, we entered the fray. Sarth was pulled and positioned in the corner. Moments later, Tenebron landed. One of the tanks picked him up and corralled him in the back. It was like a synchronized swimming performance. Everyone moved in unison. Every fire wall was dodged. Every void zone, avoided.

Except for one player.

He fell to a void zone early on and swore he wasn’t standing in it. Obviously the results spoke for themselves.

It was a Paladin.

I thought nothing of it. Slowly but surely, the synchronized swimming team started to lose focus. One by one, players drowned in the sea of mobs, walls or voids. The remaining few pressed on. The first drake died. Vesperon landed. He, too, fell at the cost of a healer and 2 hunters.

When the smoke cleared and the dust settled, there were 10 players remaining. The island was littered with corpses. Slowly but surely they were brought back into the land of the living.

The loot was linked. Sure enough, my beloved cloak had dropped.

As it was being rolled off, I rolled an 86. I held my breath. Would it hold?

A 73,
A 81,
A 26,
A 35

Until I saw a 95.

My heart stopped and I stared. The same Paladin who was our first casualty won the cloak.

I was crushed. I bowed my head, accepted my fate and hearthed.

Performance System

If I were to devise my own loot rules for an encounter with multiple difficulty levels, I’d impose a set of conditions.

Just because a player has the achievement doesn’t necessarily mean they’re a good player. While they are a useful tool in filtering out really standout players (who wouldn’t want to invite an Immortal?), achievements only say so much.

So let’s go back to our OS 2 drake example here.

When you link to me your 2 drake achievement, what does that tell me? It tells me that you’ve successfully done the fight. You’re aware of the fire walls. You know about the void zones. You know about the elementals and the mini-drakes. In theory, you should be to avoid those hazards.

What about a tiered reward system?

Let’s say we start out with a free roll system with main specs. If Pennant cloak drops, the casters can go after it. If Obsidian Greathelm drops, all the plate wearing DPS ground pounders can square off for it.

Here’s where we make it interesting and this is where its put up or shut up time.

If you die to a void zone, a firewall, or something else that’s easily avoidable, you forfeit the right to roll the bonus item. You can still take a crack at the tier tokens or whatever the base level items are.

In theory, this should be an incentive for experienced players to become even more extra careful. It emphasizes a lot more on player survivability then DPS since there are no DPS conditions attached.

It would be more challenging to model it into a Naxx pug. But you know, I do get tired of seeing “undeserving” players getting items they should have no business wearing. Is that elitist of me?

Yeah, it is. I’ve got no problems with players getting the best items in the game if they’ve proven that they deserve it. Dying in a fight, and AFKing only to come back and win a roll after every other player alive finished off the encounter does not prove to me that they deserve it. I find that insulting.

But that’s just my take on it. Obviously the downside to this system is that you might not get any players at all in your pickup raid when they find out the conditions attached to it.

Tichon System

This is a slight departure from above. It’s designed to be much quicker in the handling of loot and addresses the main spec/off spec delays. It’s got nothing to do with the performance aspect. In most raids I’ve been a part of, the loot master typically handles an item in a way similar to this:

MAIN SPEC ROLLS

5
4
3
2
1

OFF SPEC ROLLS

5
4
3
2
1

BEG ROLL (anyone)

5
4
*insert 25 different rolls here*
2
1

That usually lasts around 20 to 30 seconds.

So what’s the Tichon system?

I was introduced to this a while ago when I was messing around on the Tichondrius server. Basically the loot rules are even easier then above. It goes something like this:

LOOT RULES

Main spec rolls 1-1000
Off spec rolls 1-100

That’s it.

No questions. What’s done is done. Everything is settled quickly and efficiently. Loot drama only flares up if players allow it. Everyone gets a shot at loot. Off spec players have a 10% chance of winning (I think). The players who need it more (the main spec players) have a higher chance of getting it but for players who the items are off spec still have a shot at also getting it.

But here’s the thing about pug loot drama

I’m of the opinion that the raid leader explains what the loot rules are before players zone in. The moment a player zones in and gets saved to a raid (after a boss kill), then players forfeit their right to complain about the system. By joining the raid and getting saved, there’s an implied agreement somewhere that they will respect the rules and accept whatever the loot gods say without question. But once the loot rules have been explained, its up to the player to decide whether they should stay or to leave.

Obviously if the loot master loots an item to a different player then the winner, then all bets are off.

Anyway, this is just something to mull over the next time you lead a pickup raid. It’s simple, clean and easy to administer.

My Definition of a Good Priest Redux

Focus

Almost two years ago, I wrote a post about the definition of a good Priest. It was one of the questions posed by Ego back then (to which I’ve lost the original link to).

The Priest class has evolved over the past two years. We’ve gained some and we’ve lost some. Has my stance on the subject changed?

Overall Awareness: This has not changed much. If anything, the amount of information needed to make the right choice at the right time has gone down slightly. With the removal of downranking, gauging the health of a player and then responding with the appropriate rank is no longer necessary. We’re still watching out for fires and health bars. I daresay the number one killer of Priests everywhere is getting out of dangerous stuff too slowly or not at all. We’ve moved from Nightbane’s fires to Sartharion’s Flame Walls to Kel’Thuzad’s Void Zones to Mimiron’s Rocket Strikes.

Perseverance: The bosses are different. The spells and tools have become increasingly diverse. I don’t like giving up. No one likes to lose. I may not express it, but I do chase after that “high” I get after taking down a boss. It’s a great feeling knowing that you played a key role. Good Priests know when to take risks to keep tanks alive. Most fights have one or two tanks that are involved with doing something. When the tanks are down, the game is over.

Clairvoyance: Can you predict incoming damage before it lands? Can you react to the little DBM mark that gets placed on a player which signifies the ensuing Shadow Crash? When Flash Freeze hits, do you know who is going to make it and who isn’t going to make it? These are the little things that separate great healers from okay healers. Your reaction time isn’t going to increase. But spotting these small details sooner will help you make your decisions quicker. One DoT tick is enough to kill a player. How many last second saves have you made on players? Ever received slaps on the back after a kill when a raid member thought they were done for only to be saved from the jaws of death with a last second shield, or instant heal to pull them out from the red health bar?

Preparation: One thing I am glad that has changed is the amount of preparation. I used to bring 20-40 potions every raid night. Brilliant Mana Oil was in my inventory. Flasks were supplied with Illidari Marks or were farmed for on my Elemental Shaman. The reduction of chain potting has dropped potion consumption drastically. I go through about one to two injectors a month instead of per raid. I lock myself in Howling Fjord and shoot enough fish to keep myself stockpiled (MP5 fish).

Openness: Always keep an open mind. Don’t shut down everything you hear. Feedback is feedback. It’s up to you to discern between valuable and useless. But outright rejection should come after you examine it. What are other people saying about you? Does it have merit? What information is missing from their perspective? What do they see when they watch you? I can’t emphasize critical thinking enough.

All in all, it seems my stance hasn’t changed much over the past two years. It’s been refined a little by the different class changes and from my forays into the different raids. When I wrote the original post, I had just finished wrapping up Gruul’s and Mag’s. Opening into SSC started a month after that post. Man how that time flies by, eh?

How about your class? Has your definition of a good <class> changed?

Video: Conquest’s OS3D Kill


Conquest- Three DrakeFunny bloopers R us

A big round of applause to cameraman Dannamoth for capturing our first OS3D kill two weeks ago and getting it on tape. This is the first time I’ve watched this fight from a different perspective. As the Disc Priest, I usually keep my eye toward Sartharion and healing the tank on him.

(You can sort of see the various Penance bolts that fly out on the bottom right corner of the screen from time to time. That’s me.)

Dannamoth is proof that Mages have more to bring to raids then food, drinks, and intellect.

Any comments, improvements, ideas and suggestions will be forwarded to him.

Sartharion 3D Healing Assignments

sarth-dead

I realize that Matticus has done a nice job of keeping readers posted on Conquest’s progress through this fight, but I thought it might be nice for the community if I posted our specific, final draft healing assignments along with a narrative of how we got there. I know that when I was a new healing coordinator for Collateral Damage back in Tier 5 that I used to scour WoW blogs for their specific healing assignments on Vashj, Kael, and beyond. With that experience behind me, I don’t expect that readers will be able to use my precise assignments, but perhaps once I explain the process a bit, healing leaders will be able to identify techniques that will help their particular groups.

Before the First Attempt

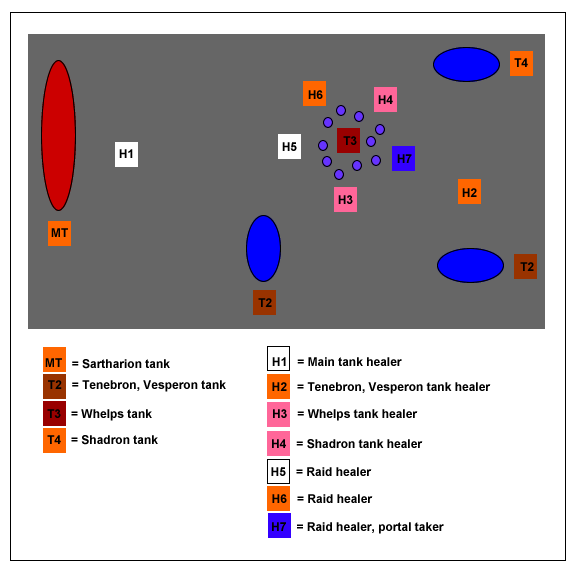
The Sunday night before our first attempt at Sarth 3D, Mallet and I, along with Kimboslicé, our raid leader, and Archdrood and Brio, our main tanks, Crazymexican, our puller, and a few various and sundry raid members, went into our cleared Obsidian Sanctum instance to block out positioning. More than anything else, this step may have led to our early success. In the calm of a cleared instance, we were able to identify marks for each person to stand on. Mallet, who would be solo-healing Archdrood, was able to learn exactly where the head and feet of the dragon would be ahead of time, in a calm environment. I paced out where our drake tank healers, whelp tank healers, and add tank healers would stand. We imagined where the firewalls would come and planned what direction different players would run to avoid them. We strategized how to position the drakes to best protect both tank and raid.

The positioning I’m sharing with you now is our “final draft,” but if you block out your own positioning in a cleared OS, our work might give you something to start with.
sarth-diagram

In my diagram, bubbles represent eeeevil nasssty dragonses, and squares represent players. You’ll notice that I’ve used class colors to show which specific players we used for different tasks. If you need a recap, orange is for druid, brown for warrior, fuchsia for death knight, pink for paladin, white for priest, dark blue for shaman. This class distribution is by no means obligatory and will vary based on the players available in your guild.

The diagram might just tell you everything to know, but in my typically verbose fashion, I’m going to give you some notes anyway.

Main Tank Healing

This is the most difficult job available in this fight, so make sure you assign someone who excels both at throughput and at situational awareness. One of the biggest parts of the learning curve in this fight has to do with this healer’s positioning. He or she has to learn how to avoid the firewalls without going out of range of the main tank. Every bit of this player’s healing goes on the main tank, and he or she has to be able to keep him up entirely alone. Based on the changes to Twilight Torment (the main tank can no longer remove it himself), your main tank healer is going to be the first in a line of “saves” on the MT. In order to survive one of Shadron’s breaths, a non-DK tank must have outside help. These breaths can occur in rapid succession, and you must set up a rotation of “saves” so that your tank can survive multiple rounds. On our druid tank, we used a rotation of 1)Pain Suppression 2)Guardian Spirit 3)Barkskin + Survival Instincts and 4) Hand of Sacrifice + Priest Bubble. On our successful attempt, four abilities were enough. I suggest assigning a player who can perform save #1, which can be any of these techniques, to main tank heal. In practice, this player will probably end up being either a discipline or holy priest.

Drake Tank Healing

We used a team of two healers to take care of the two tanks assigned to Tenebron, Shadron, and Vesperon. We staggered our tanking such that each tank only had one drake at a time. I am H2, and I healed Briolante for Tenebron and Vesperon, helping out on Shadron’s tank in the few moments where Briolante’s first target was down and second had not yet landed. Both H2 and H4, the drake tank healers, will have to move around quite a bit to stay with their targets. H4 in my scheme is a pally healer, and his target, the Shadron tank, will be helping out with whelps and elemental adds for much of the fight. It is important for H4 to keep a watch on this person, as he absolutely has to live to tank his drake. It’s also worth noting that H2 and H4 will be completely out of range of the main tank for most of the fight–any extra healing they can spare goes on the raid.

Whelp Tank Healing

I assigned my strongest paladin to heal the death knight whelp tank. Krinan, the paladin, turns on righteous fury and draws some of the whelps to her through healing aggro. Note: she is specced in a particular way to let her survive this. Perhaps she’ll tell you all about it in a guest post. Krinan and Lloth, our death knight tank, work together to gather up the whelps and the elemental adds while others AoE them down. Usually H3, the whelps/adds healer, will need some help. The whelps and elementals are the most annoying part of the fight, and they can just eat dps and healers for breakfast. Whenever I can, I HoT up Lloth or the AoE’ers. Raid healers, and even drake tank healers when possible, should try to stay close to the adds tank so that any strays can be peeled off.

Raid Healing

This fight can get a little crazy, so I assign three very strong players to raid healing. The challenge increases when raid healers, like our holy priest for example, have to position themselves such that they can take a spot in the save rotation on the main tank during Twilight Torment. I’ve put Kaldora (H5) on the side closest to the main tank to show how a raid healer in the save rotation has to edge toward Sarth at the appropriate moment. Note that raid healing gets completely, entirely insane when Twilight Torment is up on the raid. In order to dampen the effects, we call out for paladins to bubble and help soak some of the damage that way. In order for the raid healing to work in this fight, the dps/healers/add team need to stay close together.

Into the Portal

When Shadron goes down, we send players into the portal to take care of the Guardian. Epiks, our resto shaman, follows dps into the portal and works his healing magic. If you have players taking portals, DON’T forget to assign a healer to go with them. Believe me, the result is not good.

Last Words

This fight recalls Vashj, Kael, and Illidan in the amount of teamwork that it demands. As a healer, you simply cannot ignore assignments and snipe heals. You cannot save other people’s targets. Yes, a drake tank healer might assist the raid healers with a Wild Growth or two, but everyone will always keep a watch on his or her primary target. You are not a hero. You are a small piece of the puzzle. As a healer, you perform the tiny set of tasks assigned to you and nothing more. There may be moments where you feel less effective, but you need to stay in your spot and watch your assignments. You must watch around you–there is no excuse for a healer to be trapped by firewall or void zone. Even though healing is very difficult in this fight, if you set it up like I did, it is also very regimented. Each of the individual tasks is manageable. Just pace your tiny portion of the stage and do not worry about what others are doing. Let them make their own mistakes as you learn. And then, when all is said and done, the healing meter will not tell the whole story on this fight–in this case, the encounter is hard enough at the current available gear level so that if you win, every healer in the team deserves the gold medal.

Blank Sartharion Map: This is a few screenshots of the cleared island that Sartharion is on which Matt stitched together. Feel free to use this for planning. You can overlay Syd’s diagram on top of this and you can get a better idea.