Dear Blizzard: A Modest Healing UI Request

The default healing UI in WoW has come a long way since Vanilla. One of my favourite additions is the bar they have that shows the impact of your healing done. If you look up, you can see that little green strip that shows how much health is going to be restored with your heal.

Let’s look at Discipline shields for a moment. With Spirit Shell turning into the 1 minute ability turning your heals into absorbs, it becomes even more important to show how much your Flash Heal or Greater Heal is going to absorb for.

Here’s the problem.

no-absorb-indicator

You can clearly see that I have Power Word: Shield on myself. It’s going to wear off in a few seconds. Naturally, I have full health but have no way of knowing how strong my shield is without breaking open my combat log. Then I’d have to look at the absorb value and mentally calculate that as a percentage of my overall health which then causes my head to hurt.

Bro, I am healing. There is no time for me to do that. I just want to know how much firepower my shield can fend off.

Here’s the potential solution.

absorb-indicator

Same screenshot as above. The only difference is that I darkened the right side of my health bar slightly. I didn’t put a colour to it or anything. Originally, that image had a yellow stripe going down but then I realized Rogue health bars and class colours were yellow. A colour that’s bright and stands out would be ideal.

White? Nope, that’s for Priests.

Pink? Paladins.

What about an overlay or a shadow over top of the health frames instead? The right side of my Priest health frames is darker which would show how much my shields would take. The absorb bar would go from right to left. There’s addons right now where absorb amounts extend past the frame to the side. That’s a solution but I don’t consider that elegant.

The problem with that is in a raid setting, if you put out large absorb numbers, then the absorb bar would go past the frame and it might visually impede you from healing the person in the next group over in your UI.

Drop a big absorb on Jeanine in group 1 and watch as you can’t target Nathaniel in group 2 because that absorb bar is covering up part of their health frame.

I haven’t thought of what the UI would look like if my health wasn’t at full. That paladin that’s above me is at around 50% health. If I put a shield on them, should that green healing strip be used? Or a different color? Won’t be able to use a transparent or darkening solution because then it becomes black bar on a black background.

Lightening up the background might work though. A brighter background stripe could serve to highlight the absorb amount.

Whatever the case, I’m just hoping they consider looking at quality of life visuals for any kind of shields or mitigation.

Say Hi to No Stock UI!

nsui

During the summer of 2007, I started World of Matticus. In the summer of 2008, I opened the PlusHeal discussion community for healers to take part and actively contribute their ideas for other players to learn from.

It is now spring of 2009.

Enter No Stock UI.

This will be a magazine style blog with a few notable bloggers around the community:

You can find out more about us if you’re interested! You’re also certainly welcome to contribute! We’re all UI enthusiasts at heart.

What’s the big idea?

No doubt some of you are wondering what’s the point in a UI blog. But some of the most passionate and heated blog posts stem from bloggers who write about their UI and different addons. Often times these useful posts are scattered, buried and tossed aside never to be read again.

Here at No Stock UI, our goal is to deliver compelling and quality content centering around your gaming experience. Topics will range from:

  • Addons
  • Macros
  • User Interface
  • Design
  • Reviews
  • Comparisons

To start with, the blog will be updated every Tuesday and Thursday. Hopefully we can pick up the pace as time goes on. Eventually, I’d like to see it get to the point where readers can get a new post everyday. One step at a time, right?

Our posts

  • 4 Popular Heads Up Displays
  • Why Aesthetics are Important
  • 6 Nifty Addons You Might Not Know About
  • 30+ FuBar Plugins You Can’t Live Without
  • Where to Find Your New UI
  • Killer Combinations: AuctionLite + Skillet + LilSparksWorks
  • In Depth Analysis with Recount

Hope you’ll enjoy reading our posts as much as we loved writing them!

A Guide to Mouseover Macros

mouseover

One of my buddies from Conquest, the resto-shamantastic Catrii, asked me a question this week about setting up mouseover macros. I thought the explanation might benefit the community as a whole, especially as many of us are cleaning up our UIs in an attempt to be faster and more accurate once Ulduar hits. Here’s a short guide to my preferred UI-altering technique: the mouseover macro.

Mouseover what?

A mouseover macro is a series of commands that lets you press a single button (on either your keyboard or your mouse) to heal the target that your mouse pointer is currently hovering over. It replaces tab or click targeting as a quick way to pick up heal targets. With the standard, unmodified interface, healing is a 3-step process: 1) decide who to heal, 2) left click to target her, and 3) click the spell on your action bar or press the keystroke bound to it. This is a very slow process that requires you to move your hand not once but twice. Mouseover macros let you target a player and cast a spell in just one movement. As a note, I’m using druid spells as examples in this post, but mouseover macros will work for any healer. Just substitute in your spells of choice!

Examples

To make a basic mouseover macro, go in your character-specific macros window and click “New.” You’ll be prompted to choose a name and an icon for your macro. I usually assign a two-letter code for the spell. For example, I use LB for Lifebloom and RJ for Rejuvenation. But you can call it pizza, and believe me, it won’t matter. After a while, your fingers will learn the key binding and you won’t need to look. I prefer to choose highly individual (and funny) icons for mine, but you can also duplicate the original spell icon, as I will explain below.
macros-interface

Once you have your name and icon, go into the dialog box and type your commands one per line. Each command line starts with a / just like when you type commands manually. I don’t personally mess with cast sequences, and I actually think it’s best if healers make each macro cast only one spell.

Here are a couple of simple examples for what you might put into a mouseover macro. As you can see, the name “mouseover macro” comes from the first line, the one that lets you target by hovering over a player’s health/information bar in your unit frames or the Blizzard default UI.

/target mouseover
/cast Lifebloom

/target mouseover
/cast Rejuvenation

If you want the Blizzard standard spell icon to display instead of using a new one of your choice, write your macro as shown below and choose the red question mark as your icon. The #showtooltip command will update that question mark to the default icon for that spell.

#showtooltip
/target mouseover
/cast Lifebloom

As per reader Llanion’s suggestion, if you would like to cast a spell on mouseover without switching your target (keeping your target set to the MT or the boss), write your macro as below:

/cast [target=mouseover] Lifebloom

Fellow blogger Keeva contributed another version, which you’ll see below. And if you haven’t been to Keeva’s blog, go now! Well, as soon as you finish reading my post, that is.

#showtooltip
/cast [target=mouseover,help] Lifebloom; [help] Lifebloom; Lifebloom

As per Keeva’s explanation, this macro means:

“If I have a mouseover target, cast Lifebloom on them
If I don’t have a mouseover target but I have a normal target, cast Lifebloom on them
if I don’t have a mouseover target or normal target, cast Lifebloom on me.”

These examples represent the very simplest incarnations of the macro, no frills. You can add lines to your macro if you’d like to, say, use a trinket with your spell.

Here’s a macro you might use to link up your Swiftmend spell with the effect from the Living Ice Crystals. Doing this is called “slaving” a trinket to a spell.

/target mouseover
/cast Swiftmend
/use Living Ice Crystals
/script UIErrorsFrame:Clear()

Don’t forget to put in the line to clear the error message! Otherwise you’ll get annoyed by red text and alarm sounds if you hit the macro when the trinket isn’t off cooldown. There is some debate about whether to slave a trinket with an on-use effect to another spell, but personally I’m all for it. Your trinket has a greater impact overall if you use it any time it’s up.

Ok, I wrote my macro–now what?

Here’s the tricky part — keybinding the macros to a particular position on your action bars. I keybind my macros to a position on the standard action bars as I don’t use mods like Bongos or Bartender. Follow these steps to bind a keystroke to a particular location on an action bar using the Blizzard default UI.

1. Press the escape key
2. Click on Keybindings

key-bindings

3. Scroll through the long list until you see the name of whichever action bar you are planning to populate with your mouseover macros. I favor Right Action Bar, as you can see below.

4. In the Key 1 column, click one of the red boxes. Once you’ve selected it, just press the key you want to bind to that place. You’ll see the results displayed on your interface, illustrated below.

key1-column

5. Once you’ve selected your new key codes, hit Okay. If you don’t, kiss your changes goodbye! Go ahead and laugh, but I’ve made this mistake many times.

hit-okay

6. Next, hit /macro to bring up your macros interface. Click and drag the icon for the desired macro onto your action bar. Match it to the space now labeled with the keystroke you want to assign to the spell.

drag-icon

Special Cases

Action bar mods like Bongos or Bartender generally have different names for action bars and you have to configure the keybindings from within their configuration menu. Chances are if you’re savvy enough to set them up in the first place, you’ll know how to configure the keybindings.

A gaming mouse also takes an extra level of configuration, and you’ll need to consult your mouse manual to figure out how to bind the extra mouse buttons to keystrokes. The software always comes standard with the mouse. On my Razer Death Adder mouse, I assign the special buttons to F9, F10 and F11. They now function just like keys.

Charting your key bindings

The point of this exercise is to set yourself up for comfort and speed. Here’s what I do. In addition to the mouse buttons, I always bind some keys I can easily reach on my left hand: 1,2,3,4, F, G, R, C, V. Sometimes I overwrite a function I actually use, like the command to toggle the character panel, and I make sure to bind it somewhere else on my keyboard. If you really never turn with the keyboard, A and D are available real estate as well. I recommend that you never, ever, ever bind Q or E: you will need to strafe some time or other. If you want to use Q or E, make sure you have strafe available somewhere else. The same applies to the space bar–don’t be caught on the ledge without a way to jump! I have smallish hands and a short reach, so 1,2,3, and T are a little far out for comfort. Somehow I can reach 4 really well…it’s a mystery. I have offensive spells on 1-3 and push-to-talk on T. I keep my mount on V on all characters for those quick getaways. Below is a chart of where I put the mouseover macros for my major heals.

Click wheel: Lifebloom
Additional mouse button 1 (thumb): Rejuvenation
Additional mouse button 2 (thumb): Swiftmend
F: Nature’s Swiftness/Healing Touch
G: Wild Growth
R: Regrowth
C: Nourish
4: Innervate

My key bindings are based on personal preference, and yours should be too. I have an approximately equal number of casts on the left hand and the right hand, and that helps reduce repetitive stress injuries. I made sure that I could easily reach my “best” spells and that they fit comfortably in my hand.

You can use your macros to modify your behavior and correct bad habits. Rejuvenation is the very easiest spell for me to reach–do you think I would have put Healing Touch there? I also use the letters to remind me if possible. I tried Wild Growth on F, but I kept wanting to hit G for Growth, so I just went with it. Muscle memory ensures that you will grow accustomed to your keybindings–wherever they are–with practice. The only trouble I ever have involves the click wheel. My best click wheel advice is to either stay away from binding the scroll up/scroll down function or to bind them to the same thing. If you can differentiate those two movements well, more power to you! As for me, I only bind the button press function. Even so, it can be awkward to Lifebloom while mouse turning, but I’ve gotten used to it (and I don’t spam LB as much as I did back in BC. In Hyjal, I had the click wheel AND F bound to Lifebloom). If you want a clean-looking interface, you can set up all your macros on one action bar (for example, RightActionBar) and then un-display it once you know the keybindings and clicks by heart. Your macros will work whether or not an icon actually displays on your screen.

What unit frames do I use mouseover macros with?

Mouseover macros pair really well with most unit frames. I’ve used them with both Grid and X-Perl. Pitbull works just as well from what I hear, but I’ve never tried it.

Are there mods that can set up mouseover macros for me?

Healbot supports them to the point that they’re pretty much built-in, and Clique is essentially a mouseover mod. I prefer my homegrown solution because it’s extremely customizable, and now that macros sync between computers, keeping them in shape is a cinch.

But what if you like the mouseover idea and want less set up? Try Healbot or unit frames + Clique. The one drawback to Clique is that it encourages you to do double key combos, as in Shift+right click for Rejuvenation. Any time you have to press two keys to hit a heal, you lose precious time. I know this quite well–I used to use Shift+F for Rejuvenation, with the result that I almost never cast it. Lifebloom (F) was a lot faster. Since then, I’ve gotten a 5-button mouse and I have all my heals bound to a single key or click.

Common Macro Mischief

Here’s a list of the mistakes I’ve seen some players make. Try to avoid them as you learn to play with mouseover macros!

1. Binding the left and right click of the mouse to a spell. Don’t do it. You still need to be able to target, inspect, invite, etc. Some unit frames (I think Healbot) let you use left and right click to heal when you’re hovering on the frames and return those clicks to their normal functions when you’re not mousing over health bars, but I wouldn’t try it without the mod. That’s a macro that’s too complicated for my taste.
2. Letting your macros do too much for you. As I’ve said, I don’t like cast sequence macros for healing. Healing will always be at least partly reactive, and you need to be fully in control of spell choice at all moments.
3. Combining two abilities that invoke the GCD in a single macro. You’ll have to hit it twice. I believe this is the case with castsequence macros as well–you have to click for every cast in the sequence.
4. Misunderstanding trinket cooldowns. If you slave two trinkets to a spell, it’s very likely that only one of them will go off at a time. They might share a cooldown, or there might be a hidden cooldown of 45s or so preventing you from blowing both at once.
5. Changing targets without meaning to. Make sure you’re in control of where your pointer is at all times. Mouseover macros work not only on unit frames but on the avatars themselves. You can use mouseover macros for what Matticus calls “heads-up healing,” but beware that you could also switch targets unintentionally. This is why mouseovers are dangerous for dps–they were more so in the age of crowd control.

Disclaimer

I’m no expert on mods or UIs. I try to play with the standard interface when I can because I like as little clutter as possible, and macros are part of that. If you want to learn more about UI building, I’ll refer you to Keeva’s Healbot v. Grid series. I’ve learned so much from her. There’s also a topic going at PlusHeal forums with more macros for other classes, including some that are more complex than the ones I’ve talked about here. Some of that information is outdated, so be sure you read the parts of the discussion pertinent to WoTLK. I’m also interested in hearing what the community has to add to my thoughts on mouseovers. If you have an idea or clarification, please post it in the comments and I’ll try to keep this little guide updated and corrected.

Introducing the LilUI Compilation

One of the most frequently commented upon UIs belonged to Lilitharien. After much prodding, persuasion and begging over Twitter, she graciously agreed to do a write up and explanation of her UI as a guest post due to the overwhelming amount of interest.

Last Tuesday Matticus posted 33 screenshots of Healing UIs he’s collected via the PlusHeal forums. Since then he’s gotten lot of messages about the featured UIs, including (but not limited to, I’m sure) questions about my own, and I’ve even gotten messages on the PlusHeal forums about it. And there was some speculation in the comments, too, about whether or not I am using SpartanUI (For the record, I am not!). Thus, I jokingly suggested to Matt that I could write an article about my UI… and he said go for it. So, here I am!

For the link to this entire addon compilation, click here.

I’m Lilitharien, I play on the Thorium Brotherhood server in the guild and I’m a Discipline Priest.

Layout

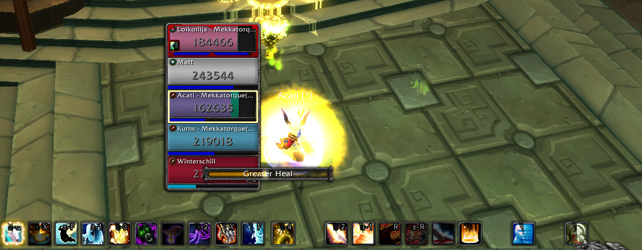
This is my UI, taken during a Kel’Thuzad fight last Thursday (click to enlarge):

raid25_KT

And here’s a breakdown I whipped up in Photoshop (click to enlarge):

ui-explained

Frames

Unitframes For my basic unitframes (myself, target, target’s target, focus target, pet, and pet’s target) I use Pitbull4. It’s configured to show debuffs in the center-most side of the frame and buffs on the outter-most side. I show a maximum of 4 debuffs and 8 buffs on these frames to save clutter, and I have it filtered to prioritize buffs/debuffs that are caused by me or that I can dispel. Health bars for players are colored by class, otherwise they’re colored by hostility: Red for hostile, yellow for neutral, green for friendly.

For my raid or party frames, I use Grid. Grid is a little complicated to set up, but absolutely amazing once you’ve got it tailored to your needs. I have a few addons I use along with Grid, and I indicate those in parenthesis next to their function. You can certainly find more to suit your specific class/spec.

My set-up is as follows:

Entire frame changes size depending on size of party or raid (GridAutoFrameSize), and grows up from the bottom. Health frames are colored by class.

  • First text line shows first 4 letters of player’s name.
  • Second text line (GridIndicatorText3) shows health deficit and also Readycheck status.
  • Third text line shows Feign Death, Death, or AFK status (GridStatusAFK}.
  • Mana, energy, rage or runic power bars (GridManaBars) are aligned to the bottom of the frame.
  • Border around frame is colored white to show my target, red to show Aggro, green to show Disease debuff, or purple to show Magical debuff. Bottom left indicator is red and shows Aggro.
  • Bottom right indicator is golden yellow and shows Prayer of Mending.
  • Top left indicator is white and shows Power Word: Shield.
  • Top right indicator is green and shows Renew.
  • Middle icon shows Weakened Soul debuff and remaining time on it (GridCooldownText).
  • Left side indicator (GridSideIndicators) is colored 3 different shades of blue to show Grace stack (GridStatusGrace).

There’s a dark blue, medium blue, and light blue.

Buffs/Debuffs

For my buff/debuff display, I use ElkBuffBars. Buffs display above debuffs, and everything grows down from the top. Debuffs are colored red to make them easier to see.

Castbar

For my castbar I use Quartz. I’ve customized my bar to be hot pink (only because I like the color but, really, you can choose any color you like!) and to show total cast time, remaining cast time, latency/lag in red, name of spell and who I’m casting it on. It looks something like this:

[Name of Spell –> Target time-remaining/total-cast-time]

I have it set this way because I use Clique to click-cast raid targets, and this allows me to see where my heal is going (if it’s different from my current target) and when exactly I can click or use a hotkey to start casting my next spell. Being able to see the latency/lag in your cast time is very, very important as a healer!

Bars

Actionbars For my action bars I use a combination of Dominos and ButtonFacade. I’ve paired all my healing spells on one side of my screen (the left, between my chat box and minimap) and all my offensive/misc spells on the other side. I have all my buffs in a bar that’s hidden, and my mana potion, healthstone, and out-of-combat food has it’s own vertical bar on the right-most side of my screen. Every single one of my spells (along with my mana potions and healthstones!) are hotkeyed to something on the keyboard. In addition, some spells are assigned to mouse clicks via Clique, which I have configured to only work on my Grid frame. My minibar is situated underneath my minimap. I also have OmniCC installed to show the remaining cooldown time on my spells and DrDamage to show the average amount of healing or damage on each spell so I can make split-second choices at a glance without having to do the math myself. The current ButtonFacade skin I’m using is Apathy, but I’ve used Serenity in the past.

Minimap

My minimap is placed in the bottom-center of my screen and is configured via Chinchilla. I have it set to not show anything but the north indicator, calendar, and search bubble at all times. When I have mail, the mail button appears above my calendar button. When I PVP, the battleground button appears on the left-bottom side of the map. Current coordinates appear on the bottom of the map, above the minibar. To keep my minimap free from the clutter of all those little buttons from addons, I use MBB, or “Minimap Button Bag.” This appears as the little purplish button on the top-right of my minimap. When I click on it, it expands all my minimap buttons above it in a row.

Chatbox

My chatbox is situated on the bottom left of my screen, and the only addon I use for it is Prat 3. This colors all players names by class (you’re probably noticing that I love having things colored by class), adds a time stamp to everything and allows me to shorten my channel names. I also hide the chatbox buttons and enabled mouse scrolling. There’s a ton more you can do with it, but this is all I need. For whispers I use WIM, or “WoW Instant Messenger.” This pops up all my whispers in separate IM-like windows, which helps me keep track of all my conversations. While I’m in combat, however, whispers won’t pop up. They’ll just appear in the chatbox as they normally would.

Rings

Some people put things like their tradeskills, mounts, and buff food on their action bars. I used to do this, too, but I find this take up sooooo much excess space. Instead I use an addon called OPie. OPie allows me to create “rings” of buttons that I can call up with keybindings (or mouse clicks!). I have my buff food in one ring, my mounts and hearthstone in another, and tradeskills in yet another. OPie also includes a ring for quest items, so I don’t have to go digging in my bags everytime I need to use one while doing dailies. (There’s also a ring for assigning raid targets, but as a healer I don’t use this one so much.) The ButtonFacade skin I use for this addon is DSMFade.

Tooltips

I use TipTac to reskin my tooltips and move the tooltip anchor. I have it set to show names and healthbars colored by class. (More coloring by class! I know! I like consistency.) For extra information, I rely on Informant and EnhTooltip (part of Auctioneer Advanced). They add item numbers, how much the item costs or sells for, how many in a stack, how many vendors sell it, etc. I also use Bagnon_Tooltips (part of Bagnon) which tells me which of my alts have the item, how much they have, and where it’s stored. Combat: Threat Meter A staple for any raider, my threat meter of choice is Omen. I have it placed on the bottom-right of my screen between my offensive/misc spells and my potion/healthstone/food bar. It shows the the name of the target it’s calculating threat for; the top 5 people, their threat number and percentage; and myself, so I can see exactly where I stand.

Scrolling Combat Text

I used to raid without one, but I hated going to back into my combat log to check things. I’d rather have the information on-hand, when it happens. Thus, I use MikScrollingBattleText. I have this split into 3 different parts. The center “box” displays buffs, debuffs, procs, and things like mana returns during combat; They appear in the center and scroll upward before disappearing. The left-side displays things that are happen to me, whether it’d be damage, healing, or otherwise, and who it is being done to me by. The right-side displays what I am doing; It shows heals, overheal, and damage alongside with the name of the target it’s being done to. Both the left and right sides scroll down and outward on a curve before disappearing. I really like this combat text mod, too, over the default one because it uses icons to indicate which spells are doing what. So, for instance, when I get mana returns from Rapture, I see the icon for my Rapture talent.

Boss/Fight Information

For boss timers and information, I use Deadly Boss Mods. For player statistics, I use Recount. I don’t believe further explanation is needed for either. Dispelling I use Decursive to inform me of any magical or disease debuffs that I can dispel. However, I don’t use the addon’s miniframes. Instead, I assigned my abolish disease and dispel magic spells to shift+right click and shift+left click, respecitively, using Clique. Thus, Decursive tells me who needs what removed, and I use my mouse keybinds on Grid to cast.

Loot/Gear

I use a few addons to help me with loot: EquipCompare, RatingBuster, and AtlasLoot. EquipCompare shows my currently equipped item next to whatever I’m hovering over, and RatingBuster does all the math for me; It calculates and displays health, mana, mana regen, spellpower, crit, haste, and hit gains or losses compared to what I have currently equipped. AtlasLoot allows me to check out which loot drops from which boss in-game. I also have InspectEquip, which adds the boss/instance an item comes from to the tool tip as well as displaying a list of where someone’s items have come from when I inspect them.

Making It Pretty

Textures/Art

I use a rather old addon called DiscordArt to position my graphical textures. The textures, as some people have noted, make it look like I’m using SpartanUI. In fact, I am not using SpartanUI at all! I found that UI buggy at best and crashing my game at worst. But, I still really liked the art used for the bottom of the screen. So, I downloaded SpartanUI and extracted the art from it. Then, I placed the art in-game using DiscordArt. It was really rather simple.

Information Panel

I use TitanPanel to display at-a-glance information at the top of my screen. This includes my location/coordinates, money, bag space, current loot type, fps/latency/memory usage, whispers, durability, current signed-in guild members (TitanGuild), mail (TitanMail), volume, and time.

Lining Things Up

I use an addon called Align that creates a grid on my screen so I can line all my UI elements up. Obsessive compulsive? Maybe. I’m a graphic designer instead of a healer outside of Azeroth, so I can assure that everything is purposefully and aesthetically placed.

Typography

I use ClearFont2 to change the overall fonts in my UI, and I also make sure the text selections in my addons use the same font. I have everything set to use Calibri 0.9.

Miscellaneous Addons

  • AkisRecipeList: Adds a frame to my tradeskill window that tells me what patterns I have left to learn and where I can locate them.
  • AdvancedTradeSkillWindow: Expands my tradeskill window and adds a queue and materials shopping list.
  • Bagnon: Simplifies my bag and bank into one frame. Also allows me to view the items in my bank when I’m no where near one. As I mentioned before, it also tells me which of my alts has an item, how many they have, and where it’s stored.
  • Carbonite Quest: Quest tracking, information, and map. I mostly have the map not showing and the quest tracker minimized unless I’m doing quests or dailies.
  • Cartographer: World map mod; Allows me to see areas I haven’t explored, among other things.
  • CloseUp: Allows me to zoom in on things in the Dressing Room, Inspect, and Character/Pet windows.
  • FarmIt: Let’s me see how much of an item I have total in my bags at a glance, so I don’t have to go digging or do any math. I have this hidden or disabled unless I’m farming something, obviously.
  • FriendsFacts: Adds race, sex, level, class, and guild name of my friends to my friends list.
  • FriendShare: Global friends list that syncs between characters.
  • Gatherer: Keeps track of locations of nodes, herbs, and chests.
  • GatherSage2: Adds skill-level and other information to gathering item tooltips.
  • InFlight: Flight timers.
  • MagicRunes: Since Pitbull doesn’t include Runes on their unitframes, this is what I use for my Death Knight. They display right above my minimap.
  • QuestGuru: Expands my Quest Log window. Also includes a tracker, but I don’t use it since I have Carbonite Quest.
  • RecipeKnown: Colors a recipe green if I have learned it already, even on an alt. Prevents me from buying duplicates and wasting money/tokens.
  • Reputation: Automatically switches which reputation I’m watching based on the last reputation gained.
  • SendSelf: Adds my alts to the send-to autocomplete feature at the mailbox without having them on my friends list.

Other Screenshots

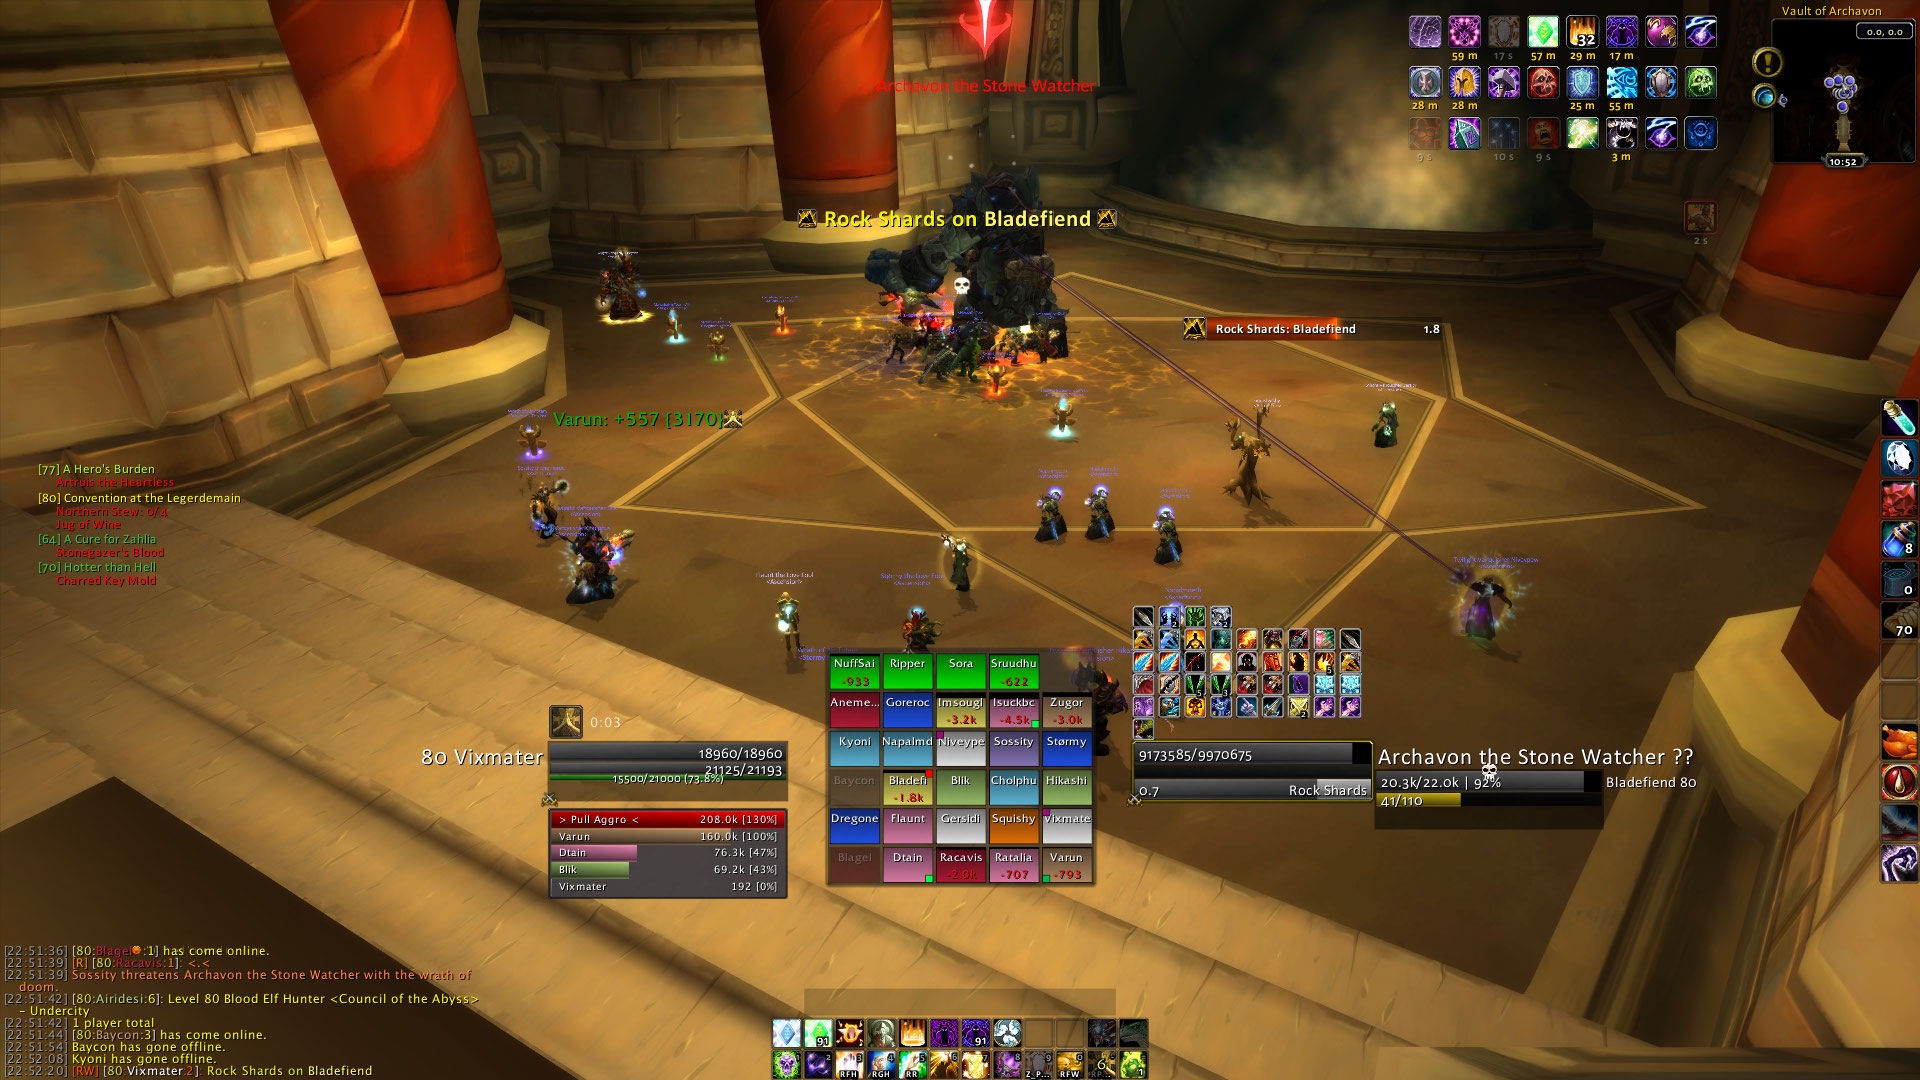
Solo questing (Click to enlarge):

solo_casting

Solo questing with OPie Quest Ring (Click to enlarge):

solo_opie

Download

Now that I’ve explained to you the exhaustive list of addons I use, you may or may not like my set-up. If you do, and it seems enough people do considering the feedback I’ve gotten, I’ve decided to package everything for your convenience. I call it Lil UI

Download LilUI now!

33 Raid Healing UIs

As healers, we are all unified by our singular dedication to our craft: Restoring life. But this is where our similarities end. Some of us like to click. Others rely on keys. Players prefer being overloaded with information. Minimalists prefer more “white space”.

From Plusheal, I’ve gathered a collection of diverse raiding UIs that healers had to offer. For those of you looking to simplify or expand your healing UI somewhat, maybe this will help spark some inspiration.

Grid healers

Evissadia – Holy Priest

evissadia

Gerunna – Resto Shaman

Gerunna

Kallisti – Holy Paladin

kallisti

Crutches – Holy Paladin

crutches

Evilhalo – Holy Priest

Evilhalo

Tulani – Holy Priest

tulani

Ayslin – Holy Priest

Ayslin

Healson – Holy Priest

healson 

Lightpelt – Resto Druid

lightpelt

Kuraj – Discipline Priest

kuraj

Myna – Resto Druid

myna

Lilitharien – Discipline Priest

Lilitharien

Minischoles – Resto Druid

Minischoles

Reviamjolly – Discipline Priest

Reviamjolly

Tequiladin – Resto Druid

tequilakin

Englar – Holy Priest

Englar

Other UI healers

Sacrales – Holy Paladin

sacrales

Avonar – Holy Priest

Avonar

Dallarus – Resto Druid

dallarus

Nattydread – Holy Priest

nattydread

Rainomi – Holy Paladin

rainomi

Revaan – Holy Paladin

revaan

Rostam – Holy Priest

rostam 

Shadowjoker – Holy Priest

shadowjoker

Sinea – Priest

Sinea


Arilyn – Holy Priest (How many raid frames do you NEED?!)

Arilyn

Asadachi – Holy Paladin

asadachi

Beneficience – Holy Priest

Beneficence

Brique – Holy Paladin

Brique

Cathe – Holy Paladin

Cathe 

Daedhir – Discipline Priest

Daedhir