Wyn’s UI – Part Four (The Macro Problem)

Part four of a series. Part One , Part Two , Part Three.

Hot Keys

One of the add-ons that has the biggest impact on my UI and gameplay is Bartender. As I’ve mentioned before, I navigate and target with my mouse. If I need to move and target or cast at the same time, I use auto run – it’s on my 4th mouse button. Nearly all of my spells and abilities are Hot Keyed to my Keyboard. Here’s how that looks:

This is what my keybinds look like when I’m out running around solo. Most of the icons should look pretty familiar, and you can see that my offensive spells are on the top line. That blank spot is for my Disc buffs when I respec for the weekend. I do not hotkey my consumables, to avoid hitting them when I type. The bottom row is non-sensical, but it’s also not bound… it’s where I throw things when I need them once, then I don’t move them out ’til I need to put something else there. When we get into macros, you’ll see that the single-buff of Fort is redundant… my first row of buttons scrolls away when I have someone Mind Controlled, and I sometimes like to play nice with the allies and toss them a buff. Again, the numbers on the bottom of the icons are from Dr. Damage. One thing about Bartender is that you can use your standard keybinds from the stock bars, but if you want the numerals to show up on the icons you have to use the slots specifically labeled in the menu for Bartender. It’s in the same window, just scroll down.

Dr. Damage also gives you super-nifty Tool Tips on mouseover. Like this:

 Dr Damage ToolTip - Smite  Dr Damage ToolTip - Heal

I think I may have mentioned that I’m an information junkie… this just feeds the problem.


offensive with alt

This is still my offensive set-up, but I’m holding down the Alt button. See how the icons change? That’s a product of using macros with the “?” icon. I’ll get to that in a second. Notice, too, that the healing coefficients change on ProH and Nova’s icons.

When I’m raiding, a quick Shift+Scroll Up gives me this:

Greater Heals normal

Holding Alt will make the same changes that happened to the offensive set-up.

My Super-Secret Macros

I may be crazy for deciding to discuss macros. They can be very simple or complicated, and I use a mixture of both. This is not intended to be a macro tutorial. These are simply a few I’ve cooked up, cobbled together, or flat-out stolen. I wanted to show you what those extra buttons on my bars do, and this seemed to be the best way. PLEASE feel free to ask questions about the ones I list, but understand that I probably won’t be able to help you troubleshoot one that you’ve written. If you DO want a how-to, the best one I’ve ever read is over at Priestly Endeavors. A few notes before we begin:

  • I’m Horde. If it’s a macro that sends a whisper, and you’re an Ally, your buddies won’t speak Orcish, so change that to Common.
  • Nearly all of these use the #showtooltip command. That makes the tooltip show up on mouseover, even though it’s a macro.
  • When I’m setting these up, I almost always pick the “?” icon that shows up first. That way, if it’s a button that does more than one thing, the icon on my bars will change when I press the modifier.
  • LINES are very important to a macro. If you keep typing without hitting [enter] it will read all as one line. New commands MUST be started on a new line, so make sure they match up to the line-breaks here if you copy/paste.


Since none of my offensive spells involve macros, I’m going to assume you’re looking at the raiding picture with all the G-heals. I’ll go from left to right.

Gheal macroStopcasting saves lives. Even after 2.3, being able to stop a heal on one target, change targets, and instantly start casting your new heal is an excellent skill if someone is spiking. Also, you can keep hitting this when targeting the MT, and just let it land when they actually need a heal. That way, you can drop out of the 5-Second-rule, without abandoning your job. (yes, you could jump or step forward, but jumping wastes time, and so does hitting multiple buttons.)

#showtooltip Greater Heal(Rank 7)
/stopcasting
/cast Greater Heal(Rank 7)


 FW Macro Now that all priests have Fear Ward, it’s nice to be able to let your tank know you’ve got their back. This one casts FW on your target, and whispers them.

#showtooltip
/cast fear ward
/script SendChatMessage(“Fear Ward on YOU”, “WHISPER”, “Orcish”, UnitName(“target”));


Prayer Macro AltThese three all do pretty much the same thing, and I just wrote it as another space-saver. Hit the macro, and it’ll cast Prayer of (whatever) on your target and their party. Hold Shift, hit the  macro, and it’ll cast a single-buff on your target. Hold Alt, hit the macro, and it’ll cast a single buff on you. Neat, huh? (You can tell it’s not a raid night because of how few candles I have on me….)

For Shadow Protection:
#showtooltip
/cast [modifier:shift] Shadow Protection(Rank 4); [modifier:alt, target=player] Shadow Protection(Rank 4); Prayer of Shadow Protection(Rank 2)

For Fortitude:
#showtooltip
/cast [modifier:shift] Power Word: Fortitude(Rank 7); [modifier:alt, target=player] Power Word: Fortitude(Rank 7); Prayer of Fortitude(Rank 3)

Divine Spirit:
#showtooltip
/cast [modifier:shift] Divine Spirit(Rank 5); [modifier:alt, target=player] Divine Spirit(Rank 5); Prayer of Spirit(Rank 2)

Flash Heal Macro Normal Because my UI set up has either my offensive spells or my Greater Heals visible, but not both, I wanted the option to toss a G.Heal on myself when I’m solo without too much effort. So I made this. Generally, it’s the same as my stopcasting macro for Greater Heal, only for Flash. The difference comes in that if I hold Alt, it’ll interrupt whatever and start a max-ranked G.Heal on me, without changing my target. Handy, right?

#showtooltip
/stopcasting
/cast [modifier:alt, target=player] Greater heal(rank 7); Flash Heal(Rank 9)


I would feed my Shadow Fiend cookies if I could. I love the little guy. But sometimes, he gets lazy. This macro will keep him attacking non-cc’d mobs if his current target dies, and toss a scroll on him (if I have one) to boost his mana-return. Just spam it for a second.

#showtooltip
/cast Shadowfiend
/petaggressive
/petattack
/use [target=pet] Scroll of Strength
/use [target=pet] Scroll of Agility


Most of us have been in a situation with lots of people rezzing at the same time. Just save time, and have your macro type in your healing channel who your target is. Mine also whispers the person that’s getting a rez.

#showtooltip
/cast Resurrection(Rank 6)
/6 Saving %t the run back, but not the repair bill
/script SendChatMessage(“Rezzing you”, “WHISPER”, “Orcish”,UnitName(“target”))

Focus Macro This is really simple. It just sets my focus to whatever I’ve got targeted. No muss, no fuss.

/focus

There are some really nifty things you can do with focus macros, like this one I stole from Priestly Endeavors

/focus [noexists,target=target][exists,dead,target=target][modifier:alt,target=target]
/stopmacro [modifier:alt]
/cast [target=focus] Shackle Undead

The first line says: [make my current target the focus if I don’t have one] or [make my target my focus if my current focus is dead] but [if I’m holding Alt, make my target my focus no matter what].
The second line says:[if I’m holding Alt to re-set my focus, ignore the rest of the macro]
The third line says: [whatever I’m targeting, cast shackle undead on my focus]

Down-ranking macros are fun! Here’s one for Prayer of Healing. Hold Alt to cast rank 3.

#showtooltip
/cast [modifier:alt] Prayer of Healing(Rank 3); Prayer of Healing(Rank 6)

P4 Random Not a macro, but sometimes in a quest or a fight there’s a random item you need to use regularly. I drag mine over to “J” and just hit it whenever I need it. This is from when I had the daily quest in Nagrand.

Nova NormalNova Alt I always heard it was good to keep Rank 1 Nova on your bars for PvP purposes, but where to put it? On the same button, naturally. Hold Alt to use Rank 1, hold nothing for max-rank.

#showtooltip
/cast [modifier:alt] Holy Nova(Rank 1); Holy Nova(Rank 7)

Lifetap We all know Warlocks Life Tap at the WORST time… this was my solution to train my ‘Locks to know when it was okay. For this one, I didn’t use the “?” icon, since that would just look like a normal Renew. Dr. Damage still catches the heal, though. (True story: one of my Warlocks actually macro’d his LifeTap to whisper me that he was going to do it in response to this macro. I was so proud!)

/script SendChatMessage(“Lifetap if you need to”, “WHISPER”, “Orcish”, UnitName(“target”));
/cast Renew

OhShit Sometimes, you have to keep yourself alive ’til your fellow heal-bots can help you out. EVERYONE must have an “Oh, Shit” button. This one can keep me up through over 20k damage. The [combat] modifiers keep reagents from being used up accidentally.

/target player
/cast [combat] Power Word: Shield
/use Master Healthstone
/cast Prayer of Mending
/use Fel blossom
/use [combat] Super Rejuvenation Potion
/use [combat] Nightmare Seed
/use Battlemaster’s Perseverance
/use Vial of the Sunwell
/cast Renew

Trink 1 Trink These are both really simple, but helpful. No matter what trinkets you have equipped, each of these macros will use one of them. Use the “?” icon, and you can see which trinkets you have equipped at the moment.

#showtooltip
/use 13

#showtooltip
/use 14

P4 Berserking If my heals have to come faster, they may as well come bigger. This trips Berserking, my OP-as-hell Racial, and my +healing trinket at the same time. (Does not trip GCD)
You can macro all kinds of things together – multiple trinkets, other abilities. Go nuts!

#showtooltip
/cast Berserking(Racial)
/use Tome of Diabolic Remedy


I wrote this last one just to save space on my bars. It gets out my Puppy and my Nether Drake. If I hold Alt, it gets out my Puppy and my Raptor.

#showtooltip
/use Worg Carrier
/cast [modifier:alt] Swift Blue Raptor
/use Reins of the Azure Netherwing Drake

Add
/equip Riding Crop
as the last line, if you want, but remember to replace your trinkets when you get where you’re going!

To Be Continued. . .

Wyn’s UI – Part Three (Boss in Action)

Part three of a series. Please read Part One & Part Two.

Okay, finally a real action shot like I’ve been promising. Welcome to Mother Shahraz. There’s a LOT going on in this fight, but you do get to stand still for most of it (unless you get Fatal Attraction, but that’s another post altogether.) I picked this shot because it catches a few things – good mana-regen cycle, a solid fight with only one real phase, and me making a pretty big mistake.

Typical Bossfight:

Click to enlarge....as soon as Matt uploads the larger version!


BF Focus

1. I set the boss as my focus on this one, so I can more easily watch for what aura she has and which tank she’s targeting. Different fights call for different focii; just set it to whomever you need to babysit. If you’ll look at the bottom row of myBartender you can see an icon that’s an eye with something pointing at it.
I’ve macro’d that button to set my focus just to make it a little faster and easier. I’ll post about the macros I use at the end of this series.


2.HoT Candy keeps track of everyone I’ve Renewed. Right now, it’s just the MT, but that’s because my mana’s about shot. (No worries, my pot CD finished as I took the SS.) Resto-Druids especially take note: HoT Candy is your friend.

RegenFu Bar
3. This is part of RegenFu. I’m just about out of the Five Second Rule, and will hit some serious mana-regen goodness. Fully buffed, my non-casting regen is over 900, but in full shadow resist, it takes a big hit. So I’ll burn Inner Focus before my next big heal, to maximize the mana I get back without stopping casting. I also wait until I’m out of the FSR to burn my Earring of Soulful Meditation. (If you don’t have it, find a way to get it. The Bangle of Endless Blessingsfrom Botanica is a substitute, but only about half as good.) I rarely make it the full 15 seconds without casting something, but at least I get the full benefit at the beginning.

4. Here’s where this shot catches me not paying close attention. Look here on my ElkBuffBar – Clearcasting is just expiring, but you can see at the top of my screen that I didn’t have enough mana to cast the Circle of Healing I was trying to cast. On Grid, you can see that group 3 was taking pretty even damage – I was spam CoH-ing them to patch them up. I should’ve thrown a G.heal on Joe in the middle, there. I’d’ve been finished with the cast by the time I had enough mana to CoH again, and been able to burn Inner Focus more appropriately, or let one of my Shammies top off the rest of the Warlocks while I regenned a little more.

5. On Bartender, you can see which of my cooldowns are available. Mana management is absolutely critical for these kinds of fights. My Pot CD finished as the SS was taking, Fiend is down, Inner Focus is available, and my Earring is down.
Pot CD
Fiend CDEarring CD

As healers, our mana-rotation is as critical as a DPSers spell rotation. Learning to be efficient is one of the best things you can do to become a better healer. For me it looks something like this:

  • Start: 12.5k manaI can haz cookie?
  • First Pot – 9k mana
  • Pop Earring – 9k mana again
  • Inner Focus – When expensive heal is needed
  • Shadowfiend – 6k mana
  • Second Pot – 7k mana
  • Earring again – ASAP

    And so on.

Mana is a lot like gasoline in your car – it’s just as easy to keep the top 1/4 of the tank full as it is the bottom 1/4. And the earlier you pop those cooldowns, the sooner they’ll be available for you to use again. Once you’ve used them all, just rotate through as soon as they’re available. I tend to Inner Focus for Prayer of Healing, but will use it for G.heal or Binding heal, if necessary. A tip for Mother – don’t wait to Fiend. Your mana will drop faster than you’ll believe, and when that CD comes up again, you’ll be very thankful. Also, watch for the auras that increase or reduce shadow damage. You don’t have to wait for the increase-aura to Fiend, although it will help you, but you will want to avoid the one that will nerf your little guy.

BF Quartz Bar
6. Okay, I’m going to highlight that mistake a bit more here. Since I didn’t use my Clearcast to throw a heal on poor Joe, I pasted this copy of my casting bar in from another screenshot so you could at least see where it goes and how it works. You can see from my toon’s posture that I’m not actually casting anything. Quartz tells me what I’m casting, what rank, shows a timer, and who I had targeted when the cast began. I change targets almost constantly, so that’s a very handy feature.

BF Grid All7. This is one of the best shots to show how Grid works; most of the raid is at full health, and it’s obvious who needs heals. If you look at the top-right square, you can see Acalon – our MT for this fight. The Red dot in the upper left of his box means he has aggro. There will be any number of those little dots when there are multiple mobs targeting people. That dot, rather than damage taken, is my cue to take action in most cases. A working knowledge of the mobs involved helps me know if I should start casting a heal, or just shield/renew the people with aggro. The groups are a little jacked right now – my raid leader moves Shammies into the melee group in a rotation for Bloodlust (Heroism) purposes. You can also clearly see who is dead, and who is out of my range.

BF DBM
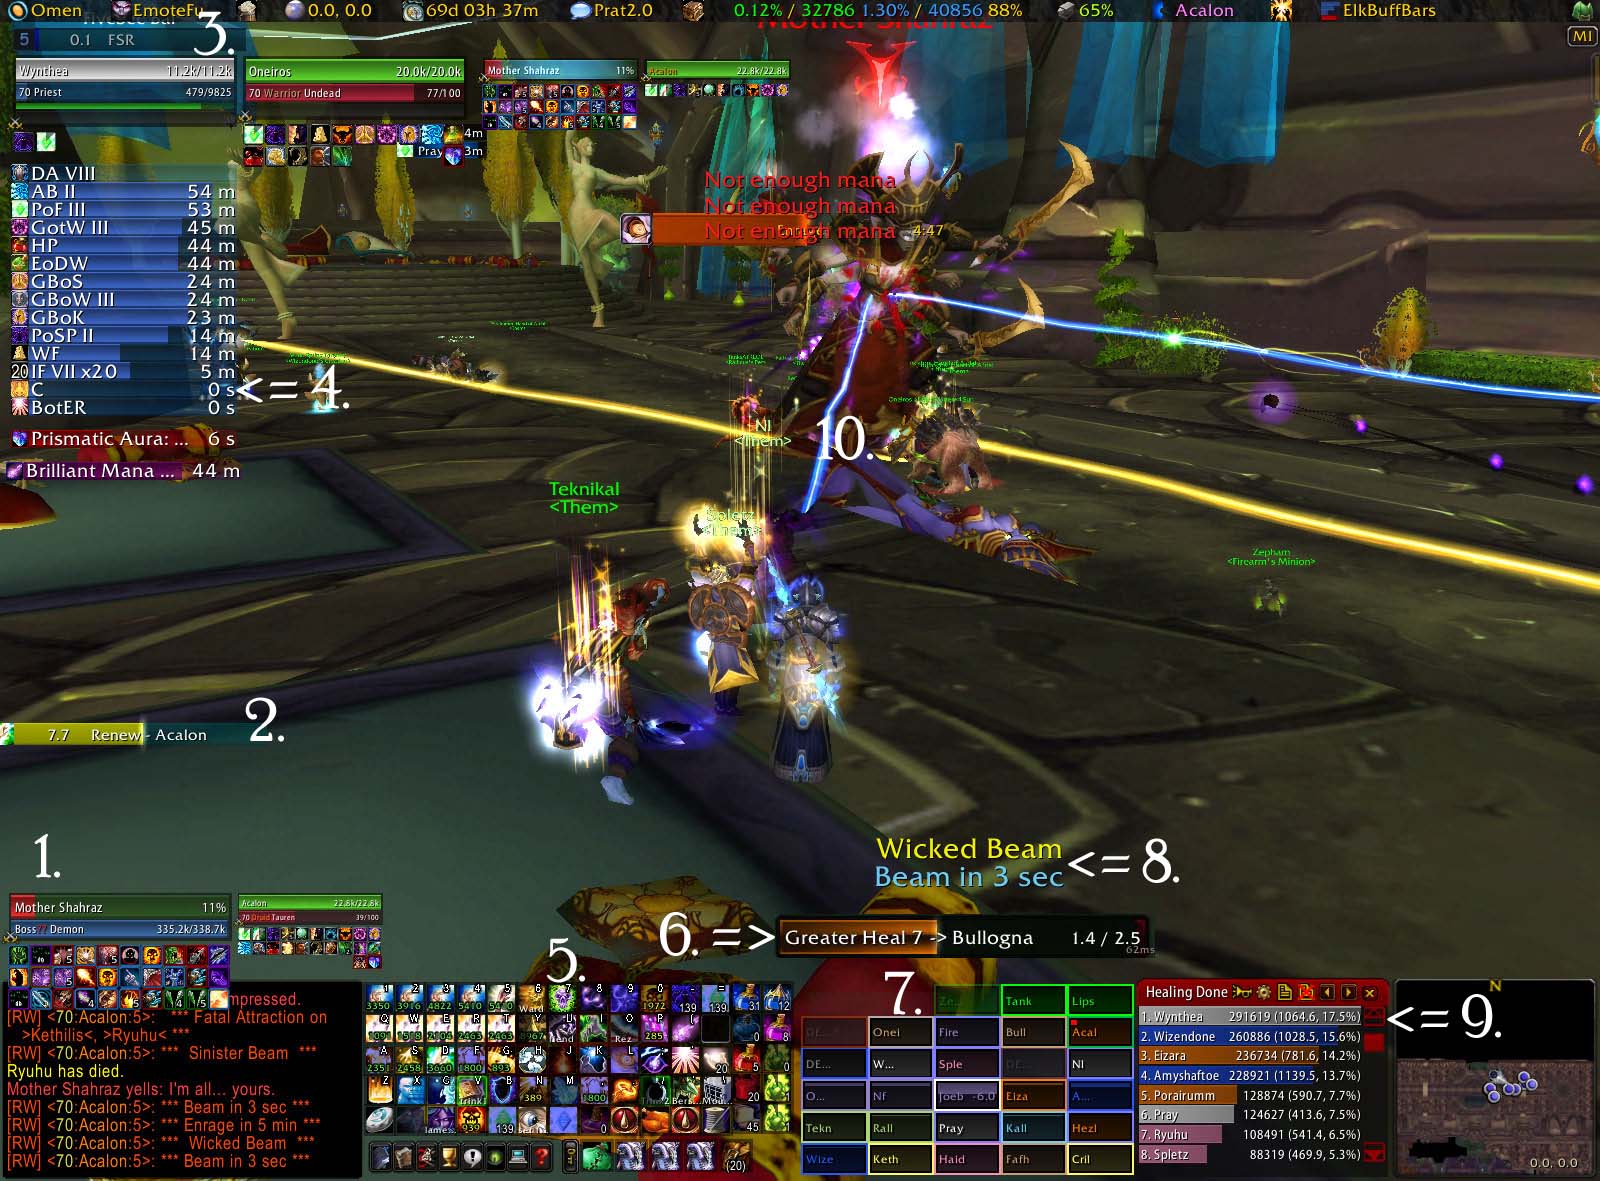
8.Deadly Boss Mods lets you move where your raid warnings pop up. Back to the concept of reducing eye movement to maximize reaction time, having them right where you can see them helps you know who’s about to need a heal – especially if it’s a fight like Void Reaver or Illidari Council where the boss targets random raid members to take damage.

9. Here’s Recount again. Pray is a shadow priest. He’s beating the Paladins on heals, because they both died early-on. It’s important to note that just like any other statistics, the data is only as valuable as its interpretation. This particular shot tells you very little without knowing the set-up. Por was assigned to heal up those people who get Fatal Attraction. Not very glamorous, and it limits his ability to cross-heal. Wize and I are both on raid-heals, so we’re pretty much neck-and-neck. Eizara is generally assigned to the Tanks, but her mana-efficiency is so excellent that she helps a lot with hotting the raid. She is an absolute BEAST of a resto-druid.

10. Scrolling Combat Text isn’t that important, as far as I’m concerned, for my incoming heals or mana regen – I’m watching bars, so I can see that. The important thing is that it tells you when you gain a buff or debuff. Clearcasting, Diabolic Remedy, Deep Meditation, Band of the Eternal Restorer, Berserking… all that stuff pops up over my head, and keeps me from having to watch my buff list. There are mods that do this, and will personalize it any number of ways, but the stock UI also has this feature now. Unfortunately, I didn’t catch it showing in this ss, and it looked funny ‘shopped in. The “10” is where it would go.

Bossfight Breakdown

These shots were taken during a trash-pull right after Mother. I’m very self-critical, and have found a lot of value in analyzing my own performance after a given boss fight. I wanted to walk you through my personal stats after a fight.

Wynthea's Effective Heal Detail
This is a pretty typical boss-fight mix for me. I’m usually assigned to raid healing, and expected to help out on the tanks when they’re taking extra damage, or their healers are in some way incapacitated. Notice how MANY times particular heals were used: 17 Greater Heals compared with 14 Flash heals. 57 Renews. Clearly, I love me some Circle of Healing. It is my bread-and-butter for raid healing, but be careful not to fall into the trap of spamming it for everything. I have seen priests with upwards of 90% CoH – I cannot stress how inefficient that is. CoH is a great tool, but it is not in any way a substitute for good decision making.

A few examples:

  • My CoH costs approximately 400 mana to heal 5 people for about 1k each. I can patch up a group with roughly 3k damage each for 1200 mana. Not bad, but if that group happens to be my actual group, my ProH heals for about 2.5k per target at a cost of around 900 mana. Time-wise, the 3 second cast is the same as the time it would have taken for me to cast the three CoH’s. It’s actually a faster option, because my GCD won’t be up by the time the ProH is done, so I can move directly on to my next target. ProH also gets cheaper because of how well it lends to burning Inner Focus.
  • CoH is perfect for a situation where a group is taking moderate damage across the board – assuming you throw out about 3 CoH’s on the same group, you just healed 5 people for about 3k each – much better than the time it would have taken to Flash Heal the same people (7.5 seconds) for that amount… but if a single-target is down by even 5k, you’re much better off throwing a rank-5 Greater Heal than spamming 5 CoH’s.

Note: If you are taking damage yourself, and so is the Tank, don’t be afraid to Binding Heal. Once they nerfed the mana cost (it used to be about 1k, and now it’s around 700), it became very viable to heal the two most important targets you have – yourself, and the guy keeping the bad guy from flattening you. It costs about the same as two Flash Heals, and saves you the casting time, and the decision.

This shot is the report for WHO I healed during the same bossfight.

Healed Who

1. Remember, my assignment was to raid-heal, and supplement on the tanks when their assigned healers needed help. (Usually from getting the Fatal Attraction debuff.) Acalon was our MT, and he got the bulk of my raw heals, usually in the form of ProM, Renew, and Greater Heal, with a few Flash Heals thrown in if I got nervous. I forget where I read it, but a good rule to follow is to Flash Heal if your target needs a heal NOW, Greater Heal if you think you have time, and just Renew them if you KNOW you have time. That said, I keep Renew on the MT at all times, and ProM him as much as possible. My #2 target is Omegax – a warlock with a fondness for Life Tap. His heals are mostly Renews. Oneiros and Bull were our OT’s, their mixes look a lot like Acalon’s.

2. This second area of the screen shows a break down of what heals I used on a particular target. Haidi is one of our healadins, and the first example of my typical raid-healing mix. You can see that he didn’t require any special attention. Working through the rest of the raid heals, this is pretty much typical for everyone, maybe with a Flash Heal thrown in.

To Be Continued. . .

Wyn’s UI – Part Two (Trash)

Part two of a series. Please read Part One

Note: It seemed more relevant to organize these shots by topic rather than in chronological order. So, we’re jumping from Akama to Illidari Council trash.

Typical Trash Heal Mix:

Click to enlarge

1. This is pretty typical mix healing on trash. With so much going on, I tend to focus on instant casts. I also use PW:S liberally, but that’s one of few things Recount doesn’t show. I didn’t take an SS of my over-healing, but on trash it’s substantial. My mana-regen is enough that I don’t have to drink between pulls (you can see my mana bar is full). You’ll notice also that I don’t simply spam CoH. It’s overkill, and it’s boring.

2. I have an Illidari Blood Lord set as my focus. This is because he’s a Paladin mob, who will bubble himself and start to heal. The bubble has to be mass-dispelled, so rather than wait for them to call me to dispel it, I just watch him, and cast it as soon as he has the debuff. (around 25-30%.)

3. Recount’s main window. One of the reasons I keep Recount open during combat is to get a good sense of what my fellow healbots are doing. Most of us have been together for a while now, and we have a pretty good idea of our standard baseline. Typically, I’m about 1.5% ahead of Wize, who is around 3% ahead of Eiz, who is about 2% ahead of Por… you get the idea. This is an atypical pull, because Wize is #3. As you can see from Grid, it’s because he got smooshed. (You can’t do your best when you’re dead! remember that!) Also, Por is near the bottom because he was AFK. It’s handy to be able to get a nearly-real-time idea of who’s paying attention to the pull, and who needs to take a break, without having to constantly over-communicate.

The other large reason I keep it open is because my guild is constantly auditioning new healers, and it’s good to be able to give the Raid Leader an accurate opinion of how the new guy is fitting in with the old guard. I also have a pretty good idea of my heal-mates’ gear, and if an under-geared newbie is out-performing a same-class veteran, it will become obvious very fast. With recount, I can see what heals they are casting, who their targets tend to be (tanks, raid, or a combo? do they follow assignments?), and how much over-healing they have. As I’ve said before, over-healing isn’t a huge issue unless people are dying or pulling aggro (then dying), but with a new person, a large amount of over-healing and a low amount of effective heals could indicate a lag problem or a lack of attentiveness. As an additional coaching tactic, I’ll frequently set the trial member as my focus – Quartz allows you to customize those casting bars as well, and I can tell what rank of what heal they’re using, on what target, and at what health level they began their cast. Recount simply makes it easier for me to stalk people, and keeping it open makes the data easier to access. As a side tip, Recount gives you a lot of options for linking the stats. I’ve found that guest healers appreciate getting a quick link to let them know that they’re doing okay. Running with a BT guild on farm can be intimidating, and everyone performs better when they’re relaxed.

I don’t pay a huge amount of attention to recount actually DURING bossfights, I have more to worry about. But I don’t like the idea of opening and closing it all the time any more than I like the idea of not having the trend-style information easily available. And, sometimes, having it up for things like Dispels on RoS phase 1 or Gorefiend helps give real-time feedback to people who need it.

4. With Grid, it’s after the pull, so not much of interest is going on here, but you can see in Wize’s frame what it looks like when someone is highlighted because of low health. Grid also shows exactly what their deficit is, and I have mine set to approximate the amount of incoming heals they’re about to receive. Wize has none incoming, because he just stood up. Again, the faded squares are people who are out of range. You can see the train of people making their way into the Chamber of Command on my mini-map.

5. Yes, we raid with a Battle-Chicken.

To Be Continued. . .

Obligatory Female-Perspective Post or Introducing Wynthea

Urban legends and media coverage both paint the stereotypical WoW-player as a pale, socially-stunted, acne-prone guy in his twenties. He might be in college, or live with his parents, or both. If he has graduated, he probably works in a computer-related field. Either way, the closest he’s gotten to female companionship is his level 28 NE-hunter alt and some lipstick on his hand.

Hi, my name is Ariel. You can call me Wynthea. I work in the finance industry, and live in a chic apartment of my own. I like to cook, swing-dance, pump iron, and watch obscure films. I speak three languages. I think that my red hair should serve as a warning to others. I play WoW. Better than you, and better than your boyfriend.

A girl playing Warcraft for her own reasons is unusual – most of us play to spend time with a boyfriend or family member. I’ve been told that we bring a different perspective to the guilds we lead and the raids we run. As is true in every competitive social and professional setting, we face a unique set of interactions and challenges, which has been well-documented elsewhere. I won’t bore you with tales of harassment, discrimination, or disappointment. It suffices to say that I’ve been called worse, questioned more, and respected by better. And I’m still here. Still playing, still progressing, and still learning.

Occasionally, I like to share a bit of what I’ve been taught, but more than that I like to brainstorm with like-minded players. Through a few lucky clicks, I found the World of Matticus, and started commenting. It was an ironic coincidence when eHarmony’s blog-buddy finder matched us up as sworn enemies. We had a good laugh about it, after the pirate gremlins saved me from his death-ray. Mostly, I sit on vent and listen to Matt whine about not having enough reagents, or forgetting where he hot-keyed Stoneform and Desperate Prayer. In return, he keeps me from screaming at my raid leader and catching a fast G-kick. I’m honored and flattered that Matt has invited me to add a little bit of my perspective to his World. He needs my presence so his sanity doesn’t get lost.

Street Cred

I have two level 70 Priests, one leveled Holy, one Shadow. Both are now Holy-CoH spec.

Renwein of Darrowmere (Human) – moth-balled since 2.3; made it 3/4 TK and 5/6 SSC, runs an occasional weekend-ZA.

Wynthea of Nazjatar (Troll) – Slayer of Illidan and countless gnomes. Red mohawk of DOOM.

My true love in this game is PvE, but I’ve dabbled more and more in PvP – the quickness of an arena match is a good nerve-soother when hours in a raid get to be too much. I have no real PvP claims to fame, but I’ll brag about them when I achieve them.