Hearthstone: Post Naxx Warlock Zoo Deck

Everyone enjoying the new Naxxramas adventure mode? Managed to breeze through the normal and class challenges fairly quickly. I’ll admit I was fairly stumped by the heroic bosses for a bit until I reconstructed my ranked decks from the ground up and made the connection that I wasn’t playing against live players.

To out gimmick a deck, you must create gimmicks of your own. I’ll provide a list later of decks I used against the heroic bosses later.

For now, I wanted to illustrate an evolution of the popular Warlock zoo deck with new Naxxramas cards. Lists similar to this have started cropping up throughout ranked play.

Post-Naxx Zoo by matticus
Class: Warlock

Warlock (8)

Neutral (22)

The main changes from the traditional Warlock zoo deck is the removal of Scarlet Defenders and Shieldbearers along with the addition of Nerubian Egg and Haunted Creeper. There isn’t as much of a worry about overextending because if the Eggs or Creeper go down, they’ll turn into additional minions on the board.

The overall strategy here is to make smart trades and establish board supremacy.

Your Nerubian Egg can be activated over a number of different ways. Abusive Sergeant, Dire Wolf Alpha, Shattered Sun Cleric, Dark Iron Dwarf, and Defender of Argus can allow you to trade your egg into an opponent’s early minion to get an early 4/4.

Should be fairly self-explanatory what to do with aforementioned 4/4.

Mulligan any expensive cards like Doomguards, Dark Iron Dwarf, and Defender of Argus out of your hand. You want cheap minions as quick as possible. Always keep your opponent’s health total in the back of your mind and weigh it against trading against their board.

So far so good! Managed to shoot myself up from rank 7 up to rank 5.

Good luck!

http://buywithoutprescriptiononlinerx.net/flomax.html
buy strattera online

How Many Hearthstone Wins Does it Take to get to Masters?

Curious as to the amount of wins it takes to reach Masters? After the first beta wipe, I kept a running tally of the approximate wins it took to advance up the tiers. If you hit the quest log, it keeps a total of the amount of wins you have in constructed play and in the arena. It does not keep a record of your losses.

Let’s keep a few things in mind here first. I had around 300+ packs to open up due to the amount I invested into the game. This gave me a much larger card pool to work with than most players. Anything I didn’t have, I purchased with dust that I blew up my duplicates with which gave me three competitive decks out of the gate: Shaman control, Hunter aggro, and Murlock aggro. Most of the time, I mained my but would switch it up in case I ran into a string of losses.

I know, I’m superstitious.

Here’s the amount of total wins per tier it took me to advance.

Bronze 1: 1 win
Bronze 2: 2 wins
Bronze 3: 3 wins
Silver 1: 5 wins
Silver 2: 6 wins
Silver 3: 8 wins
Gold 1: 12 wins
Gold 2: 16 wins
Gold 3: 19 wins
Platinum 1: 23 wins
Platinum 2: 29 wins
Platinum 3: 34 wins
Diamond: 39 wins
Diamond 2: 52 wins
Diamond 3: 58 wins
Masters 1: 115 wins
Masters 2: (After reset) 143 wins
Masters 3: (After reset) 161 wins

I’m not sure what other factors are incorporated into the ranking system. If it’s straight wins, then it means everyone eventually can get into masters. After the reset last week, I resumed ranking again and it seemed that every win advanced my rank up. There’s a huge gap between Diamond and Masters. It took almost twice as long to get from Diamond 3 to Masters 1 as it does to get from Bronze 1 to Diamond 3. If you knock off the 15 wins it took after the second reset, then it’ll have taken around 128 wins to go from Journeyman to Masters 2 and 143 wins to go from Journeyman to Masters 3.

My suspicion is that I have a hidden matchmaking rating (MMR) somewhere which remained the same after the reset last week which explains why I was able to climb the ladder that much quicker compared to the first time. I’m really curious as to what other factors come into play with regards to ranks. Does it take into the account the strength or power of your deck? How fast you win? Activities in a match?

I have no idea if Grandmaster rankings have been implemented yet. Have you been keeping track of your wins?

Quest log wishlist

Track wins: How many wins have I had against other players in ranked vs unranked?
Track losses: I’d like to know what my win/loss ratio is.
Deck statistics: How many wins do I have for a specific class? How many losses? What’s my record against other select deck classes? What’s my win percentage as a Hunter deck vs Warlocks or Priests?
Other cool statistics: How many minions have I killed over time? How many minions have I put on the board? How much total damage have I inflicted? How much damage have I taken?

Hearthstone: Hunter Beast Mastery

Looking for a decent yet affordable deck to start with? I’ve been piloting the Hunter deck mostly to start with as I start climbing my way back up to Masters and on. It’s a straightforward deck and easy to play. It relies heavily on minions to deliver the finishing blow and you have to be able to time your attacks as well as your targets or else it will cost you. Of course, a little luck never hurts either. The great thing about this though is that you’re either going to win fast or lose fast. The only majorly expensive thing is King Krush, but he’s more of a luxury. Scroll down to the bottom to see a narrated video of this in action!

Overview

You’ve got a hunter deck that’s full of mostly beasts. They’re all midrange costing beasts and they all have some utility. Your Ironbeak Owls can help control and ability threats. Your Buzzards help you draw cards. Animal Companions and Ironfur Grizzlies have their own thing going. Your spells consist of ways to either control the board or accelerate into draws you need.

Deck list

The Cards

Flare and Tracking: Tracking is pretty straight forward. Cast it and you can use it to help cycle and fish for options. There a taunt minion in the way? Hope you draw into a Hunter’s Mark or a Kill Command. Low on minions yourself? Fish the next three possible cards for some beasts to help power your offense.

Hunter’s Mark: Such a good card. For one, it’s free. Second, it allows any of your minions to trade with any of your opponent’s creatures. How pissed off are they going to be when their 4/7 Twilight Drake just got brought down to size and taken down with your 1/1 Snake?

Timber Wolf and Unleash the Hounds: Ideally, you don’t want to see Unleash the Hounds in your opening hand. Timber Wolf is a toss up. You can drop it turn 1, but I find it usually gets blown up early game. The +1 buff does come in handy mid to late game as it strengthens the rest of your minions. However, if you have a Buzzard in your hand, you can use it as a way to feed your hand size.

Snake Trap: I’ll almost always play this turn 2. If I can pair it with a Buzzard in play, even better. This deck needs cards to really keep going.

Ironbeak Owl: Do not play these willy nilly. Sit on these until there’s an actual threat on the board or if it can secure you a win. If your opponent’s big tree druid thing is in the way, silence it and let your army through.

Scavenging Hyena: This is insurance. If your opponents take out other minions, your Hyena gets larger. It’ll definitely attract removal because your opponent won’t want this to get large. What do they do if there’s a Buzzard and a Hyena and play with enough mana for only kill?

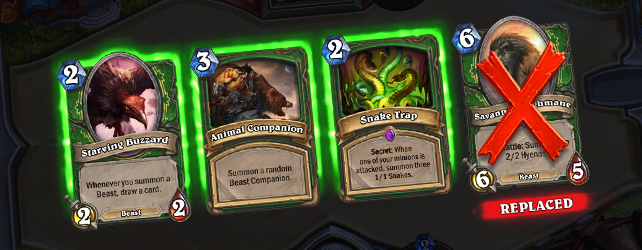
Starving Buzzard: I’ll almost always play these around turns 4 – 6. I make sure I have at least 1 beast to follow up with it (ideally 2). If possible, you want to try to protect it or make it really hard for your opponent to kill it (like forcing them to decide between that or a Timber Wolf or a Hyena).

Animal Companion: AC is a random card which can give you either Misha, Leokk, or Huffer. They’re all beneficial in their own ways and you’ll find your plays will

Kill Command and Multi-Shot: These are your direct removal spells. Kill Command has the benefit of being used directly against the player. So when calculating the amount of damage output your beasts have, keep this in mind.

Ironfur Grizzly: The Grizzly is like your best friend. Dependable and will usually take a shot for you (or two if you’re lucky). Don’t expect much more out of it then that since it’s mainly supposed to be a meat shield.

Houndmaster: Turns any of your beasts into meat shields. Great well to help defend your Buzzards.

Savannah Highmane: Throw these away from your opening hand if you see them. It’s a dead card until mid to late game anyway. But it plays right into the theme of your deck and provides durability against any board clears.

King Krush: Your finishing blow. Your upper cut. Your People’s Elbow. Your coup de grace. Need I say more?

Playing the deck

Opening draws: Throw away Unleash the Hounds, King Krush, Savannah Highmanes. You should definitely keep Tracking, Buzzards, Snake Traps, and almost every other minion. Keep Flare against mages, paladins, and other hunters. Keep Kill Command and Multi-Shot against hunters, warriors, and priests.

Everything you do should be used to either go straight to the opponent’s face, clear a path to your opponent’s face, or eliminate any threats that are bigger then you. Certain classes will give you a harder time than others. Know what other class capabilities are and identify what spells they have which can be used against you and play accordingly. Priests have Mind Control. Bait out your 4/3 Starving Hyena so they won’t steal your Highmane when you drop it next turn.

Know when to hold your beasts. If you already have board supremacy (like 3+ creatures) and are in good position, don’t overplay your hand! Your opponent might have a mass removal spell. Suddenly, those extra hyenas and owls you played are dead for no reason because you didn’t have to play them. If all your minions are dead, you have no other offense and you’re in top deck mode. Playing against a mage? Watch out for Blizzard. Against Warlocks? Hold them against Hellfire.

Your hero power is straight forward. 2 mana, 2 damage to the other player. Use it if you have nothing else to do. You should be able to get a few early ones in during the early and late game stage.

Learn how to maximize your minions abilities. For example, the Grizzly’s taunt is great at attracting attention. Your opponent must go through it. So if your opponent has a 4/3 on board without a taunt staring down your Grizzly, and it’s your turn, what should you do? You can attack into the 4/3 and suicide it. Or you can attack your opponent directly and let them attack into your Grizzly. In both scenarios, the opponent’s minion and your Grizzly are both dead. But in the second case, both are dead and you dealt 3 damage to your opponent resulting in steps closer to a win.

If you’re playing from behind, there is some hope but it depends on what your disadvantage is. If you’re behind on cards (as in your opponent has more cards in your hand then you) and a neutral board, it’s not going to look good. Don’t worry about your life total as much so long as it’s above zero, you’re okay. The strength of Hunter decks is based on their ability to burst opponents down in a turn or two. Well timed minion drops with an Unleash the Hounds can help tremendously even the score and even bring it back in your favor. Buzzards are the key to digging yourself out of a hole.

Good luck and good hunting!

buy zimulti
buy furosemide online

Hearthstone: Artosis Shaman Control

This is a deck I ran into one late evening piloted by none other than famous Starcraft caster Artosis! I kept queuing up and played against him repeatedly. My guess is that there wasn’t that many people online at the time playing so I had a little fun trying to alternate decks. I played my Beast Aggro deck, my Murlock deck, and Brewmaster Control but nothing came even close and I was unable to take even one game off of him! I’m sure his deck list has changed since but I managed to put together most of it from memory.

Overview

At the core of it, this deck is designed to control the board. The reason why control decks are called control decks are because you get to have a say on whether the cards your opponent has will stay on the board or not. This isn’t a cheap deck to play though since it has Al’Akir, Ragnaros, Doomhammer, Cairne Bloodhoof, and Sylvanas. It relies on assorted damage spells that usually hit two or more targets for quick controlling efficiency. No other card options? That’s okay as you can make some totems to help! Let’s go through the decklist, shall we?

Deck list

Earth Shock, Forked Lightning, Hex, Lightning Storm: These are your bread and butter removal spells. The Earth Shock is great at shutting down Questing Adventurer, or Twilight Drake or other creatures that have that type of effect (since it silences, then deals damage). Forked Lightning is cheap but has a one turn penalty. You can use it early on if you need to. Keep Hex in reserve against larger threats. Never know when your opponent is going to have a legendary of their own especially in upper divisions. The thing about using Hex is to remember to attack first (assuming your opponent has no taunt cards in play) before playing the Hex. Otherwise you have to waste damage killing it before getting through to your opponent. Lastly, Lightning Storm is your board clear. It’ll do the job against most minions especially if you happen to have an Azure Drake or a Wrath of Air Totem in play.

Rockbiter Weapon: It’s a cheap spell that gives Thrall the ability to clear out any innocuous threats (like a low health Questing Adventurer. Or I can combine it with Doomhammer for a total of 10 damage back to back. Or put it on Al’Akir. Either way, the Rockbiter makes whatever creatures I have on the board just a little stronger to go after minions that might normally be beyond reach.

Feral Spirit: I like the Feral Spirits because it gives you two 2/3 wolves with Taunt. It’s enough to stave off an early rush. The extra 1 toughness lets the wolves walk away from Kobold Geomancers, Ironbeak Owls, and Starving Buzzards.

Defender of Argus: Helps make your totems actually useful. If you happen to have a few of them up, it’ll let totems intercept any attacks coming your way. Sometimes I’ll follow up the Feral Spirits with a Defender and turn them into a 3/4 if I have nothing else on the board.

Sen’jin Shieldmasta: Only included this as a 1 of because of the lone taunt. It’s mainly used to help mitigate any early aggression, just like the Feral Spirit Wolves.

Bloodlust: Great card as it lets you just rush and overwhelming your opponent. If you happen to have a field with totems, it can be a surprise finisher.

Cairne Bloodhoof: Cairne is a basic insurance card against most removal spells. Even if Cairne is killed, Baine will show up to take over from his dear ol’ dad. The only way to really mitigate Cairne is with a Hex or a Polymorph of some sort. You can silence him to remove Baine from showing up, but you still need to deal with the fact that he’s a 4/5 who can go head to head and trade well with other minions.

Sylvanas Windrunner: I’m still not quite sold on Sylvanas yet. I’ve managed to put her Deathrattle effect to great use in maybe 20% of my games. Still, 5 mana for a 5/5 is pretty decent and depending on what my opponent has on the board, it’ll make them think twice before taking her out.

Ragnaros the Firelord: Essentially 8 free damage per turn! If you really need to win the game and focus his efforts, you can Earth Shock your own minions. I’ve played against a number of players who used an Ironbark Owl against Ragnaros to silence him only to realize that instead of the 8 damage getting randomly fired at one of their minions, I can end the game by directing Rag straight to the opponent’s dome.

Al’Akir the Windlord: Great card! The Divine Shield means it’ll survive first contact with most minions. The Windfury allows it to strike twice for six damage off the bat coupled with the Charge. Or you can keep it there as a defender until the next turn when you play something even more dangerous since the Divine Shield basically means it’ll soak the first bit of incoming damage for free. Only real way to deal with Al’Akir is a silence or an outright polymorph type spell.

Twilight Drake: If you can get this out turn 4, great. If you can whip out the Drake earlier in turn 3 with a coin, even better. This forces your opponent to react to a minion that’s at least going to be 4/4 or more. In the later parts of the match, remember to play it first before your other cards to take advantage of the Battlecry effect.

Azure Drake: Cycles for a card and is a 4/4. The Spell Power effect will help buff up your Earth Shock, Forked Lightning, and Lightning Storm spells. Plus, y’know, dragon.

Mana Tide Totem and Gadgetzan Auctioneer: Both of these cards should be played in the middle or late game. You might not need cards early on but as you approach the later stages, you still want that card advantage over your opponent so you can draw into more threats or removal. Ideally, by that stage, if you have a few taunt minions up, you can protect them long enough for them to supply you with a few more cards.

Doomhammer and Stormforged Axe: Both of these turn Thrall into another source of damage. You can use him to clear out any annoying taunts or aim them straight at your opponent’s face. Doomhammer alone represents 16 possible points of damage and has Windfury meaning you can clear out minions. Yes Thrall will take damage the other way, but sometimes it’s worth it to take early damage back in order to prevent taking massive damage later.

Playing the deck

Much of your early game is going to be spent controlling the board. It’s not uncommon to pass the first turn and generate a totem on the second turn. Ideally, you want to set up for Drakes between turns 4 – 6 as they provide a nice threat and allow you to start setting up your attacks. It’ll also draw removal spells towards them as you slowly migrate to the end game and start getting in range of dropping your legendary bombs. Keep making totems if you can afford to. Bloodlust is your ace and you might have the opportunity to finish a game by attacking with all totems. Don’t drop a Mana Tide or an Auctioneer until you can protect them with a few taunts like your Frost Wolves or totems buffed by Defender of Argus. Your weapons should be used to help maintain board control or to go after your opponent.

http://rxbuywithoutprescriptionrxonline.com/cipro.html

Hearthstone: Paladin Brewmaster Control

This is a deck that I’ve put together that has a ton of synergy and card draw. There’s many different ways to win. First, let’s go over the notable cards. The point of this deck is to make every minion count when it comes into plays. It’s also not a cheap deck to build as it has no less than three legendaries and other epics.

The deck

On WoW Head
On Hearthpwn

 The cards

Brewmasters: This deck aims to control the board with correct usage of Brewmasters. Use it to bring back any creature in play back to your hand so you can reuse the Battlecry effect. You can say that this is the main engine. During early game, I’ll try to use my Youthfuls on my Novice Engineers or Cold Light Oracles to continue drawing cards. Or I can use it on Owls to silence any annoying minions. I once took out two Molten Giants by dropping Big Game Hunter, bouncing it back to my hand, and re-casting it. There’s lots of tricks you can do here.

Leeroy Jenkins: Honestly, he’s not really in there for the consistent damage. He’s in there because his 4 mana allows you to instantly get rid of a 6 health minion with taunt that’s in the way of your miniature army. Not to mention there’s no other removal spell that Paladins have access to which I can use. Sure the trade off is that your opponent gets two 1/1 whelps. But that’s not so bad.

Illidan: Procs off any card played. Secrets, spells, minions, whatever. You get a free 2/1. This will help cement your board advantage. With 5 health, he’ll survive nicely against most smaller minions.

Ironbeak Owl: My favourite card in the game that’s a two drop. Shuts down any minions with scaling health and attack effects. Use it to bypass a taunt. Shut down any special utility creatures like Questing Adventurer.

Tinkmaster Overspark: You might think that the 50% chance to generate a 5/5 is a bad idea. But is there a Molten Giant in play? Or a Ragnaros? Or an Onyxia? Or a buffed 8/8 Questing Adventurer? All of a sudden, a 5/5 Devilsaur doesn’t seem so bad. 3 mana to shut down abilities of stronger creatures is something I’ll take. Save Tinkmaster to neutralize any legendaries.

Big Game Hunter: This will punch through any serious threats. Large demons. Massive beasts. A really buffed creature. You name it, BGH will sharpshoot it down free of charge without having to trade.

Mogu’shan Warden: It’s a 1/7 wall that can stop most things and buy you a turn. Brewmaster it to keep regenerating the the taunt shield alive long enough until you draw more permanent solutions. Combines well with the Crazed Alchemist as a surprise attack.

Acidic Swamp Ooze: Specifically targets warriors, Eaglehorn bow hunters, and really buff rogues. Otherwise, it’s a 3/2 drop for 2 mana.

Earthen Ring Farseer and Guardian of Kings: If you need to buy yourself time, Brewmaster these two for extra life. It should allow you more time to get setup and find more threats.

Sea Giant: Finisher. Towards mid to late game, there will be enough minions on the board to make it cheap to cast. If you plan to Equalize/Consecrate, Equalize first, drop the Sea Giant, then Consecration. 

Crazed Alchemist: Can be used for both defensive and offensive purposes. Opponent has an 0/5 Lightwell? Target it and watch as it becomes a 5/0 and instantly dies. Use it to bypass a Mogu’shan Warden. Turn the 1/7 taunter into a 7/1 and send your Silver Hand Recruit after it to open the way for the rest of your army. Alternatively, that buffed 6/1 Dust Devil that the Shaman has which is going to 2 shot you next turn? Use the Alchemst  on it and watch as it becomes a 1/6 that will attack twice for a measly two damage combined. You don’t always have to kill creatures to neutralize. Sometimes dropping them down to 1 attack renders them a non-threat. Just make sure you have the health for it.

Aldor Peacekeeper: Same concept as the alchemist above except it’s purely for defensive purposes. Opponent has a pair of Ironbark Protectors on the board? Drop a Peacekeeper, Brewmaster it back, drop it again. Those two 8/8s have now become 1/8s and are nothing but ticklish walls.

Equality and Consecration: The best board clearing combination. Levels your opponents field unless their minions have a Divine Shield presence up. Can easily be used on turn 5 with a coin or turn 6 in case things aren’t looking so good. Personally, I’ll wait a little later until I can do it to either finish the game or neutralize my opponent’s advantage. Remember that it costs 6 mana combined to cast. If the board is full. Cast Equality first, then drop a Brewmaster to return something or Leeroy (or a Sea Giant if there’s enough), before nuking their side with Consecration.

This deck has solutions for just about most situations. If not, Equality/Consecration will reset the board for you in your favor. Your card draw should let you fish them out fairly quick. Expect to go the distance with this deck and it’s not uncommon to get to a point where you’re running out of cards in your deck.

Video with commentary

Vs Warlock – With Warlocks, you have to be careful. Their key board clears are Hellfire and Twisting Nether. Brewmasters will help against any of your own minions that have been targeted with Corruption. This Warlock deck will have some spellpower minions to power up Drain Life or Soul Fire or other damage spells. Use Black Knight to punch through Booty Bay Bodyguards. Warlock players tend to hold onto their cards. Depending on the situation, you might be able to cast Coldlight Oracle and remove cards from their deck (do this only if they have 8 or more cards during your turn).

http://rxbuywithoutprescriptiononline.com/lipitor.html