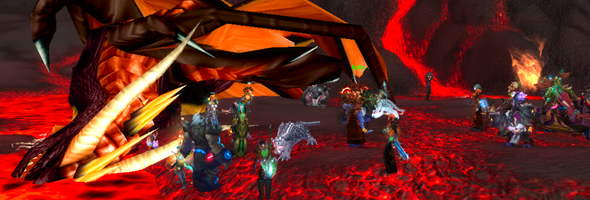
I realize that Matticus has done a nice job of keeping readers posted on Conquest’s progress through this fight, but I thought it might be nice for the community if I posted our specific, final draft healing assignments along with a narrative of how we got there. I know that when I was a new healing coordinator for Collateral Damage back in Tier 5 that I used to scour WoW blogs for their specific healing assignments on Vashj, Kael, and beyond. With that experience behind me, I don’t expect that readers will be able to use my precise assignments, but perhaps once I explain the process a bit, healing leaders will be able to identify techniques that will help their particular groups.
Before the First Attempt
The Sunday night before our first attempt at Sarth 3D, Mallet and I, along with Kimboslicé, our raid leader, and Archdrood and Brio, our main tanks, Crazymexican, our puller, and a few various and sundry raid members, went into our cleared Obsidian Sanctum instance to block out positioning. More than anything else, this step may have led to our early success. In the calm of a cleared instance, we were able to identify marks for each person to stand on. Mallet, who would be solo-healing Archdrood, was able to learn exactly where the head and feet of the dragon would be ahead of time, in a calm environment. I paced out where our drake tank healers, whelp tank healers, and add tank healers would stand. We imagined where the firewalls would come and planned what direction different players would run to avoid them. We strategized how to position the drakes to best protect both tank and raid.
The positioning I’m sharing with you now is our “final draft,” but if you block out your own positioning in a cleared OS, our work might give you something to start with.

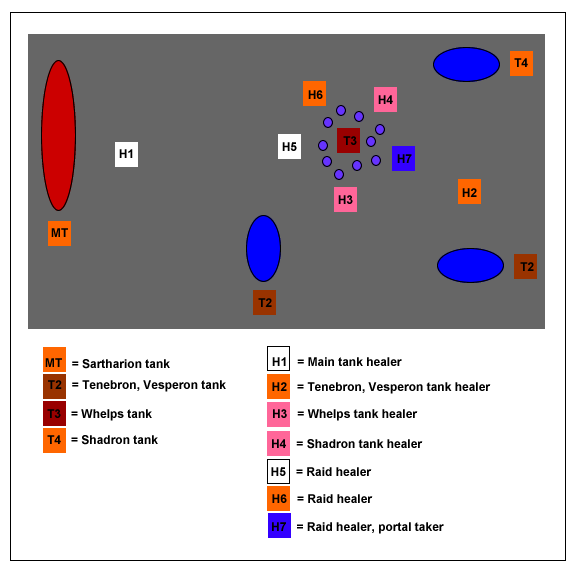
In my diagram, bubbles represent eeeevil nasssty dragonses, and squares represent players. You’ll notice that I’ve used class colors to show which specific players we used for different tasks. If you need a recap, orange is for druid, brown for warrior, fuchsia for death knight, pink for paladin, white for priest, dark blue for shaman. This class distribution is by no means obligatory and will vary based on the players available in your guild.
The diagram might just tell you everything to know, but in my typically verbose fashion, I’m going to give you some notes anyway.
Main Tank Healing
This is the most difficult job available in this fight, so make sure you assign someone who excels both at throughput and at situational awareness. One of the biggest parts of the learning curve in this fight has to do with this healer’s positioning. He or she has to learn how to avoid the firewalls without going out of range of the main tank. Every bit of this player’s healing goes on the main tank, and he or she has to be able to keep him up entirely alone. Based on the changes to Twilight Torment (the main tank can no longer remove it himself), your main tank healer is going to be the first in a line of “saves” on the MT. In order to survive one of Shadron’s breaths, a non-DK tank must have outside help. These breaths can occur in rapid succession, and you must set up a rotation of “saves” so that your tank can survive multiple rounds. On our druid tank, we used a rotation of 1)Pain Suppression 2)Guardian Spirit 3)Barkskin + Survival Instincts and 4) Hand of Sacrifice + Priest Bubble. On our successful attempt, four abilities were enough. I suggest assigning a player who can perform save #1, which can be any of these techniques, to main tank heal. In practice, this player will probably end up being either a discipline or holy priest.
Drake Tank Healing
We used a team of two healers to take care of the two tanks assigned to Tenebron, Shadron, and Vesperon. We staggered our tanking such that each tank only had one drake at a time. I am H2, and I healed Briolante for Tenebron and Vesperon, helping out on Shadron’s tank in the few moments where Briolante’s first target was down and second had not yet landed. Both H2 and H4, the drake tank healers, will have to move around quite a bit to stay with their targets. H4 in my scheme is a pally healer, and his target, the Shadron tank, will be helping out with whelps and elemental adds for much of the fight. It is important for H4 to keep a watch on this person, as he absolutely has to live to tank his drake. It’s also worth noting that H2 and H4 will be completely out of range of the main tank for most of the fight–any extra healing they can spare goes on the raid.
Whelp Tank Healing
I assigned my strongest paladin to heal the death knight whelp tank. Krinan, the paladin, turns on righteous fury and draws some of the whelps to her through healing aggro. Note: she is specced in a particular way to let her survive this. Perhaps she’ll tell you all about it in a guest post. Krinan and Lloth, our death knight tank, work together to gather up the whelps and the elemental adds while others AoE them down. Usually H3, the whelps/adds healer, will need some help. The whelps and elementals are the most annoying part of the fight, and they can just eat dps and healers for breakfast. Whenever I can, I HoT up Lloth or the AoE’ers. Raid healers, and even drake tank healers when possible, should try to stay close to the adds tank so that any strays can be peeled off.
Raid Healing
This fight can get a little crazy, so I assign three very strong players to raid healing. The challenge increases when raid healers, like our holy priest for example, have to position themselves such that they can take a spot in the save rotation on the main tank during Twilight Torment. I’ve put Kaldora (H5) on the side closest to the main tank to show how a raid healer in the save rotation has to edge toward Sarth at the appropriate moment. Note that raid healing gets completely, entirely insane when Twilight Torment is up on the raid. In order to dampen the effects, we call out for paladins to bubble and help soak some of the damage that way. In order for the raid healing to work in this fight, the dps/healers/add team need to stay close together.
Into the Portal
When Shadron goes down, we send players into the portal to take care of the Guardian. Epiks, our resto shaman, follows dps into the portal and works his healing magic. If you have players taking portals, DON’T forget to assign a healer to go with them. Believe me, the result is not good.
Last Words
This fight recalls Vashj, Kael, and Illidan in the amount of teamwork that it demands. As a healer, you simply cannot ignore assignments and snipe heals. You cannot save other people’s targets. Yes, a drake tank healer might assist the raid healers with a Wild Growth or two, but everyone will always keep a watch on his or her primary target. You are not a hero. You are a small piece of the puzzle. As a healer, you perform the tiny set of tasks assigned to you and nothing more. There may be moments where you feel less effective, but you need to stay in your spot and watch your assignments. You must watch around you–there is no excuse for a healer to be trapped by firewall or void zone. Even though healing is very difficult in this fight, if you set it up like I did, it is also very regimented. Each of the individual tasks is manageable. Just pace your tiny portion of the stage and do not worry about what others are doing. Let them make their own mistakes as you learn. And then, when all is said and done, the healing meter will not tell the whole story on this fight–in this case, the encounter is hard enough at the current available gear level so that if you win, every healer in the team deserves the gold medal.
Blank Sartharion Map: This is a few screenshots of the cleared island that Sartharion is on which Matt stitched together. Feel free to use this for planning. You can overlay Syd’s diagram on top of this and you can get a better idea.
