Assigning Healing Strategy – Part 1: Recognizing Class Strengths

OLYMPUS DIGITAL CAMERA
Image courtesy of woodsy.

Welcome to the first in a 5 part series here on World of Matticus. For the next several weeks, I’ll be covering the rare topic of assigning raid heals. No one really wants to do it but it’s the most important job in the raid and I’ll provide a basic overview of the process and some advanced tips!

Introduction

Congratulations! Due to your success as a healer, you’ve been promoted to the healing coordinator of your raid!

You poor guy. What are you going to do? It’s like you’ve been asked to build some Legos and you’re given a whole mess of pieces without the instructions! But don’t worry, I’m here to help!

I’m not going to go too much in detail about the different classes. In fact, I’m going to make a few generalizations about the 4 healing classes so that you have a basic framework in mind for maintaining your raid group. Raid bosses are like math equations and if you have the right variables you’ll get the right answer.

Sweeping generalizations

I’m going to break this part down by each healer class and their strengths into certain categories that are important to consider on boss fights and trash. Remember that we’re only looking at the big picture (or macro) setting for all 4 classes.

Mitigation: How strong this class is at cushioning incoming damage.
Single target effectiveness: All classes have spells capable of keeping a person alive. But are they the best and most efficient at it?
Multi target effectiveness: How strong they are at keeping multiple players alive within certain areas. Lots of encounters involve groups of players standing together.
Endurance: How long can they last doing what they’re needed to do?

Priest

Mitigation: Fair – Power Word: Shield, Renew and Prayer of Mending are the first line of defense for Priests. They’re adept at counteracting incoming damage.
Single target: Good – In addition to the spells above, Flash and Greater heal provide a sizeable punch to top off targets.
Multi target effectiveness: Good – Prayer of Healing is like casting 5 Flash Heals at the same time to everyone in your group. Circle of Healing is sick.
Prayer of Healing: Fair – This depends largely on the role they need to fill. But with the right trinkets and with constant chain pots, they can fill in for a main tank healer or an AoE group healer.
Endurance: Fair – Mileage may very. I’m at the point now where I’ve never needed an Innervate. It’s going to largely depend on gems, enchants, spec, and what they’ve had that morning for breakfast. Seriously.

Druid

Mitigation: Good – Lifebloom and other HoT spells keep their targets up for prolonged periods of time. Damage sustained by the target gets healed quickly even if it’s just a Resto Druid.
Single target: Good – Don’t get me wrong, I’m sure they can keep most players up individually. I’ve never noticed them to be outstanding single target healers since they’re busy maintaining their LB stacks. Healing Touch seems to take forever. Glad they’re receiving an improved direct heal in Wrath.
Multi target effectiveness: Fair – Can’t compete against Chain Heal or Circle of Healing. However, excels when asked to stabilize a certain number of players (like 2 main tanks for instance).
Endurance: Fair – I’ve seen Innervates and chain pots last a long way but I’ve also seen Druids teeter on the edge of being manaless.

Paladin

Mitigation: Poor – No real HoTs, no way to prevent damage. What they have to do is to make sure their heals can fix the damage dealt after it’s already been done.
Single target: Excellent – Cheap heals! Spam heaven! Reliable for counteracting spike damage.
Multi target effectiveness: Poor – Very difficult to keep a group alive. May not be able to catch enough players due to the length of the total spell casts.
Endurance: Excellent – Between crit spells and potions, Paladins should be able to take a lickin’ (in their mana pool) and keep on tickin’. Mana should not be a problem here for them.

Shaman

Mitigation: Fair – Earth Shield’s usually enough to help maintain health stability of tanks.
Single target: Poor – Get any of the other 3 classes to do it if possible. The Healing Waves are well and good, but I don’t expect them to last very long compared to the other options here.
Multi target effectiveness: Insanely good – Armed with smart heals, Resto Shamans are able to identify potential targets while clocking in the least amount of work. I’m so jealous. But in all due seriousness, there’s a reason why raids stack Resto Shamans.
Endurance: Fair – Chain Heal’s the most efficient spell in the game and for what they need to do, they’ll need it. Potting, Mana Spring totem and Water Shield solves any mana disputes.

Guidelines to follow

Now that we’ve recognized their strengths, let’s go over some points.

Here’s a few guidelines that I use when I’m handling healer assignments. I’ve developed a pattern that I’ve followed unless exceptional circumstances dictated otherwise (like missing a certain class).

  • Assign tank healers first: They take precedence over anyone else. A typical formula I use that has worked on many boss encounters is to assign 2 Paladins and either a Druid or a Priest.
  • Group healers: A lot of end game fights involve raid placement and specialized group configurations. We can’t get away with healers just raid healing at will. The scope needs to be narrowed down so that AoE healers can maximize as much as possible. CoH Priests and Shamans will shine here.
  • Melee healers: I’m usually stuck with a few Shamans. I like to task 1 with the exclusive job of healing melee DPS. Since Chain Heal is on auto pilot, there are two chances for Chain Heal to jump to the main tank if it’s needed. If a Shaman is missing, I have no problem tasking a Priest to this.
  • Insurance for the healer group: The lone IDS (Improved Divine Spirit) Priest in our raid is placed in a group with 4 other healers (like 2 Paladins and 2 Priests, or something). Since that Priest isn’t capable of AoE healing other groups, they’re tasked with Prayer of Healing the healing group. This frees up the other 4 healers to worry about their other jobs instead of having to focus on their own health.

Next week, I’m going to go further in depth and try to explain the increasingly diverse roles and jobs that healers will have to step up to the plate for. Check back next Saturday when I cover double shifting and pivot healers.
Mopping the Floor With Your Healers on the Meters

meter
Image courtesy of buzzybee

Although Wyn and I have debated on the usefulness (or uselessness) of meters before in the past, we both agree that it does have some use if used properly. Today’s post isn’t another followup discussion of that. I think we’ve exhausted it to death. Today, I’m here to tell you how to abuse the meters. It’s time to unleash the greedy beast of a healer within. There’s a reason why pride is one of the seven deadly sins, but we’re going to give into that instinct today.

It’s time to have a little fun on trash pulls! Let’s go over a few ways to increase your healing. Remember that mana is not a primary concern since we can drink quickly between trash pulls.

Flash heal often: This is our fastest spell. It’s not the most efficient in terms of healing per mana, but we want to hit our guys as fast as we possibly can.

Take damage on purpose: Stand in the AoE. Eat a cleave. Shadow Word: Death often. But don’t do that if you’re going to die in one stroke. Extra damage you take means more heals you need to do.

Ease off the Renew: Normally, Renew is a great stabilizing spell and I frequently apply it to my targets before they take damage. However, it takes 15 seconds for it to run its course and your target will get brought to full before all the Renew ticks are utilized. Be greedy and flash instead!

Binding Heal: This is the big brother version of Flash heal. Not only does it heal your target, it heals you at the same time. So eat a bit of damage and Binding Heal someone else in the raid. It’ll add extra numbers and pad your meters further.

No Shields: Power Word: Shield prevents damage and they don’t count towards healing. Letting the damage through means you can heal more instead.

AoE heal at every opportunity: Specifically, use Circle of Healing. There are very few instant heal spells in the game. The ability to instantly heal 5 people for ~1000 health screams abuse. Use it often when you can even if it’s only a mage who took glancing damage. Yes, that’s right, use an instant cast spell to heal 1 player who took minor damage! You want to beat that Resto Shaman, don’t you?The one that’s been taunting and teasing you every raid? The one who said you weren’t buck? Yeah. That’s right.

Maximize trinket use: Most trinket cooldowns are 2 minute use (actually come to think of it, I think all of them are). That means you can use your trinkets 30 times every hour and increase your healing done by that much. Since we’re concerned with going all out, it’d be crazy not to use them every chance.

Respect chain heal: Respect the Resto Shaman. Chain Heal is unbelievable. The Shaman sets the initial target while the last 2 jumps from Chain Heal are automatic based on the health of nearby members. They’ll always go to the players with the lowest health within range.

Be a thief: Building upon the last point, what is Chain Heal’s greatest weakness? It’s the 2.5 second cast. Of course with increased spell haste, that cast time will go down fast. The Priest answer to Chain Heal is Circle of Healing. Be sneaky and set your local Resto Shaman as your focus. When they wind up their Chain Heal, beat them to the punch with a tap from Circle of Healing!

I wouldn’t advise using these tips on progression trash nights. But farm trash mobs are entirely fair game. DPS players love to use meters to show case their e-peen and it’s about bloody time for healers to do the same. Don’t just top the healing meters, dominate them, eh?

Addon: Instant Health is Pants Crappingly Awesome

During this weeks Twisted Nether blogcast, one of the questions posed by Fimlys was what addons I currently favor the most. I said to him that I favoured Pitbull the most but there was another addon called Instant Health that was beginning to grow on me. I touched about it in some details on the blogcast and promised a blog post specifically on the addon and here it is.

The problem

WoW servers don’t update health bars instantaneously. The information is sent from a player to the server, then from the server to your UI. There are two interaction points where lag due to hardware or ISP issues can cause problems, and although this typically happens in regular intervals, it can take as long as 3 seconds to complete.

All healers have been in situations where their heals have gone off, yet the target still died. Cooldowns and trinkets were blown at the last possible moment to add more “oomph” to their heals. Our efforts were futile because even though it showed that we did cast our instants, it did not appear to have been tracked or anything.

The solution

I acted on a tip from Aylii and Lang, my main tank. They both advised me to take a hard look at an addon called Instant Health. The beta was released a little over a week ago. So what’s it about?

This addon updates the health of player/party/raid members and pets much faster than normal by using your local combat log data rather than waiting for the server to send updated health information to you.

It works with Blizzard’s default UI as well as ANY custom addon you might have installed. All you need to do is put it in your addons folder and enable it!
Notice, this addon only speeds up health updates for player/party/raid members and pets. (People that are recorded in your combat log.) Players/mobs that are not in your group will have their health updated normally.

The trial

Intrigued, I had to get a copy of the addon quickly and stress-test the sucker. I forwarded a copy to Wynthea as well, so we could compare notes afterward. So how did Instant Health stack up to our combined play?

In a word, scary. This mod updates health lightning fast. You’ll get a better idea by observing a protection Paladin tanking waves of trash in Mount Hyjal. By updating health on a much faster scale, I’ve found that I’ve been able to make decisions even quicker. Information is life for healers and the faster we get it the faster we can make choices. It’s an awesome addon for us twitch healers that rely on quick reactions. Non healers might think that it’s redundant for an addon that updates heath only a fraction of a second sooner than server updates but they wouldn’t understand. 9 out of 10 Matts agree that this addon is an absolute must have for any raiding healer (the other Matt passed out in shock and stress of watching health bars drop too fast).

-Matticus

I’m very impressed with the potential of this add-on. Personally, I heal less Whack-a-mole style, and more proactively – paying attention primarily to those with aggro – so the benefit to my reaction time on MT healing is negligible. Where this mod really shines is with tough decision-making: you can see which player’s health is dropping fastest and react with better information. The biggest drawback to Instant Health is that when it acesses the information, it somehow changes what is reported to any other combat log parser you may use. Recount, SWstats, WWS, and Recap will all be so dramatically skewed that they become unusable. If you feel like rolling up your sleeves, you CAN fix it yourself – rename the addon’s directory, LUA file, and TOC to ZZZ_Instant_Health, so that the order-of-access is properly aligned. (If you don’t feel completely comfortable doing this, DON’T!) There is also a minor issue affecting default UI Target-of-Target frames that cannot be corrected. Other raid-frames do not have this problem. These relatively minor issues aside, I think this is a great tool. Spell Haste is becoming more and more important as a stat, and anything else that can decrease the time it takes to get a heal on someone that needs it is huge.

-Wyn

Wyn’s UI – Part Four (The Macro Problem)

Part four of a series. Part One , Part Two , Part Three.

Hot Keys

One of the add-ons that has the biggest impact on my UI and gameplay is Bartender. As I’ve mentioned before, I navigate and target with my mouse. If I need to move and target or cast at the same time, I use auto run – it’s on my 4th mouse button. Nearly all of my spells and abilities are Hot Keyed to my Keyboard. Here’s how that looks:

This is what my keybinds look like when I’m out running around solo. Most of the icons should look pretty familiar, and you can see that my offensive spells are on the top line. That blank spot is for my Disc buffs when I respec for the weekend. I do not hotkey my consumables, to avoid hitting them when I type. The bottom row is non-sensical, but it’s also not bound… it’s where I throw things when I need them once, then I don’t move them out ’til I need to put something else there. When we get into macros, you’ll see that the single-buff of Fort is redundant… my first row of buttons scrolls away when I have someone Mind Controlled, and I sometimes like to play nice with the allies and toss them a buff. Again, the numbers on the bottom of the icons are from Dr. Damage. One thing about Bartender is that you can use your standard keybinds from the stock bars, but if you want the numerals to show up on the icons you have to use the slots specifically labeled in the menu for Bartender. It’s in the same window, just scroll down.

Dr. Damage also gives you super-nifty Tool Tips on mouseover. Like this:

 Dr Damage ToolTip - Smite  Dr Damage ToolTip - Heal

I think I may have mentioned that I’m an information junkie… this just feeds the problem.


offensive with alt

This is still my offensive set-up, but I’m holding down the Alt button. See how the icons change? That’s a product of using macros with the “?” icon. I’ll get to that in a second. Notice, too, that the healing coefficients change on ProH and Nova’s icons.

When I’m raiding, a quick Shift+Scroll Up gives me this:

Greater Heals normal

Holding Alt will make the same changes that happened to the offensive set-up.

My Super-Secret Macros

I may be crazy for deciding to discuss macros. They can be very simple or complicated, and I use a mixture of both. This is not intended to be a macro tutorial. These are simply a few I’ve cooked up, cobbled together, or flat-out stolen. I wanted to show you what those extra buttons on my bars do, and this seemed to be the best way. PLEASE feel free to ask questions about the ones I list, but understand that I probably won’t be able to help you troubleshoot one that you’ve written. If you DO want a how-to, the best one I’ve ever read is over at Priestly Endeavors. A few notes before we begin:

  • I’m Horde. If it’s a macro that sends a whisper, and you’re an Ally, your buddies won’t speak Orcish, so change that to Common.
  • Nearly all of these use the #showtooltip command. That makes the tooltip show up on mouseover, even though it’s a macro.
  • When I’m setting these up, I almost always pick the “?” icon that shows up first. That way, if it’s a button that does more than one thing, the icon on my bars will change when I press the modifier.
  • LINES are very important to a macro. If you keep typing without hitting [enter] it will read all as one line. New commands MUST be started on a new line, so make sure they match up to the line-breaks here if you copy/paste.


Since none of my offensive spells involve macros, I’m going to assume you’re looking at the raiding picture with all the G-heals. I’ll go from left to right.

Gheal macroStopcasting saves lives. Even after 2.3, being able to stop a heal on one target, change targets, and instantly start casting your new heal is an excellent skill if someone is spiking. Also, you can keep hitting this when targeting the MT, and just let it land when they actually need a heal. That way, you can drop out of the 5-Second-rule, without abandoning your job. (yes, you could jump or step forward, but jumping wastes time, and so does hitting multiple buttons.)

#showtooltip Greater Heal(Rank 7)
/stopcasting
/cast Greater Heal(Rank 7)


 FW Macro Now that all priests have Fear Ward, it’s nice to be able to let your tank know you’ve got their back. This one casts FW on your target, and whispers them.

#showtooltip
/cast fear ward
/script SendChatMessage(“Fear Ward on YOU”, “WHISPER”, “Orcish”, UnitName(“target”));


Prayer Macro AltThese three all do pretty much the same thing, and I just wrote it as another space-saver. Hit the macro, and it’ll cast Prayer of (whatever) on your target and their party. Hold Shift, hit the  macro, and it’ll cast a single-buff on your target. Hold Alt, hit the macro, and it’ll cast a single buff on you. Neat, huh? (You can tell it’s not a raid night because of how few candles I have on me….)

For Shadow Protection:
#showtooltip
/cast [modifier:shift] Shadow Protection(Rank 4); [modifier:alt, target=player] Shadow Protection(Rank 4); Prayer of Shadow Protection(Rank 2)

For Fortitude:
#showtooltip
/cast [modifier:shift] Power Word: Fortitude(Rank 7); [modifier:alt, target=player] Power Word: Fortitude(Rank 7); Prayer of Fortitude(Rank 3)

Divine Spirit:
#showtooltip
/cast [modifier:shift] Divine Spirit(Rank 5); [modifier:alt, target=player] Divine Spirit(Rank 5); Prayer of Spirit(Rank 2)

Flash Heal Macro Normal Because my UI set up has either my offensive spells or my Greater Heals visible, but not both, I wanted the option to toss a G.Heal on myself when I’m solo without too much effort. So I made this. Generally, it’s the same as my stopcasting macro for Greater Heal, only for Flash. The difference comes in that if I hold Alt, it’ll interrupt whatever and start a max-ranked G.Heal on me, without changing my target. Handy, right?

#showtooltip
/stopcasting
/cast [modifier:alt, target=player] Greater heal(rank 7); Flash Heal(Rank 9)


I would feed my Shadow Fiend cookies if I could. I love the little guy. But sometimes, he gets lazy. This macro will keep him attacking non-cc’d mobs if his current target dies, and toss a scroll on him (if I have one) to boost his mana-return. Just spam it for a second.

#showtooltip
/cast Shadowfiend
/petaggressive
/petattack
/use [target=pet] Scroll of Strength
/use [target=pet] Scroll of Agility


Most of us have been in a situation with lots of people rezzing at the same time. Just save time, and have your macro type in your healing channel who your target is. Mine also whispers the person that’s getting a rez.

#showtooltip
/cast Resurrection(Rank 6)
/6 Saving %t the run back, but not the repair bill
/script SendChatMessage(“Rezzing you”, “WHISPER”, “Orcish”,UnitName(“target”))

Focus Macro This is really simple. It just sets my focus to whatever I’ve got targeted. No muss, no fuss.

/focus

There are some really nifty things you can do with focus macros, like this one I stole from Priestly Endeavors

/focus [noexists,target=target][exists,dead,target=target][modifier:alt,target=target]
/stopmacro [modifier:alt]
/cast [target=focus] Shackle Undead

The first line says: [make my current target the focus if I don’t have one] or [make my target my focus if my current focus is dead] but [if I’m holding Alt, make my target my focus no matter what].
The second line says:[if I’m holding Alt to re-set my focus, ignore the rest of the macro]
The third line says: [whatever I’m targeting, cast shackle undead on my focus]

Down-ranking macros are fun! Here’s one for Prayer of Healing. Hold Alt to cast rank 3.

#showtooltip
/cast [modifier:alt] Prayer of Healing(Rank 3); Prayer of Healing(Rank 6)

P4 Random Not a macro, but sometimes in a quest or a fight there’s a random item you need to use regularly. I drag mine over to “J” and just hit it whenever I need it. This is from when I had the daily quest in Nagrand.

Nova NormalNova Alt I always heard it was good to keep Rank 1 Nova on your bars for PvP purposes, but where to put it? On the same button, naturally. Hold Alt to use Rank 1, hold nothing for max-rank.

#showtooltip
/cast [modifier:alt] Holy Nova(Rank 1); Holy Nova(Rank 7)

Lifetap We all know Warlocks Life Tap at the WORST time… this was my solution to train my ‘Locks to know when it was okay. For this one, I didn’t use the “?” icon, since that would just look like a normal Renew. Dr. Damage still catches the heal, though. (True story: one of my Warlocks actually macro’d his LifeTap to whisper me that he was going to do it in response to this macro. I was so proud!)

/script SendChatMessage(“Lifetap if you need to”, “WHISPER”, “Orcish”, UnitName(“target”));
/cast Renew

OhShit Sometimes, you have to keep yourself alive ’til your fellow heal-bots can help you out. EVERYONE must have an “Oh, Shit” button. This one can keep me up through over 20k damage. The [combat] modifiers keep reagents from being used up accidentally.

/target player
/cast [combat] Power Word: Shield
/use Master Healthstone
/cast Prayer of Mending
/use Fel blossom
/use [combat] Super Rejuvenation Potion
/use [combat] Nightmare Seed
/use Battlemaster’s Perseverance
/use Vial of the Sunwell
/cast Renew

Trink 1 Trink These are both really simple, but helpful. No matter what trinkets you have equipped, each of these macros will use one of them. Use the “?” icon, and you can see which trinkets you have equipped at the moment.

#showtooltip
/use 13

#showtooltip
/use 14

P4 Berserking If my heals have to come faster, they may as well come bigger. This trips Berserking, my OP-as-hell Racial, and my +healing trinket at the same time. (Does not trip GCD)
You can macro all kinds of things together – multiple trinkets, other abilities. Go nuts!

#showtooltip
/cast Berserking(Racial)
/use Tome of Diabolic Remedy


I wrote this last one just to save space on my bars. It gets out my Puppy and my Nether Drake. If I hold Alt, it gets out my Puppy and my Raptor.

#showtooltip
/use Worg Carrier
/cast [modifier:alt] Swift Blue Raptor
/use Reins of the Azure Netherwing Drake

Add
/equip Riding Crop
as the last line, if you want, but remember to replace your trinkets when you get where you’re going!

To Be Continued. . .

Wyn’s UI – Part Three (Boss in Action)

Part three of a series. Please read Part One & Part Two.

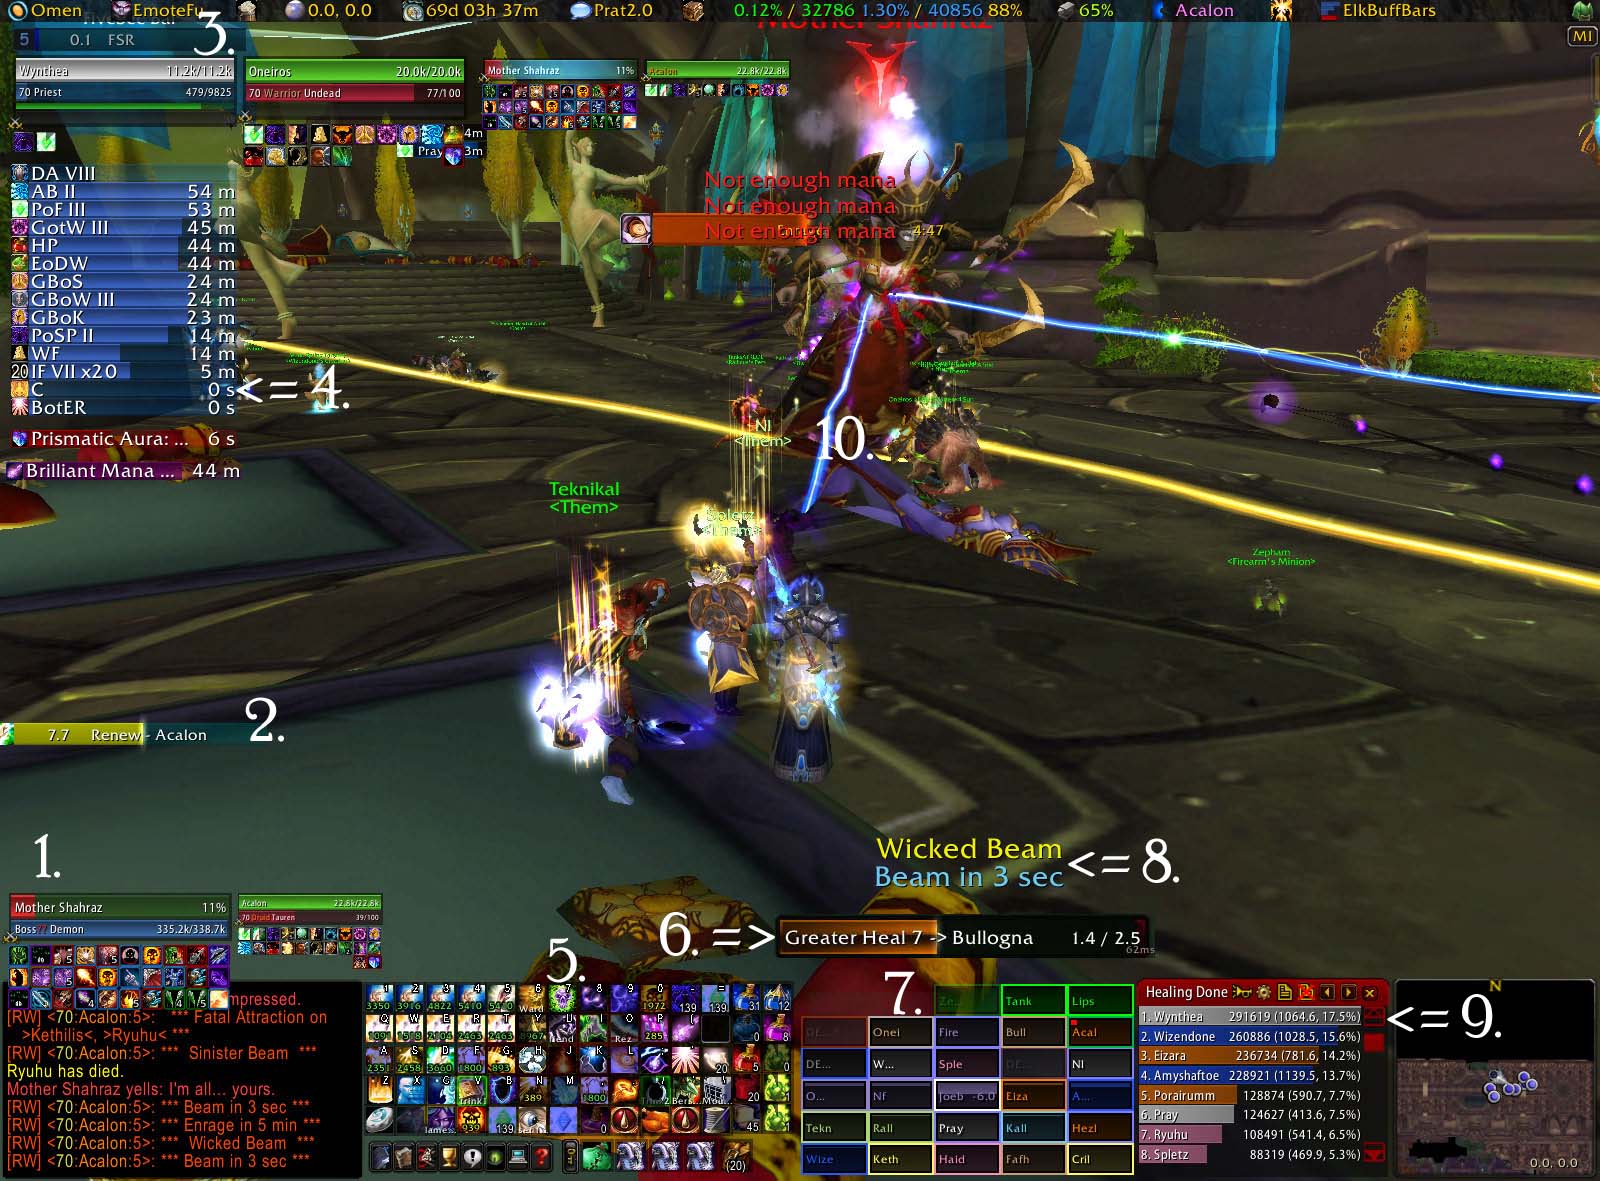
Okay, finally a real action shot like I’ve been promising. Welcome to Mother Shahraz. There’s a LOT going on in this fight, but you do get to stand still for most of it (unless you get Fatal Attraction, but that’s another post altogether.) I picked this shot because it catches a few things – good mana-regen cycle, a solid fight with only one real phase, and me making a pretty big mistake.

Typical Bossfight:

Click to enlarge....as soon as Matt uploads the larger version!


BF Focus

1. I set the boss as my focus on this one, so I can more easily watch for what aura she has and which tank she’s targeting. Different fights call for different focii; just set it to whomever you need to babysit. If you’ll look at the bottom row of myBartender you can see an icon that’s an eye with something pointing at it.
I’ve macro’d that button to set my focus just to make it a little faster and easier. I’ll post about the macros I use at the end of this series.


2.HoT Candy keeps track of everyone I’ve Renewed. Right now, it’s just the MT, but that’s because my mana’s about shot. (No worries, my pot CD finished as I took the SS.) Resto-Druids especially take note: HoT Candy is your friend.

RegenFu Bar
3. This is part of RegenFu. I’m just about out of the Five Second Rule, and will hit some serious mana-regen goodness. Fully buffed, my non-casting regen is over 900, but in full shadow resist, it takes a big hit. So I’ll burn Inner Focus before my next big heal, to maximize the mana I get back without stopping casting. I also wait until I’m out of the FSR to burn my Earring of Soulful Meditation. (If you don’t have it, find a way to get it. The Bangle of Endless Blessingsfrom Botanica is a substitute, but only about half as good.) I rarely make it the full 15 seconds without casting something, but at least I get the full benefit at the beginning.

4. Here’s where this shot catches me not paying close attention. Look here on my ElkBuffBar – Clearcasting is just expiring, but you can see at the top of my screen that I didn’t have enough mana to cast the Circle of Healing I was trying to cast. On Grid, you can see that group 3 was taking pretty even damage – I was spam CoH-ing them to patch them up. I should’ve thrown a G.heal on Joe in the middle, there. I’d’ve been finished with the cast by the time I had enough mana to CoH again, and been able to burn Inner Focus more appropriately, or let one of my Shammies top off the rest of the Warlocks while I regenned a little more.

5. On Bartender, you can see which of my cooldowns are available. Mana management is absolutely critical for these kinds of fights. My Pot CD finished as the SS was taking, Fiend is down, Inner Focus is available, and my Earring is down.
Pot CD
Fiend CDEarring CD

As healers, our mana-rotation is as critical as a DPSers spell rotation. Learning to be efficient is one of the best things you can do to become a better healer. For me it looks something like this:

  • Start: 12.5k manaI can haz cookie?
  • First Pot – 9k mana
  • Pop Earring – 9k mana again
  • Inner Focus – When expensive heal is needed
  • Shadowfiend – 6k mana
  • Second Pot – 7k mana
  • Earring again – ASAP

    And so on.

Mana is a lot like gasoline in your car – it’s just as easy to keep the top 1/4 of the tank full as it is the bottom 1/4. And the earlier you pop those cooldowns, the sooner they’ll be available for you to use again. Once you’ve used them all, just rotate through as soon as they’re available. I tend to Inner Focus for Prayer of Healing, but will use it for G.heal or Binding heal, if necessary. A tip for Mother – don’t wait to Fiend. Your mana will drop faster than you’ll believe, and when that CD comes up again, you’ll be very thankful. Also, watch for the auras that increase or reduce shadow damage. You don’t have to wait for the increase-aura to Fiend, although it will help you, but you will want to avoid the one that will nerf your little guy.

BF Quartz Bar
6. Okay, I’m going to highlight that mistake a bit more here. Since I didn’t use my Clearcast to throw a heal on poor Joe, I pasted this copy of my casting bar in from another screenshot so you could at least see where it goes and how it works. You can see from my toon’s posture that I’m not actually casting anything. Quartz tells me what I’m casting, what rank, shows a timer, and who I had targeted when the cast began. I change targets almost constantly, so that’s a very handy feature.

BF Grid All7. This is one of the best shots to show how Grid works; most of the raid is at full health, and it’s obvious who needs heals. If you look at the top-right square, you can see Acalon – our MT for this fight. The Red dot in the upper left of his box means he has aggro. There will be any number of those little dots when there are multiple mobs targeting people. That dot, rather than damage taken, is my cue to take action in most cases. A working knowledge of the mobs involved helps me know if I should start casting a heal, or just shield/renew the people with aggro. The groups are a little jacked right now – my raid leader moves Shammies into the melee group in a rotation for Bloodlust (Heroism) purposes. You can also clearly see who is dead, and who is out of my range.

BF DBM8.Deadly Boss Mods lets you move where your raid warnings pop up. Back to the concept of reducing eye movement to maximize reaction time, having them right where you can see them helps you know who’s about to need a heal – especially if it’s a fight like Void Reaver or Illidari Council where the boss targets random raid members to take damage.
9. Here’s Recount again. Pray is a shadow priest. He’s beating the Paladins on heals, because they both died early-on. It’s important to note that just like any other statistics, the data is only as valuable as its interpretation. This particular shot tells you very little without knowing the set-up. Por was assigned to heal up those people who get Fatal Attraction. Not very glamorous, and it limits his ability to cross-heal. Wize and I are both on raid-heals, so we’re pretty much neck-and-neck. Eizara is generally assigned to the Tanks, but her mana-efficiency is so excellent that she helps a lot with hotting the raid. She is an absolute BEAST of a resto-druid.

10. Scrolling Combat Text isn’t that important, as far as I’m concerned, for my incoming heals or mana regen – I’m watching bars, so I can see that. The important thing is that it tells you when you gain a buff or debuff. Clearcasting, Diabolic Remedy, Deep Meditation, Band of the Eternal Restorer, Berserking… all that stuff pops up over my head, and keeps me from having to watch my buff list. There are mods that do this, and will personalize it any number of ways, but the stock UI also has this feature now. Unfortunately, I didn’t catch it showing in this ss, and it looked funny ‘shopped in. The “10” is where it would go.

Bossfight Breakdown

These shots were taken during a trash-pull right after Mother. I’m very self-critical, and have found a lot of value in analyzing my own performance after a given boss fight. I wanted to walk you through my personal stats after a fight.

Wynthea's Effective Heal Detail
This is a pretty typical boss-fight mix for me. I’m usually assigned to raid healing, and expected to help out on the tanks when they’re taking extra damage, or their healers are in some way incapacitated. Notice how MANY times particular heals were used: 17 Greater Heals compared with 14 Flash heals. 57 Renews. Clearly, I love me some Circle of Healing. It is my bread-and-butter for raid healing, but be careful not to fall into the trap of spamming it for everything. I have seen priests with upwards of 90% CoH – I cannot stress how inefficient that is. CoH is a great tool, but it is not in any way a substitute for good decision making.

A few examples:

  • My CoH costs approximately 400 mana to heal 5 people for about 1k each. I can patch up a group with roughly 3k damage each for 1200 mana. Not bad, but if that group happens to be my actual group, my ProH heals for about 2.5k per target at a cost of around 900 mana. Time-wise, the 3 second cast is the same as the time it would have taken for me to cast the three CoH’s. It’s actually a faster option, because my GCD won’t be up by the time the ProH is done, so I can move directly on to my next target. ProH also gets cheaper because of how well it lends to burning Inner Focus.
  • CoH is perfect for a situation where a group is taking moderate damage across the board – assuming you throw out about 3 CoH’s on the same group, you just healed 5 people for about 3k each – much better than the time it would have taken to Flash Heal the same people (7.5 seconds) for that amount… but if a single-target is down by even 5k, you’re much better off throwing a rank-5 Greater Heal than spamming 5 CoH’s.

Note: If you are taking damage yourself, and so is the Tank, don’t be afraid to Binding Heal. Once they nerfed the mana cost (it used to be about 1k, and now it’s around 700), it became very viable to heal the two most important targets you have – yourself, and the guy keeping the bad guy from flattening you. It costs about the same as two Flash Heals, and saves you the casting time, and the decision.

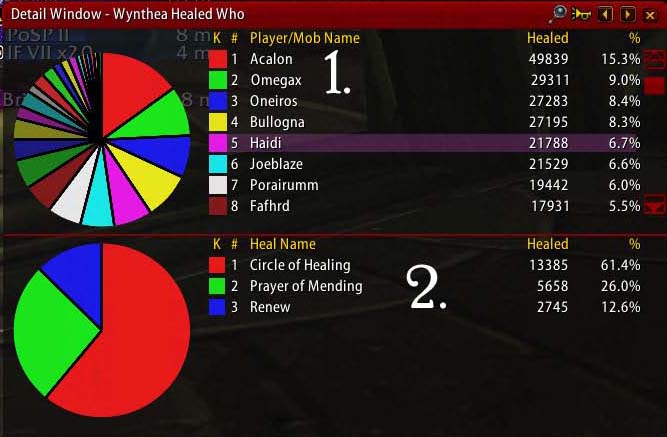
This shot is the report for WHO I healed during the same bossfight.

Healed Who

1. Remember, my assignment was to raid-heal, and supplement on the tanks when their assigned healers needed help. (Usually from getting the Fatal Attraction debuff.) Acalon was our MT, and he got the bulk of my raw heals, usually in the form of ProM, Renew, and Greater Heal, with a few Flash Heals thrown in if I got nervous. I forget where I read it, but a good rule to follow is to Flash Heal if your target needs a heal NOW, Greater Heal if you think you have time, and just Renew them if you KNOW you have time. That said, I keep Renew on the MT at all times, and ProM him as much as possible. My #2 target is Omegax – a warlock with a fondness for Life Tap. His heals are mostly Renews. Oneiros and Bull were our OT’s, their mixes look a lot like Acalon’s.

2. This second area of the screen shows a break down of what heals I used on a particular target. Haidi is one of our healadins, and the first example of my typical raid-healing mix. You can see that he didn’t require any special attention. Working through the rest of the raid heals, this is pretty much typical for everyone, maybe with a Flash Heal thrown in.

To Be Continued. . .