When I levelled to 100 and started queueing into heroics, my mana regen was absolutely abysmal. I actually opted to pick up Words of Mending because of the extra passive Prayer of Mending that it would fire out. Heroics at 610 ilevel with non-existent Spirit with similarly geared tanks and DPS is truly a challenge.
No one has health pools high enough to soak that kind of periodic and unnecessary damage.
The damage out from the group is competing against my ability to keep the group alive long enough resulting in strategically healing the tank and the highest DPS.
My mana regeneration isn’t enough to keep everyone topped off which results in a different mindset of making sure players are above an arbitrary threshold (like 30% across the board).
Don’t mistake my observations as complaints as most of us veterans have been here before from the start of Burning Crusade, through the heroics of Wrath, the mana and healing crunch during early Cataclysm, and the slightly more relaxed Mists of Pandaria. I’ve done the dance before. I’m still trying to get over the fact that spirit’s only available on a few items. I mean, I get it. I know why. But it’s the first expansion where I’m not scrambling for as many spirit items as possible and where I’m legitimately competing against Warlocks and Mages for that cloth gear.
Normal mode dungeons and early heroics (ilvl 600 – 615)
Now, let’s talk about talents for a second. I mentioned Words of Mending because the outgoing Prayer of Mending was free. I love free (even though it’s like buying McDonalds coffee, with every 7th coffee granting you a free one after). It means my mana can be saved for other crucial spells like a well timed Power Word: Shield. At this stage of the gearing process, you probably don’t have any trinkets but you’re slowly working on your way to obtaining that legendary ring from Khadgar. Maybe you have it, maybe you don’t. You might still be using an heirloom weapon or something. The name of the game here is efficiency and low costs (or free costs). Like it or not, you’re going to be dying for mana if you intend to solo queue into heroics. The pool of players will range from skilled players who won’t take any damage to players who are attracted into standing in every fire or void zone or ignoring mechanics.
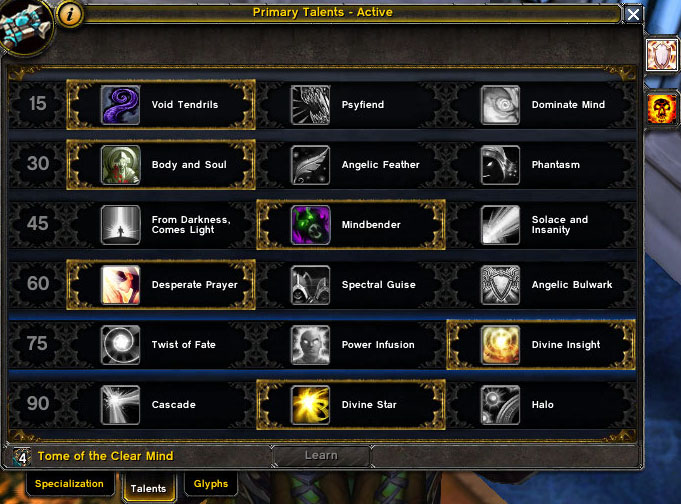
Recommended talents and glyphs
- Level 15: Desperate Prayer
- Level 30: Body and Soul
- Level 45: Surge of Light
- Level 60: Psychic Scream
- Level 75: Power Infusion
- Level 90: Divine Star
- Level 100: Words of Mending
Surge of Light tends to proc after one or two taps of Holy Nova. Great if you need to bank a few instant heals in reserve for upcoming damage. Your Psychic Scream talent and glyph offers you an out in case CC breaks early or if you attract company. Power Infusion provides much needed mana relief during high pressure phases. Your Power Word: Shield will both absorb and heal with one action.
Heroic mode and Challenge Mode (ilvl 615 – 630+)
Now you’re in a slightly better position. Your spells and heals are hitting for a little more. People aren’t dying as much. You can afford to be a little inefficient here and there if you need to in order to save players. Your trinkets and neck have spirit on them now. You’ve said goodbye to Hellscream’s BoAs. You’re ready for the next step and want to gear yourself up for raids that’ll be opening in December. You want to be an asset to your guild and indispensable to your raid.
Recommended talents and glyphs
- Level 15: Desperate Prayer
- Level 30: Body and Soul
- Level 45: Surge of Light or Mindbender
- Level 60: Psychic Scream
- Level 75: Spirit Shell
- Level 90: Divine Star
- Level 100: Clarity of Will
Psychic Scream stays. It’s a clutch spell that can make or break your Challenge Mode attempts. Surge of Light continues to be useful but Mindbender is another choice if you want that slight extra damage (very slight). You don’t need the Power Infusion as much since it only kicks in once every two minutes. Instead, pick up Spirit Shell because you’ll guaranteed to use it twice throughout most boss fights to help the group absorb incoming bombs or damage pulses or anything that could potentially flatten your group.
Clarity of Will becomes the winner here for the level 100 talent. You can pre-shield your tank a few times with it before they engage the boss and it gives you something to do if everyone is at full health. I managed to coat the tank with a potent 163k shield before a pull. I’m sure some of you can do much higher. Try to load up on as much mastery to help increase the power of Clarity of Will and your other absorb effects.
Raiding (ilvl 630+)
Welcome to raid finder (or normal mode or heroic mode or mythic mode, whatever your fancy). You’re now working with a team of healers and you’re in a position where you can bust out your Disc specialties and shine.
Recommended talents and glyphs
Level 15: Desperate Prayer
Level 30: Body and Soul
Level 75: Spirit Shell
Level 90: Divine Star or Halo (encounter dependant)
Level 100: Clarity of Will
You’re going to be building up and banking Holy Fire stacks for Archangel anyway. May as well convert that into Power Word: Solace and use ’em as you go. Your level 60 talents for crowd control aren’t going to be relevant as much so it’s a preference. Level 90 talents will center around the raid encounters. Returning priests may be shocked (and partially annoyed) to find that Halo and Cascade now have a slight cast time. Clarity of Will continues to be my pick for the 100 talent because you can pair up with another healer who can supply heals to the tank while you drop large absorb shields simultaneously.
I consider Penance to be mandatory but Fade and Purification is up to you. Some of the upcoming encounters will involve plenty of dispelling so I like having the Purification glyph. Fade adds a slight damage reduction. It might not seem like much but it’s something especially at the start of a tier.
Anyway, don’t take my word as gospel. Start of with whichever talents and glyphs you like and feel free to try out new builds as you adventure throughout Draenor. If you’ve been having success with a different build, post it! I’d be happy to hear and try it out myself. I have not had an opportunity to give Saving Grace a try. Any of you budding Priests out there use it in current dungeons?
http://rxbuywithoutprescriptionrxonline.com/fucidin.html
Buy Rimonabant online