Say you’re storming the Citadel on a fairly regular basis, massacring the Lich King’s advance nasties from Lord Marrowgar right up – literally – to Deathbringer Saurfang. You might be progressing through it at your own pace, or you might have it on farm and are running through weekly as a warm-up to pick up gear. Well, either way. Here are some general and some shaman-specific tips from my own experience on how to healing can help your group steamroller the nasties.
Lord Marrowgar:
1. Bone Spike Graveyard: Pain. In. The. There are two things you can do to mitigate its effect on your healing. Firstly, make sure you remind your healing 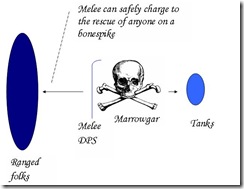 teammates to watch out for bonespike on each other. For example, if your tank healer is spiked then you need to pick up the slack for him and heal the tanks. Just til he gets back on his feet. Secondly, standing behind Marrowgar as shown in the diagram will help your DPS get you un-spiked as quickly and safely as possible.
2. Coldflame is not cool. Really. Move out of the fire before it gets to you. Yep, I know it’s a pain and it seems to as soon as a healer has moved there’s more coldflame racing towards you. Standing at range will give you time to see it and move.
3. One shaman to another: people stand in fire. Us healers know it like we know the sky is (sometimes) blue. Bone Storm and Bone Spike Graveyard do damage. There’s a lot of it going round. So consider dropping mana tide early to have it ready again later if needed and using bloodlust after the first Bone Storm so that DPS get time to use it when Marrowgar’s not doing the tango.
Lady Deathwhisper:
1. Spread out. At least a bit. Deathwhisper’s room is just big enough that if you stand too far to either side you won’t be able to reach the people on the other side. Spread your healer team out so that tank healer A is covering the tank on the left, tank healer B on the right and raid healer in the middle. If you’re running two healers then they’ll need to be a bit closer to the middle for raid coverage. There’s also less chance you’ll all get caught in death and decay if you spread out.
2. Healer, cleanse… everything. This fight has some status changes which give Deathwhisper and her crew an edge. If Curse of Torpor is running amok on your raid then cleanse it, first on you then on other targets. If a Cult Fanatic casts Vampiric Might (magic effect) on itself then cleanse it in order to down it quicker. Or tell your mages to spellsteal it: they’ll love you.
3. Shamanic wisdoms: think about your totem placement; you might want to manually place them rather than drop all four in one place. Personally I drop stoneskin and healing stream well to the left with the tank I watch over. I then separately drop Flametongue and Wrath of Air nearer the middle/mid-back, depending on whether it’s 10 or 25 man. I re-place totems at Deathwhisper when phase 2 hits.
Gunship battle:
1. Welcome returning soldiers back. With a lot of healing. When the boarding party returns Muradin might well still be trying to kill at least one of them, probably with rending throw. In my opinion it’s best to play it safe: overheal them all as they come back over rather than waiting for them to take an unexpected damage spike they might not survive. If at all possible have one member of the boarding party announce when they’re returning.
2. You’re a field medic, not a pirate. I think healers should stay on their ship rather than boarding. Healing on the Edge ™ of the ship works just fine. Yes, you have to move out of the cannon fire patches but at least there is ample time to do that. Things can and do go wrong for the boarding party and the chance of that goes up exponentially according to how many people jet over. You don’t need to.
3. Shaman talk: Consider earthshielding a different target, particularly a DPS on the boarding party. My 10 man run usually has an enhancement shammy swinging over to swash some buckles, and full of health they’re not. If Muradin/Saurfang decides he doesn’t like her she’s the most likely to go splat quickly and she is aware of it. I put earthshield on her for this fight: not only might it help in a pinch but it also makes her feel a tad bit safer when jetting off to hostile territory. She hasn’t died here since I made that change.
Deathbringer Saurfang:
1. Healers need time to breathe. Mark of the Fallen Champion can make things hectic if everyone’s trying to deal with everything on this fight. Arrange for one person to deal solely with victims of the mark when it starts hitting. Personally I have our disc priest doing that while our shamans chain heal around the rest of the group. It just gives everyone enough slack to not turn into headless chickens.
2. Be prepared. You’d be forgiven for thinking this was a healing-easy fight based on the first couple of minutes of it. Remember that the longer it goes on the more healing-intensive it gets, and its length is dependent on your group’s general level of kit and knowledge of the fight. Don’t let boredom tempt you into overhealing early on. Manage mana well and be ready for it to be challenged.
3. If you’re a shaman: Earth bind is your friend. Place it near-ish the platform to catch blood beasts as they spawn. It’ll just give the ranged DPS some breathing time, which should give you breathing time with less potential for blood beasts tearing up your warlock. Keep it refreshed. If you have more than one shaman co-ordinate to have your earthbinds cover a greater area.
World of Matticus: helping healers storm their local citadels since 2010. As with many fights at present the thing to remember above all else is to be mobile and flexible if the situation requires. I’ll also briefly be extolling the virtues and citing an example of shamans retreating to advance, later in the week.
How about you – are you a healer with any tips to add for the first wing? Any widely held tactics you’d particularly like to discredit? Any questions been troubling you about the healing on wing the first, whether or not you’re a healer? Comments are very welcome!
