Malygos Phase 3 Made Simple

malygos-p3

“Anyone have any tips for Malygos Phase 3?”

This is a common question I’ve seen on my Twitter that I’ve decided to address.

The phase 3 of Malygos is difficult for players the first time they run into it. It generally takes a number of wipes before players figure out what to actually do and how to do it.

When I explain this fight to pickup groups or other guilds, I try to keep things as simple as possible.

Setting up

As phase 2 ends, the entire instance is going to fill with bright, seizure inducing colors.

To make sure everyone’s in sync and starting in the right area, I get everyone to snap and move down to the southern side of the platform. Look on your minimap for this if you have to. I ensure everyone stays together as much as possible.

Note the red dot in the diagram above.

As the platform breaks apart and your raid falls, see to it that no one touches their flight controls. Let Malygos settle down and park himself. Once he does that, the raid leader cues the raid to climb.

Climb directly up until you’re at head level with Malygos. For the remainder of the fight, this is where you’ll be on the Z axis of things. You don’t have to worry about climbing or diving. You and your raid are only going to focus on strafing.

Movement

Note the four dark blue (navy) circles on the map above. Those are going to be the 4 points everyone will navigate to.

Now that the raid is head level and starting at the south position, you’re going to move towards the east, north, west, before heading back to the south.

In other words, fly counter-clockwise in 90 degree increments. You don’t have to do this constantly. Only move when the raid gets hit with a static field (30 yard AoE damage spell). See a static field? Move east. Another static field? Head north.

For the DPS

Even though I’ll have anywhere from 6 to 7 healers for phases 1 and 2 on Malygos, I’ll specifically jump into the play on phase 3 to help DPS. I like to get another healer to do it with me. This drops healing drakes down to 4 but increases attacking drakes by 2 (or having a net result of 20 firebreathing drakes).

Flame spike: Damaging fire attack that awards a combo point at the cost of 10 energy

Engulf in flames: Finisher that adds a DoT effect. The more combo points, the longer the duration of the DoT. Can stack.

As you can see, the more Flame Spikes you cast, the more DoTs you can add and the longer they last. It takes a while to build up momentum.

For the sake of simplicity and those doing it the first time, I suggest going for a 1-1-1-2 rotation.

On a side note, I think the guild best is currently at 22 stacks. Can’t remember if it was one of my Warlocks, a Hunter, or Kimbo (Ret Pally) who pulled it off.

For the healers

First thing’s first. What you may realize is that your raid frames are going to be useless! They don’t show the health of the drakes! There are a few addons that combat this, but I’m going to assume that you completely forgot to get them.

Press Shift V. This brings up healthbars on to the screen. At this point, you’re going to be relying on heads up healing. In other words, you’ll have to filter out the players with low health bars, target them, and heal them.

Revivify: 10 second HoT. Each application adds 1 combo point. This can stack up to 5 times.

Life Burst: This is an AoE healing finisher which increases your healing done by 50% (and lasts longer per combo point). If you have maxed out combo points (5 of them), the spell will heal around 15000 across all friendly targets within 60 yards.

This is like extreme whack-a-mole.

You may not have combo point indicators so you’ll have to keep track of it mentally in your head. And since Life Burst is a large AoE, you don’t always have to target the weakest drake. Just pick one and slam the key and it should engulf everyone.

For the DPS and healers

Lastly is the Flame Shield mechanic. Any spell that registers combo points will work (Revivify or Flame Spike). The more combo points, the longer the shield.

You’ll want to use this when he targets you with a Surge of Power. Having Deadly Boss Mods installed will cue a large warning on your screen that Malygos is looking at you.

Even though he looks at you, you still have time to build up points to survive. A lot of players will panic when this happens and feel helpless.

Get a grip on yourself and calm down.

When he looks at you, there are 3 seconds before he fires his laser beams. The beams will last 5 seconds. You just need to have the shield up for a portion of it to survive. With luck, your AoE healers can still catch you while the beam is going off to help mitigate some of the damage.

Let me reiterate, you don’t have to have your shield up the entire 5 seconds to survive. So if you’re caught with your pants down without any combo points and he’s looking at you, fire off 2 or 3 combo point spells and hit your shield. You should be able to survive it with slight scale damage.

Reminders

  • Run south going into phase 3
  • When Malygos levels up, climb up to him and reach head level
  • Strafe in 90 degree increments going counter clockwise
  • DPS: 1-1-1-2
  • Healers: 3-3-3-3-3-4 and press Shift V to toggle health bars
  • Don’t panic when he catches you with no combo points since you still have time

Good luck and good hunting!

Patchwerk through the eyes of a Resto Shaman

Image courtesy of Feralis.org

Lodur from Zul’jin here once again. This post I’d like to talk a little bit about healing Patchwerk as a restoration shaman. This will be a bit of a short post for me this week. Patchwerk for the longest time has been THE premiere check for your dps, your tanks and your healing. He is a perfect measuring stick for your raid if you think about it. He’s a straightforward fight, dps can sit and dps, tanks sit and soak damage and healers sit and heal. There’s no fancy gimmicks, no movement or fire to move out of , so it really is the perfect boss fight to check out your raids gear and ability.

You might ask youself “What is there to know? Don’t we just dump heals into tanks and call it a day? ” There are a couple different roles a shaman can play for healing through Patchy here. The two tried and true methods are Chain Heal spam and Lesser Healing Wave spam. Lets talk about the strengths of each for a moment here.

Lesser Healing Wave method.

  • Quicker heals
  • Using Glyph of Lesser Healing Wave allows the spell to hit for almost as much as Healing Wave
  • Lower spell cost for more heals per mana spent.
  • Quickly allows off tanks to be topped off to full health

Chain Heal Method.

  • More efficient heals (5.3 healing per mana spent)
  • Allows for both off tanks and main tank to be targeted and healed through the jumps of chain heal.
  • Smoothes out healing on the off tanks so second healers have an easier time keeping the tanks health even.
  • Allows for lag compensation due to added healing buffer.

Lesser Healing Wave Method:

This method is really straightforward. Simply put you keep Earth Shield up on your tank and continue to dump Lesser Healing Waves and Riptides into him constantly. Make sure to keep your Water Shield up for maximum mana regen and to make sure you have full charges available for Improved Water Shield. Using this method you have to apply healer tunnel vision. By that I mean you have to pay attention to your tank and only your tank, if you try to heal another OT or the Main Tank, your tank is likely to eat a large spike before you can top him off. This method allows for very little error but is very mana costly in the end.

Chain Heal Method:

Personally I prefer the Chain Heal method, let me explain a bit about why. Firstly, it is simply our most efficient heal. You get the most bang for your buck out of it and if you have your 4 piece set bonus from tier 7, or even if you’re still rocking a couple pieces of tier 6, you just get the most mileage out of it. Secondly it has a lot of synergy with some other talents that you will find useful for this fight.

Lets go ahead and assume you’re assigned to heal one of the two Hateful Strike tanks (I’m operating under the assumption you’ll be using the two OT strategy.) The tank you are specifically assigned to will be your the starting point of all your heals. He will get the most out of your chain heals. After that if the OT’s are situated right, it will bounce off of your tank and onto the second OT, thereby adding a buffer to that tanks healers. My experience has show that two restoration shamans placed on the OT’s produce enough of a healing buffer that the other healers have a light healing load, it makes sure to smooth out the spikes in healing you normally see. Think of it as like providing the driving baseline for a band, it helps set the framework for everything around it. There are a few more benefits to this. Lets say something goes terribly wrong and all of a sudden someone other then the OT’s takes a Hateful Strike, if you’re already chain healing you’ll be able to heal the person through the smart heal component without having to divert attention away from the OT’s in order to heal someone up. We can also assume you’ll be using a healthy smathering of Riptide it’s just going to pump your Chain Heal amount up that much more. Also, by using your chain heal you’re allowing for Tidal Waves to be up all the time so if you need to throw a LHW or a HW it hits for that much more.


All in all he’s not terrible for us, just make sure you have your Runic Mana potions and Mana Tide Totem ready to go to keep your mana up, and it should be smooth sailing for you. Both methods work (regardless of crit or haste gear =P ) and as long as you’re paying attention to your tank, you will easily succeed.

Now if you guys have a different way of doing it, please feel free to share =)

Till next time, Happy Healing!

~ Lodur

Heroic Sartharion 3D Conquered

matts-drake

It is done. Approximately 24 hours since the experience and epiphany I had last night, it all paid off.

Sarth and his 3 drakes are down.

Twilight Drake

A big thank you goes to everyone in the guild. Without their efforts of them, the assistance of the Plus Heal Community, and the various bloggers who’ve written about their experiences, this post would not be here right now.

The handling of the Drake was flattering. The officers and an overwhelming majority of the guild felt that I should have gotten the first one.

Needless to say, I double checked to make sure.

The last thing I want on my hands is a riot because the GM gets awarded the first Drake. I’m not one for mounts. Even though I made a Flying Carpet, I still ride on my purple Gryphon. But I guess the Gryphon will get rested for a while.

Subsequent mount drops will be handled with interested members rolling instead of the loot master doing a raid roll. This gives players a measure of control and it allows players who don’t care about the mount to opt out of rolling for the ones that do.

My hands were shaking once we got that Shadron down. It was the first time we hit that plateau and after that, it just felt like smooth sailing from there.

Total time spent: ~8 hours on just 3 Drakes alone
Time of death: 7:04 PM PST, January 28

  • Worked on the pull
  • Worked on the Drake positioning
  • Worked on Whelp and Elemental tanking (We used a Death Knight)
  • Worked on healing the ad tanks and the Drake tanks
  • Worked on surviving Fissures and Firewalls
  • Worked on timing Main Tank “saves” (Pain Suppression, Barksin + Survival Instincts combo, and Guardian Spirit)

Extra things

These points may be minor, but they might help you. We increased the healing from 6 to 7. This gave us 2 Paladins. The fight took slightly longer, but it paid off.

Now what these Paladins did was they spent 17 points into Protection to pick up Divine Guardian.

The moment I used my Pain Suppression on the first breath, I’d pick one Paladin and tell them to bubble. Since a majority of the raid members are standing together, this helps mitigate raid damage during that period. On the second save, the Druid tank on Sarth popped his Barksin and Survival Instincts to outlive that breath hit. At this point, if it goes off, I alert the Holy Priest to get into position because his Guardian Spirit is up next.

Reader Rivendael brought up a great comment that I wanted to reiterate:

Hi Matt, I’m surprised that you have to watch the animations at all :)

It’s very responsible of you, considering that most healers need to/are very used to watching mainly health bars, but in the end, I’d say that the job of watching for breath cooldowns should in fact fall on the tank.

As my guild’s druid tank on Sarth (we’ve downed 3D), even before the fight, I establish player orders for the cooldowns we’re using. When Vesp lands, I call for the first cd-user to “prep” (usually all my healing pallies and priests). When I see the breath animation, I call for the prepped player to use his cd. Then I call for the next player to prepare. And so forth.

My healers just need to macro their cd to me and be in range, that’s all, and I take the burden off them so they can -visually- focus on their heals, while dodging lava walls and void zones. As the one player facing Sarth’s bigass head all the time, it’s the least I can do. Since your Sarth tank obviously has a mic, why not suggest that he do the same?

The answer to that is we both do it. The Sarth tank and I are able to watch for his head. As a healer, I like to use IceHUD so that I can see the health bar of my target, the health bar of myself, and the action that’s going around. This goes hand in hand with my heads up technique of healing.

The “double affirmative” from the Sarth tank and myself strengthens our judgment. It’s better to have two pairs of eyes on it if possible. It helps confirm that it is the right time to use a save when two players are saying the same thing. While there’s nothing wrong with allowing Sarth’s tank to call out when to use the save, I prefer keeping my head up instead of relying on reflexes to hit the tank.

Either we’re both right or we’re both wrong.

I do have a video from a DPS perspective. Just need to find a suitable host. Any ideas of a Youtube or Filefront alternatives?

Also: Ner’Zhul is ridiculously PvE competitive. We’re in the top 20 of guilds that have successfully killed Sarth 3D.

10 Seconds with Sartharion 3 Drakes

I’m the type of player that likes to relentlessly playback previous events (or wipes) in my head. I try to see if there’s anything I can do better from my perspective or anything I should have done differently. Here’s a 10 second mentally recalled highlight reel moment of a time that happened all too often.

We run a 6 healer setup and I’m the only one on the Sarth tank.

0:00

Vent call: Firewall, move!

*Casts Shield, Renew, and dives narrowly avoiding a wall*

0:02

Vent call: Vesperon landing!

*Casts Penance*

0:04

Sarth tank: I have the debuff!

*Casts Flash Heal*

0:06

*Casts another Flash Heal*

0:08

His attack animation stopped and he’s raising his head.

WAIT! HIS HEAD IS RAIS-!

0:10

Sarth tank: I’m down!

Reflections

Thankfully, that was just earlier on in the night. After I settled in more and got into the groove, I was able to get my timing down perfectly. The problem with me was that I ended up being off in my timing.

The timing was off enough to get our tank 1 shot.

But I managed to fix it. I figured that I was zoomed in too close on my character that I had to adjust my camera more to keep my sights on Sarth. That took up precious time and added increased risk.

I managed to solve it by maxing out my camera distance so that no matter where I ran, I’d still be able to keep an eye on his head.

FYI

I use his head as an indicator for when he’s about to breathe. When he tilts back, that’s the time to use the Pain Suppression.

What’s killing us

We lose 1 or 2 people to void zones in the beginning or to a Firewall. There is a bit of inconsistency. Some attempts, the raid group is able to blast through the first drake with no problem. In other cases, people are just getting sloppy or we have bad lag luck (like a player dying to a void even though they’re 15 yards away from it).

The second problem occurs when the third drake lands. Players are killing themselves. Going to see if that can be fixed by having Paladins “tactically bubble” at certain times to lessen the overall raid damage with that Shield talent thingy.

As for me, the 10 attempts where the raid lived long enough for Vesperon to touch down, I was able to squeeze off Pain Suppression fast enough for 7 of them.

That’s a 70% save percentage.

Not good enough Matt. Not good enough.

Healing Assignments for Resto Druids

broccoli-banner

Perhaps more than any other healing class, Wrath of the Lich King has revolutionized the way druids heal. I’m going to take a bit of a look back to where we came from as a way to help understand any troubles druid healers might face at present when we try to figure out what our role in raids should be.

Back in the “Good” Old Days

I came of age as a healer during the BC raid content, and I think part of me will always missing rolling Lifebloom stacks on four different tanks during the Hyjal trash waves. Lifebloom spam may have been widely criticized, but at the time it was effective and felt very dynamic for the player. The timing was tight enough to require tank-specific macros, which I miss, because I could always change their icons to a pig whenever I got mad at them (sorry, Brio). However, when healers argue now that they don’t want to be locked into a rotation, they’re probably thinking of something like old-school LB rolling with horror. That was a rotation, all right–but it left me dizzy. I had to keybind Lifebloom twice–both to my mouse clickwheel and to F. The “F” was for when I needed to refresh while turning with the mouse. At the time, there was no way to increase the 7 sec Lifebloom rotation, and the penalty for letting the stack fall off was fairly severe. I never ran into mana problems, but sometimes the tank would take more damage than I liked if their stack slipped off, and I had few ways to play catch-up. If one tank’s stack went, then most likely all four would.

Even some boss fights made Lifebloom spam worthwhile. On Illidari Council, I used to assign Bonkers to roll LB on three tanks, giving him 1 GCD per cycle free to do “whatever he wanted.” Let me add that the healing buffer Bonkers provided to three of the tanks won the fight for us on more than one occasion. Why did I give the assignment to Bonkers and not myself? Because Bonkers is quicker than me. My assignment, keeping up the group on Malande, was a lot easier. The odd thing is, these kinds of assignments seemed great to Resto Druids at the time–1 GCD free? That’s amazing.

Now that I think about it, the Good Old Days don’t seem so great after all.

Broccoli, v. 3.0

Patch 3.0 brought new tools for the druid healer, offering flexibility where before we had none. However, it strikes me that many Broccoli Stalks might be a little bewildered by all our new toys. And if we’re confused, imagine what it’s like to do healing assignments for a resto druid these days. A few days ago I came across this topic on PlusHeal forums, posted by Siha of Banana Shoulders:

So, I’m the healing lead for my guild, and it usually falls to me to do healing assignments.

I’m having some trouble deciding how best to make use of resto druids. I know in TBC I always used to use them for a multi-tank assignment, keeping a bunch of people hotted up with Lifebloom, but I’m not really on top of all the resto druid changes in WotLK yet.

The talented Siha, as always, gets right to the point with her post. I replied in the topic, but I think that the question has enough merit to warrant a full-length post.

So, what do we do with the newly-versatile druid? After looking at my own performance and those of my Cruciferous Vegetable buddies in Conquest, I am convinced that Resto Druids can be assigned in two different ways for Wrath content. I’m going to showcase a couple of meters-topping druid performances to show just how versatile trees are these days

Raid Healing

This assignment is the most obvious for a resto druid. Wild Growth, due to its higher total healing and it’s status as a heal over time spell, suffered less from the recent nerf than Circle of Healing did. With Rejuvenation, Wild Growth, and perhaps a glyphed Healing Touch in the mix, druids have a powerful toolkit to deal with raid damage.

Let’s take a look at the meter breakdown from an expert druid healer on Gluth, which features heavy raid damage:
s13-meter

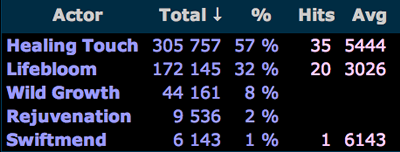
Now, the meter % alone might not mean much, but let’s factor in healing assignment. Both S13 and I were assigned to heal the kiters on Gluth, and we have similar gear. Why did he outperform me? Let’s take a look at the abilities breakdown.
s13-breakdown

Take a look at S13’s Healing Touch percentage and the amount it hits for on average. That tells me–even if I didn’t already know–that he’s using the Healing Touch glyph. The fact that he’s able to get so much healing out of a direct healing spell also tells me that S13 is fast. He’s really great at reacting to situations. Notice here that he’s also made a lot of use of Lifebloom–nerfed it maybe, but useless it is not. This WWS report is post-WG nerf, by the way. S13’s performance shows how little a healer has to rely on Wild Growth to be effective (and to post good numbers while doing so). If I were to take a look at S13’s targets, I would see a lot of healing on the 5 kiters, but also a decent amount on other members of the raid. S13 is a great raid healer because he’s able to pay attention to a lot of things at once and to accurately judge when he can go a bit beyond the boundaries of his assignment.

Tank Healing

Yes, I know druids have an AoE heal now. That doesn’t mean that we’re not still good at our old role, healing the main tank. I’ve just shown you the WWS from a druid who excels at raid healing. Now, I’m going to show you my own meter performance. I am a tank healer. That’s what I like, and that’s what I’m good at. I’ve been healing a warrior MT so long that I know how the damage hits and what I can do to fix it. I don’t pretend to be the best at anything, but if I’m in charge of healing assignments, I’m going to stick myself to a tank. It’s not usually very showy on the meters, but I’m going to give you a peep at the one fight in Naxx that does let tank healers show off–Patchwerk.
syd-meter

To understand this image properly, you should probably know that Silvia and I were assigned to heal the offtank, a druid, while S13 and Arktos were assigned to the main tank, a warrior. For the life of me, I can’t remember what Kaldora, our holy priest, was assigned to that day. The nature of the fight dictates that there is simply more healing to do on the off tank(s) than on the main tank, so an off-tank healer is going to post higher numbers. Be that as it may, this is nonetheless a good performance from me personally. Let’s look at the breakdown of what I did.
syd-breakdown

First of all, notice the presence of Regrowth. I use the Regrowth glyph, and a fight with heavy tank damage also shows it off. Meanwhile, I keep Lifebloom rolling on the primary off-tank. As for Rejuvenation, I keep it on both the primary off-tank and the backup. At higher gear levels, your raid is less likely to need two offtanks for Patchwerk. I used to post even more impressive numbers when two off-tanks took heavy hits. I would keep up my full hot rotation on the druid and use Rejuvenation, Swiftmend, and a Nature’s Swiftness/Healing Touch on the secondary off-tank. I always say that Resto Druids can heal two tanks as well as one, and it’s very nearly true. This is a lesson I learned in Zul’Aman, and it still serves me well on a multi-tank fight like Patchwerk. One thing an MT healer can never forget is the power of Swiftmend–it’s easy to ignore, but make yourself use it whenever you can. You’ll notice that Nourish is missing from my rotation, even though I have the 4pc T7 bonus. Regrowth is simply better if the damage is high. I will use Nourish on fights where Regrowth might be overheal, or on long fights that might stress my mana.

My message to healing leads is this: resto druids can tank heal. You might think that only a paladin or discipline priest will work, but don’t discount the resto druid, particularly one who’s used to this job. We may have a discipline priest solo-healing the MT on Sarth 3D, but that doesn’t mean a resto druid cannot be assigned to the task. In fact, some days I want to arm-wrestle Mallet for the job.

Glyphs and Talents

As you can see from our performances, S13 and I, despite having almost the same gear, are very different healers. There are slight differences in talents and glyphs that support each of our preferred roles. Here are my thoughts on how to set up a resto druid to excel at either raid healing or tank healing.

Raid Healing

In terms of talents, I suggest Tranquil Spirit to make Healing Touch and Nourish more efficient, a fully talented Gift of the Earth Mother, and perhaps Naturalist for the shortest Healing Touch cast time. As an alternative, you might put either 1 or 2 points into Improved Tranquility. I find this spell very useful when I can remember to use it. It shines on any fight where the raid is fairly close together and AoE damage as high–I’ve used Tranquility to good effect on Loatheb, Sapphiron, and OS3.

To heal S13-style, you will absolutely need to glyph Healing Touch. I am extremely impressed with the HPS of this spell, and it only gets better as your gear scales. In addition, we can all afford the mana at this point. S13 doesn’t run OOM any more than I do. The raid healer has some amount of choice in the other glyph slots. I suggest Swiftmend and Innervate, but if you find that you never use Swiftmend, Lifebloom will also work. The Regrowth glyph, while good in and of itself, won’t do much for you if you’re never assigned to tanks.

Tank Healing

In terms of tank healing talents, the most important one to have is Nature’s Splendor from the Balance tree to extend HoT duration. However, all raiding restos should have this talent. I also use Tranquil Spirit to support my Nourish (in case I ever use it), a fully maxed Improved Regrowth, and Gift of the Earthmother for easier HoT refreshes. I do not have Living Seed at the current moment. It accounted for less that 1% of my total healing when I had it. If I get enough haste to remove points from Gift of the Earthmother, I may try it again. I have a feeling that either 1) Living Seed will do more healing in Ulduar or 2) it will get some sort of buff in the future. As for Replenish, either build should skip it because it’s endlessly terrible, but the tank healer especially does not need it.

In terms of glyphs, I use Swiftmend, Regrowth, and Innervate for main tank healing. The only debateble choice here is Innervate. I prefer it over Lifebloom, but Keeva of Tree Bark Jacket, who also main tank heals often, writes very convincingly in favor of the LB glyph in this recent post. A main tank healer should not glyph Healing Touch. It’s more useful in the large version paired with Nature’s Swiftness.

Conclusions

We’ve come a long way from Lifebloom spam. Whether we’re set to healing tanks or the raid, druids have a variety of techniques now to support their chosen role. We can do it all–just not all at once. If you’re a healing lead, it’s important to get to know your healers. With the new diversity of the druid class, skill and preference start to weigh heavily on how you should assign your druids. So, why not ask them what they like, and what they are good at?