
So now that you know what each talent is, does, and have a basic idea of when it’s most effective, let’s take a look at how to build a spec:
Step 1:
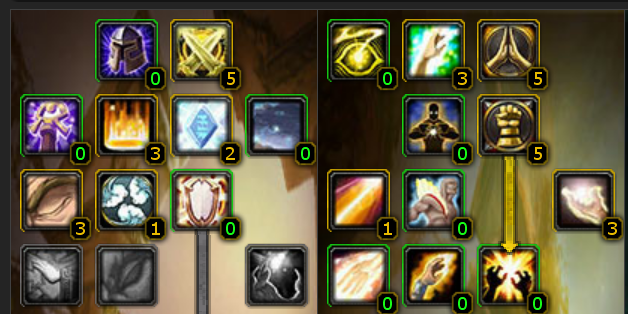
To start, plug in those mandatory 14 points:
- Twin Disciplines – 5
- Improved Inner Fire – 3
- Improved Power Word: Fortitude – 2* **
- Meditation – 3
- Inner Focus – 1
*PvEers: If you are 100% certain that another Priest in your raid will have Imp:Fort, and not mind buffing, and you REALLY feel the need for threat reduction, you can move these two points into Silent Resolve. I don’t think it’s worth it, but it is an option.
**PvPers: Choose Martyrdom rather than Imp:Fort.
Step 2:
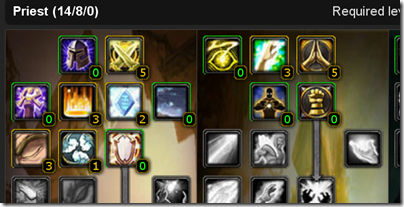
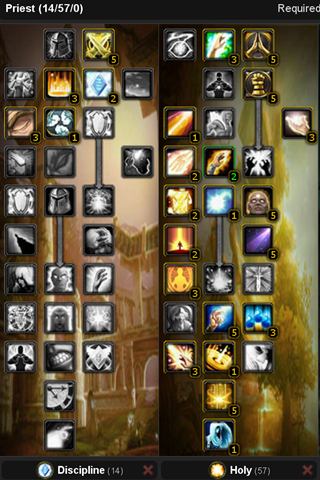
Decide whether this is a Holy build, or a Discipline build. For this example, I’ll walk you through my Holy spec, my reasons for each point, and where you could easily change it to suit yourself – and which changes wouldn’t be as helpful.
Step 3:
Build it!
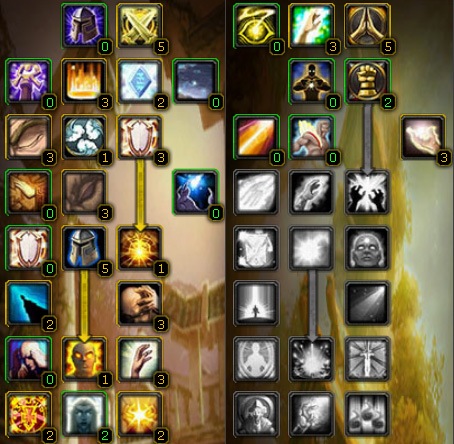
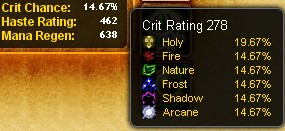
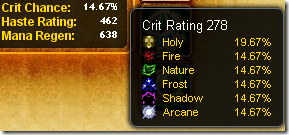 For Tier 1, take a look at your crit on your character screen. The idea here is that you want enough crit to get the mana saving goodness that is Surge of Light and Holy Concentration with reasonable reliability. Since Holy is largely a raid-healing spec, your three major raid-healing spells are Circle of Healing, Prayer of Mending, and Prayer of Healilng. CoH hits 5 people (6 if glyphed), ProM hits 5 (6 with 2-piece T7, assuming full duration), and ProH hits 5. If you have 2-piece T8, ProH gets 10% extra chance to crit.
Why does this matter?
Because in the first tier, Holy Specialization allows you a tremendous amount of control over the crit chance of your heals. Having around 20% crit unbuffed (25% fully raid buffed) gives you a 1-in-5 crit chance for each 5-target raid heal, with the raid buffs allowing some insurance. As with everything heal-related, you want to react as quickly as possible, and KNOWING that you will get a free, instant Flash Heal after every AoE allows you to plan ahead. If you have enough crit on your gear to get you to that threshold, you can start subtracting points from Holy Specialization. Personally, I like having the freedom to stack a bit more Spell Haste on my gear, so I choose to max out Holy Specialization so that my crit isn’t lacking.
Next, take a look at a Recount, WWS, WoWmeter, or other combat log parse. How much do you Renew? A lot? A little? For more research, check out the uploaded combat logs for a guild that’s farming the content your guild is learning. Do those Holy Priests use Renew? Often, if there’s a huge discrepancy between a very successful guild, and a guild that’s having trouble, a small strategy change can make a big difference for those new to the content. (I’m probably going to catch some flack for that – yes, the idea is that all Priests are individuals, and your spec should reflect that. My argument is that when evaluating the effectiveness of a particular spell, look ahead and see how effective it is for successful people in content that you plan to clear. Don’t be so attached to your personal status quo that it prevents you from achieving your goals.)
If Renew is something you use, or plan to use, a lot, pick up the three points in Improved Renew.
Healing Focus – for this talent, consider the content your guild is working on. Are you having trouble keeping yourself and your assignment alive during Mimiron? This could be a great option. Aside from that, there just aren’t many fights where the pushback will kill you, and you’ll be too far away from a Paladin that could use Concentration Aura – or another healer that can help you until the danger has passed.
 Tier 2 gives you even more wiggle room. Spell Warding will help you if you tend to die to spell damage. If you’re building a spec specifically for Mimiron or Mimiron hard mode, this will help protect you from his Rapid Burst ability. However, it’s five points that help NO ONE except you.
Divine Fury – points in this are a must if you still use Greater Heal a lot – more than can be helped by Serendipity, or if you also use your raid spec to solo quest grind. If neither of those are true, and you took points in Healing Focus, feel free to only put in two points. If you skipped healing focus, you have to put at least three points here to move forward. (Two will get you to tier 3, but you’ll need 3 for tier 4 if you take Desperate Prayer, and 4 if you don’t.)
Since I do all of my dailies in my Holy-raiding spec, I go ahead and max this out. It only costs me one extra point, which I steal from Improved Healing.
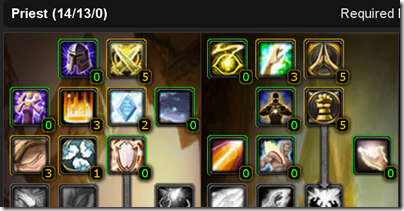
Tier 3 includes an easy decision: Max out Inspiration. Even though this is a raid-healing build, it’s a guarantee that some of your AoE will land on the tank. Spreading the love around won’t hurt the rest of the raid, either – if anything, it’ll make your job easier.
Blessed Recovery won’t help you in a raiding scenario, so skip it. (If you’re getting critical melee hits regularly enough to take this, get yourself a new tank.)
Desperate Prayer is completely up to you, but I find it very useful. It’s cheap, instant, has a short cooldown, can crit, and is a GREAT “Oh Sh–!!” button, especially now that pots are only once-per-fight.
In tier 4, since this is a healing build, forget about Searing Light.
To move forward, you’ll need 5 points between Holy Reach and Improved Healing, or 4 if you also maxed out Divine Fury. Since Improved Healing only affects Greater Heal (which I use rarely these days) and Divine Hymn (Which I always Inner Focus), I give Holy Reach both points, and stick just 2 in Improved Healing for filler. (You could also completely bypass Improved Healing by putting these two points in Healing Focus.) In my opinion, that 5% savings on a heal I don’t use often is less efficient than the extra radius on my AoE heals. (And I’m more comfortable putting that point into Divine Fury, where on the rare occassions I do need Greater Heal, it will be fast enough to be effective.) Although you’ll run into many people who are perfectly comfortable with 1 point in Holy Reach, you will rarely see Holy builds that skip it entirely – you want CoH and ProH to have the chance to hit as many people as possible. If you skipped Healing Focus, you’ll notice only 1 point in Improved Healing is needed to move forward. You can easily plug that point into Lightwell, Blessed Resilience, or Test of Faith later in the tree.
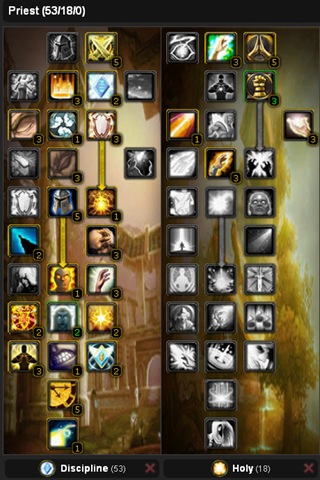
 Once you reach Tier 5, maxing out Spiritual Guidance is a no-brainer, since it’s a flat-out increase to your spell power. Similarly, don’t skip Spirit of Redemption, since one point here buys you an extra 5% spirit. (Which, obviously, also increases your spell power in addition to your regen. It’s also nice to not ever have to inform your raid leader when you need a battle-rez, since it will be glaringly obvious.) Your other choice in this layer is Healing Prayers, and since Prayer of Healing and Prayer of Mending each benefit from set bonuses, and the AoE damage in Ulduar encounters makes Prayer of Healing your work-horse spell, skipping Healing Prayers is mana-suicide. Max it out.
In tier 6, Spiritual Healing is a misnomer, since it has nothing to do with spirit, however, it’s a straight up increase to the amount healed by all of your healing spells; max it out. Surge of Light is another talent where theorycrafters disagree: is one point sufficient, or are two required? Because I count on these procs, I max it out to ensure that I get them as often as possible. (And, really, why wouldn’t you want more mana-free, castable-on-the-move heals that stack Serendipity and take advantage of Twin Disciplines? More to the point, where could that one point buy you more benefit?)
By now, you’ve got more than enough points in Holy to get you to Tier 8, but this part of the tree is thick with awesome points. Still in tier 7, Holy Concentration is one of the best talents we have to increase our mana-regen, and you’ll find yourself gasping for water on longer fights without it. Combined with Surge of Light, this is one of the main reasons that crit is important for Priests these days. Take all 3 points. Lightwell, on the other hand, is a polarizing point. There are enough points in this particular spec that you can take it if you have trained your raid to use it properly, just either drop Divine Fury down to 4 points or Improved Healing down to two. Both of these will impact your Greater Heal (the former will nerf your cast time by .1 seconds, the latter will increase its mana cost by 5%.) Personally, I skip lightwell altogether.
Blessed Resilience used to be a strictly PvP talent. Then they re-worked it to “increase the effectiveness of your heals by 1% per rank.” Which makes it viable for PvE, theoretically. Frequent plus heal poster Sindaga posted the math over on the Elitist Jerks Priest Compendium that shows how this works:
“Empowered Healing vs. Blessed Resilience (yes, the PvP talent)
Taking two examples for empowered healing (Flash Heal & Binding Heal); this is due to the very low amount of greater heal casting, personally, done in Ulduar 25 and 10-man. Each heal will be looked at with empowered healing or with blessed resilience. Calculations will be done with 3000 spell power (a very attainable goal with even just a couple ulduar upgrades). The formula used will be as follows:
Spell = [Average + (Spellpower * coefficient)]*(talent modifiers)
i) Calculations with Empowered Healing (w/ spiritual healing modifier)
Flash Heal = [2049.5 + (3000 * 0.9668)]*1.1
Flash Heal = 5445 healing average
Binding Heal = [2237.5 + (3000 *0.9668)]*1.1
Binding Heal = 5652 healing average
Greater Heal = [4300.5 + (3000 * 2.2256)]*1.1
Greater Heal = 12075 healing average
ii) Calculations with Blessed Resilience (w/ spiritual healing modifier)
Flash Heal = [2049.5 + (3000 * 0.8057)]*1.13
Flash Heal = 5047 healing average
Binding Heal = [2237.5 + (3000 *0.8057)]*1.13
Binding Heal = 4969 healing average
Greater Heal = [4300.5 + (3000 * 1.6111)]*1.13
Greater Heal = 10321 healing average
iii) Calculations with Blessed Resilience & Test of Faith (w/ spiritual healing modifier) – I found something interesting testing with Renew. If the spell is cast below 50%, the ticks (even if the health goes higher than 50%) stay with the 12% increased effectiveness.
Flash Heal = [2049.5 + (3000 * 0.8057)]*1.25
Flash Heal = 5583 healing average
Binding Heal = [2237.5 + (3000 *0.8057)]*1.25
Binding Heal = 5818 healing average
Greater Heal = [4300.5 + (3000 * 1.6111)]*1.25
Greater Heal = 11417 healing average
So those are some pretty plain numbers. If you find yourself casting greater heal more than once in a blue moon, perhaps stick with Empowered Healing. If you regularly find yourself not casting it at all during fights then a spec for better output would first put the 5 points from empowered healing to 3/3 blessed resilience and then 2/3 Test of Faith.
Justification for taking test of faith is it provides more healing to those targets who need more health.” — Sindaga
The bottom line here is that putting 3 points in Blessed Resilience along with 2 in Test of Faith increases the amount healed on targets below 50% by a significant amount. If you’re looking to take advantage of Test of Faith in the next layer of the tree, it’s a good idea to pair it with Blessed Resilience – and you can easily take the points from Empowered Healing to make that happen. It’s entirely a play-style dependent call, and I personally prefer the constant levels of healing provided by Empowered Healing to the low-health dependent benefits of Test of Faith.
 Moving into tier 8, you’ll find some of your decisions have already been made, due to the preceding math. If you decided to put Sindaga’s 3 points into Blessed Resilience, you have already decided to skip Empowered Healing. If you decided against the BR/ToF combo, you’ll max it out instead. The other talents in this layer are Serendipity and Body and Soul. Although I’ve read some arguments that the self-poison cleanse is useful on the more poison-heavy encounters in Ulduar, if your Shamans, Druids, and Paladins are doing their jobs, you won’t need Body and Soul. Serendipity, on the other hand, plays a major role in making Holy a more synergistic healing spec. Layering spell haste for your bigger heals is a huge part of the raid-healing strategies for fights like Ignis, Deconstructor, Freya, and Mimiron. My typical heal pattern takes careful advantage of this: Inner Focus-Prayer of Healing -> Surge of Light-Flash Heal -> Binding Heal -> Circle of Healing -> Surge of Light-Flash Heal -> Serendipitous- Prayer of Healing -> Surge of Light-Flash Heal…. into infinity, peppered with Prayer of Mendings and Renews as much as possible, both of which provide extra Surge of Light procs, and, therefore, free layers of Serendipity to haste my next Prayer of Healing. Make sure you take maximum advantage of Serendipity.
Like tier 8, you’ve already made quite a few decisions regarding tier 9, without realizing it: If you picked up Improved Renew in tier 1, you would shortchange yourself to skip Empowered Renew. When you decided to build Holy, you decided to take Circle of Healing, (I know there was a lot of noise about avoiding it when they added the 6 second cool down, but with its coefficient balanced to reflect the cooldown, the glyph to increase it to 6 targets, and its ability to proc Surge of Light, skipping Circle of Healing would be foolish.) And when you decided between Empowered Healing and Blessed Resilience, you decided whether you would take Test of Faith as part of the Blessed Resilience package. If you’re following my build, take all three in Empowered Renew, Circle of Healing, and skip Test of Faith.
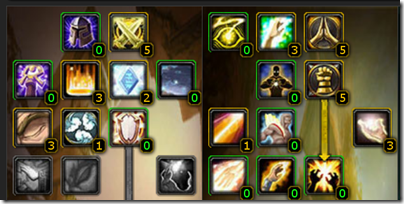
For tiers 10 & 11, you’ll notice you have exactly 6 points left. Finish out your spec by finishing out the tree with 5 points in Divine Providence, and the last into Guardian Spirit.
This is my completed spec – and I fully expect as many detractors as I do compliments. Lightwell may work for you and your raid, or perhaps you think I’m foolish to finish out Divine Fury rather than taking Healing Focus. I’d love to hear about tweaks that you make (and how they work for you), but for me this is my perfect spec – Renew-heavy, allowing me to stack haste, and with Desperate Prayer the only concession to keeping myself alive rather than focusing on my raid. 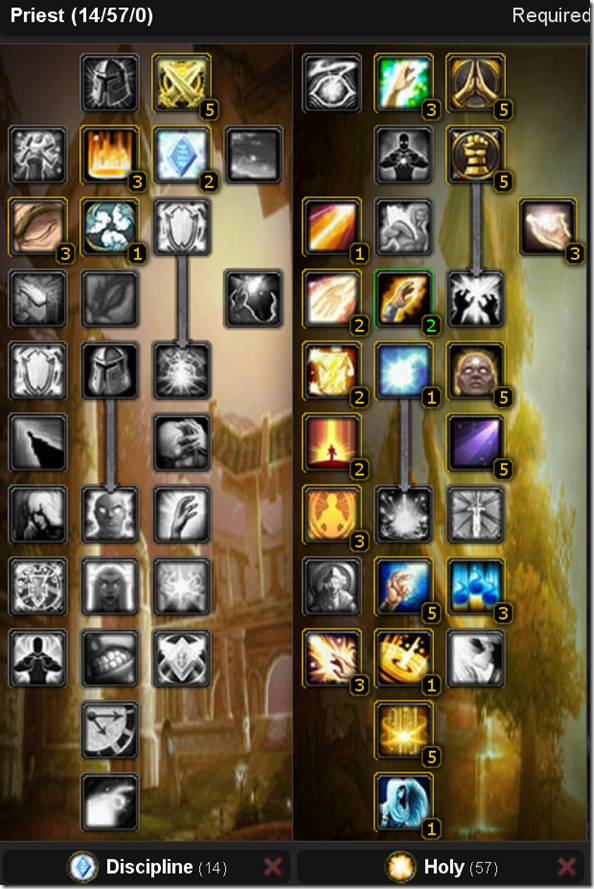
Next Post: How to Build Disc
Luv,
Wyn


