Healing Crusader’s Coliseum: Northrend Beasts Encounter

Image, abilities courtesy of MMO Champion

The Beasts encounter consists of three separate fights within 1 encounter. Consider the strategies here in beta. The information is pulled from watching various videos and reading further into datamined abilities. Feel free to make any adjustments or corrections in the comments below. Once I knock out the fight myself, I’ll update this with further information.

Watch this video here. I’ll be referencing it.

Phase 1: Gormok the Impaler

25 man health: 8.92 million

Abilities

Staggering Stomp

Deals a staggering stomp that inflicts 9263 to 9737 Physical damage to all enemies within 15 yards and interrupts spellcasting for 8 seconds.

Impale

Inflicts 150% of weapon damage to an enemy and causes it to bleed for 3500 to 4500 damage per application every 2 sec. for 30 sec. (10 second cooldown)

Your tank is going to position Gormok in the middle of the room.

The raid is going to be assaulted by Snobold Vassal. They come from the boss. Various raid members are going to be attacked by them. Seems like they jump onto players individually and prevent them from using abilities or spells. The only way for them to be removed is for your raid members to target them and kill them.

/target Snobold Vassal

I’d suggest adding that to your macro list and having it bound.

Watch out for patches of fire on the ground. Just stay out of them. No idea how much damage players take. No reason to stand in them.

You will need two tanks to handle this. The cooldown on impale is every 10 seconds. Your tanks have to switch and taunt every 30 seconds before the stacking debuff overwhelms them.

Healing Gormok

Start off with 6 healers.

Assign 2 to the tanks who are switching back and forth.

You may need 1-2 healers on the melee as they will be affected by the Staggering Stomp.

Put the last healers on raid to take care of any Vassal or fire damage. They should also help support the tanks if they’re idle.

Once he dies, you have about 15-20 seconds before the twin worms appear.

Phase 2: Acidmaw and Dreadscale

25 man health: ~6.97 million each

Abilities

Acidmaw Dreadscale
Paralytic Bite

Inflicts 12950 to 15050 Nature damage on an enemy and injects them with a paralytic toxin.

Burning Bite

Inflicts 11100 to 12900 Fire damage to an enemy and coats them with burning bile.

5 yd range, Instant

Paralytic Spray

Sprays acid at an enemy and nearby targets, dealing 8325 to 9675 Nature damage and applying a debilitating paralytic toxin.

Burning Spray

Sprays fluid at an enemy and nearby targets, dealing 8325 to 9675 Fire damage and coating them with burning bile.

100 yd range, 1.1 sec cast

Acidic Spew

Deals 2775 to 3225 Nature damage per 0.25 sec. to enemies in front of the caster.

100 yd range, Instant

Fire Spit

Deals 9250 to 10750 Fire damage to an enemy.

100 yd range, 1.1 sec cast

Slime Pool

Inflicts 5088 to 5912 Nature damage to enemy targets within the Poison Cloud.

Molten Spew

Deals 3700 to 4300 Fire damage per 0.25 sec. to enemies in front of the caster.

100 yd range, Instant

You can see the similarities between the 2 snakes. One snake will be grounded at a time while the other will be above ground. They alternative every so often.

First thing you’ll notice is that the tanks immediately face them away from the group. This helps offset Molten Spew and Acidic Spew. Make sure the tanks aren’t near each other either. You want to avoid overlapping spews.

Take note that all DPS is focused on the snake currently above ground. The snake that’s grounded probably has some sort of damage reduction modifier.

Snake above ground

Kite him in a clockwise fashion. He has to be kept moving. Around the 3:25 mark, you can see poison clouds being left. Think of Grobbulus. Have a traditional tank kite whichever snake is up. What we’re seeing is a caster tank (presumable a Warlock) on Acidmaw and holding aggro (or whoever snake is grounded). You can probably keep one healer on it.

When the snakes switch, keep an eye on the ground. Look for dust particles. Get clear of them as that’s your cue as to the snake positions.

IMPORTANT!

When Acidmaw is grounded, he’s going to be able to hit any player with Paralytic Spray. Targets nearby will be hit with that as well.

Applies a paralytic toxin that inflicts increasing Nature damage every 1 sec. and reduces movement speed over time until the victim is entirely paralyzed.

This is what Burning Bile does:

Coats enemies with burning bile, inflicting periodic Fire damage to them and their nearby allies. The burning bile of a jormungar is known to neutralize paralytic toxins.

So one of these toxins is going to cause your raiders to slowly become paralyzed and take increasing nature damage. The burning bile can clean that crap off. The raiders affected by burning bile have to run towards the toxin affected players. Make it easy and have both players run towards each other to speed it up even more.

If you wish to make it even easier for yourself, just have affected raid members run towards the main tank. It won’t matter who has what buffs as they’ll be able to cancel each other out.

Be sure that you kill Acidmaw first. If you kill Dreadscale first, you won’t have a way of removing the Paralysis.

Acidmaw above ground

The situation is going to be reversed. The main tank is going to be hit with the paralytic poison. Designate a player to run in periodically and stand near the tank to wipe off the poison.

Healing Acidmaw and Dreadscale

2 healers on the main tanks, 1 on the caster tank, and 3 on the rest of the raid. Remember that raiders will take damage from Burning Bile so they have to take care where they stand.

I’m not quite sure when they switch. I don’t know if its time based or percentage based.

Phase 3: Icehowl

25 man health: 13.3 million

Abilities

Ferocious Butt

Delivers a ferocious headbutt to an enemy, inflicting 69375 to 80625 Physical damage and stunning for 3 sec.

8 yd range, Instant

Arctic Breath

An icy breath that freezes targets in a cone in front of the caster, inflicting 20000 Frost damage over 5 sec.

100 yd range, Channeled

Massive Crash

Leaps into the air and crashes down with massive force, dealing 11000 Physical damage to all enemies, stunning them, and knocking them back.

1 sec cast

Whirl

Whirls around, dealing 9250 to 10750 Physical damage to all nearby enemies and knocking them back.

15 yd range, Instant

Frothing Rage

Increases Physical damage and attack speed by 50%.

Instant

No downtime between snakes and Icemaw. He’s tanked near the middle of the room.

Artic Breath doesn’t seem to be controllable. He’ll just turn and spray. Think to those big Sons of Hodir trash mobs in front of Hodir. Have an off tank ready to pick  him up just in case. The Breath is a channelled. As long as hes channeling the spell, players caught in the breath can’t do anything.

Dealing with Ferocious Butt

Okay, fast forward to 7:36. Icehowl leaps in the air and knocks everyone towards the wall (Massive Crash). The boss mod will announce that Icehowl is glaring at a player and lets out a bellowing roar. A quicker way is to see if the boss is facing your direction. If he is, RUN TO THE SIDE AND GET OUT OF THE DAMN WAY. At this point, Icehowl gets stunned for several seconds allowing the raid to get back into position. It seems like he takes extra damage during this stage. Looks like the stun lasts 15 seconds.

After his stun wears off, his Whirl kicks in (spins around and knocks back everyone). Your tank needs to haul ass back in range fast.

Icehowl gains an enrage and it must be dispelled. It’s called Frothing Rage. A Hunter’s Tranquilizing Shot should negate that quite nicely. Look at 8:29 for a better idea. I think this happens if Icehowl manages to connect on a player with Ferocious Butt and kills a guy or manages to hit someone. Note that the Enrage appears to wear off after 10 – 15 seconds if you’re not able to Tranq Shot it.

Healing Icehowl

Same thing as before. 2-3 healers on the main tank (I recommend a Disc Priest). Everyone else is on raid healing.

Keep tanking him centralized. When he nukes the ground, get the heck out of the way. Resume DPS. Rinse, repeat, link loot.

I hope this helps you guys out! Again, any other observations or corrections, please post in the comments. Strategies here were pulled from watching the video and from reading the datamined stuff. I’ll probably end up modifying this later depending on how off I am or if there’s a better idea.
Healing Ulduar: Freya

freya_banner

For other bosses in Ulduar, check the Ulduar Healing Strategy Page

Freya offers everything a healing druid could ever want: pretty flowers, sparkly green trees, gnarled ents, angry seed bombs, and even friendly mushrooms of safety. This boss fight is a colorful, chaotic miscellany that asks healers to use all of their skills without overtaxing them in any one area. When you take on Freya, be prepared to react to whatever her tree-friends throw at you next. Keep reading for a healing-oriented rundown of her abilities.

The Pull

Conquest wiped this weekend in our 10 man because Yogi Ragadast, our bear tank, decided to eat a pickinick right in the middle of Freya’s patrol path. Beware that this guardian of the forest ranges far. Ideally, you want your tank to charge in and keep Freya occupied by the creek while the raid stands toward the center of the room awaiting adds. Note that attacking Freya before taking care of her trash waves does exactly nothing.

Phase 1:The Trash Roulette

In Phase 1, you cannot damage the boss and must instead deal with waves of adds. Freya will summon three separate trash events to keep raiders’ nasty paws out of her vegetable garden. Waves will spawn once per minute, and it’s possible to have more than one wave active at a time if your DPS is slow. They can appear in any order, and some will repeat during your encounter. I will explain in brief how to deal with each.

Type 1: Snaplashers, Ancient Water Spirits, and Storm Lashers
This wave is the most dangerous. Each mob type has a different amount of health, and all three must die at the same time or they will be rezzed. The Snaplashers have a stacking buff that makes them hit harder when they receive damage, so your dps will have to periodically switch away from them. In 25-man raids, two tanks may be used to deal with this phase. If that is the case, healers must keep an eye (or two) on the Snaplasher tank. In 10-man raids, one tank will take care of all these adds.

Type 2: Detonating Lasher
These little flowers may look sweet, but don’t be fooled. They’re rotten little skunkflowers at the core. These guys can attach themselves a healer very easily, and they’ll blow up when killed. If I attract too many four-petaled friends, I use Shadowmeld or Barkskin until they make like a tree and leaf. The Detonating Lashers are not particularly dangerous, though raid healers may have to clean up the mess that results if someone’s too close when one of these little suckers blows up.

Type 3: Ancient Conservator
This is essentially a tank and spank add. However, he spawns fun happy mushrooms that you absolutely must stand under in order to avoid his silence. Remember, mushrooms are a good thing.

Miscellaneous Phase 1 abilities:
During phase 1, Freya will also summon a glowing green tree, the Lifebinder. When it appears, the raid must kill it immediately in order to avoid its healing effect.

Healers must also be aware of the debuff Sunbeam. Freya will target a player and cast this ability, which does a weak AoE. It’s not disastrous in regular mode, but I expect that with hard mode it’s a different story.

Phase 2: Goddess on the Move

Phase 1 serves to wear down Freya’s HoTs and allow her to take damage. In Phase 2, your tank will need to kite her in a circle around the room. Why? You’ve heard of the druid spell Living Seed. Freya, the druid goddess, casts seeds of evil. These are small glowing seed pods that appear on the ground and then detonate after a few seconds. The raid will need to stay ahead of the chlorophyllic explosions. Aside from the Bad Seeds, the spawns of the Lifebinder tree, and the Sunbeam effect, Phase 2 is a tank and spank.

Healing Assignments

Much of the healing in this boss encounter is reactive, and it can either feel like catch-as-catch can chaos or like a perfectly orchestrated minuet. It all depends on the skill of your individual raid members at their jobs. A knowledge of movement and the basic raid mechanics like target-switching on demand will lead to a win. Everything might be messy, but it’s not difficult. Healing assignments can be fairly loose here, but we assign one specific healer to the main tank and one to each of two offtanks. Beyond that, healers work their magic on the move and cover players in their area. I’d say this is one of the least demanding fights healing-wise in Ulduar. Even though the adds phase can be hectic, it’s nothing like Thorim’s arena. I’d also say this boss is slightly more difficult on 10-man because there’s less redundancy in raid roles. In 25-man, you can still eke out a kill if, say, your players execute the different movements with something less than precision.
sydsignature

Healing Ulduar: XT-002 Deconstructor

xt002_banner

Welcome to Ulduar folks. If you made it past the lag, the vehicles, and the guard-dragon, and you didn’t get sidetracked by Ignis’ Hot Pockets, chances are you’ll soon find yourself standing in front of my favorite shiny robot in the game, the XT-002 Deconstructor. She just wants to give everyone a big hug . . . a spine-cracking hug, that is. She reminds me of eeeevil pet collector Elmyra from the Animaniacs. In all seriousness, Blizzard outdid themselves here. The boss’s animations and voice are oh-so-entertaining, and this fight provides a juicy-yet-manageable challenge for healers. Conquest downed XT on 4/21 using this strategy.

Essential Abilities

To effectively heal this boss, all healers need to make sure that their unit frames show the following three abilities. If you are a Grid or Pitbull user, add these to your custom debuffs.

Gravity Bomb
This ability places a debuff on a player. They need to move away from others to avoid causing AoE damage. This debuff does not tick immediately but rather does a significant chunk of damage at the delay of a few seconds. A player with Gravity Bomb will need a large heal once the ability triggers.

Light Bomb
This ability places a debuff on a player, and as with Gravity Bomb, the player must move away from others to avoid causing AoE Damage. This debuff is a strong, fast-ticking dot, and it lasts 9 seconds, dealing 3500 damage each tick. A player with Light Bomb needs immediate and steady attention.

Tympanic Tantrum
Of the three abilities, this one is the most dangerous. Tympanic Tantrum deals damage equal to 10% of each player’s maximum health every 1 sec for 12 sec. Nearby enemies are also dazed for the duration. Every player in the raid needs to receive a medium amount of healing in order to survive this ability. AoE and group heals (Divine Hymn, Circle of Healing, Prayer of Healing, Wild Growth, Tranquility) are good solutions.

Healing Assignments

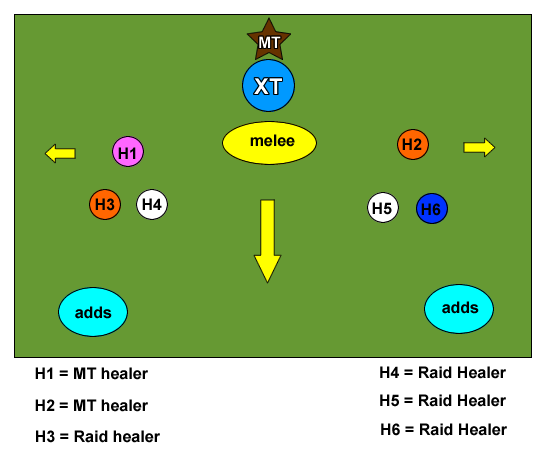
In order to meet the dps minimum for the boss, you will probably need either 6 or 7 healers. These assignments will assume 6. Consult the following diagram for the optimum positioning of your 6 healers.
xt-healing1

As always, the diagram is coded by class color. Our favorite arrangement uses a paladin and a tank healing-specced druid on the MT. On the raid, we have had good luck with using two priests, one shaman, and one raid-healing specced druid. In this diagram, you’ll notice that H3 and H4 are standing together, as are H5 and H6. The raid splits into two groups, and ranged dps stacks with raid healers. This grouping makes it easier for the person with Light Bomb or Gravity Bomb to run away. Your MT healers will have to cheat forward a bit of the pile of players in order to be in range of the tank. XT is big–approximately 10 yards across–and your tank will be on the far side.

Techniques

I’ve had the pleasure to both MT and raid heal for this fight, so I can share with you my top strategies for both positions. The key to this fight is using your abilities wisely.

MT healing
Two healers are necessary because this bot hits hard! Damage is spiky because the boss hits hard but swings slowly. We found a combination of a Resto Druid and a Holy Paladin to be very successful. The druid can keep some HoTs on the MT even through the Exposed Heart phase, in which there is no damage to the tank. We’ve lost the tank before when XT has come back with a vengeance, so be prepared with some HoTs or shields. Throughout the fight, the druid will probably be able to make a small contribution to raid healing. During Tympanic Tantrum, both MT healers will raid heal, and during the Heart phase, the paladin can probably dps, with the druid contributing as well if she is able to afford the mana hit.

Raid Healing
I learned the hard way that HoTs won’t cut it for Gravity Bomb and Light Bomb. For Gravity Bomb, have raid healers shield or pre-HoT and then time a big nuke heal to land as the bomb explodes. For Light Bomb, the player will need a series of quick heals (Flash of Light, Flash Heal, Lesser Healing Wave) or a combination of HoTs and direct heals. A Rejuv+Swiftmend is not enough. With my raid healing build, I was using HoTs + glyphed Healing Touch to good effect. Light Bomb is the more dangerous of the two bombs because it hits fast and hard.

For Tympanic Tantrum, HoTs and AoE heals are king. I was having great luck with Tranquility, Wild Growth, and Lifebloom during this phase. When you assign raid healers, make sure you distribute your AoE healers evenly on both sides.

Melee and Offtanks
There’s no way to get around doing double duty on this fight. At least one offtank will assist a couple of ranged dps with controlling the adds. Specific Raid Healers (perhaps H4 and H5) should be assigned to keeping the adds team alive.

Melee will need some attention, but Judgement of Light, if you have it, goes a long way towards keeping them healthy. We assigned our Resto Shaman to chain heal the melee group when she could.

DPS the heart!

All of the non-tree healers in your raid should switch to dps-ing the heart when it is exposed. Every little bit helps you meet the very high dps demand! I also recommend that any raid-healing druids switch forms and dps the heart. However, the MT healing druid should keep her HoTs on the tank, because XT returns suddenly and with a vengeance. If she can sneak a Moonfire in there too, by all means.

Mana Control

This fight has a few moments that will allow for OOFSR regen. It’s fairly tough on mana, and you will probably use a potion and your mana-restoration abilities (Innervate, Shadowfiend) if you are only carrying six healers. The fight is short with a 6 min enrage timer, but it’s fast and furious, so you can blow your mana if you’re not careful. If you find yourself running out, take a break instead of using your mana for offensive spells when the heart is exposed.

A Healer Check?

This boss tests healers in more ways than one. I like to think of it as a healing assignment check. Everyone has to do his or her specific job, and there’s no time for sniping. Moreover, you need a good balance of single-target and AoE heals to pull this off with 6 healers. There is both heavy Main Tank damage and extensive raid damage. Expect to use all of your skills.

sydsignature