What To Do When You Meet Lady D.

So you’ve just met a charismatic, high-powered woman. You know the type. Legions of admirers. A woman capable of raising her followers up and empowering them on to great strengths. The sort of woman who reduces her enemies to insignificance with one touch. And then leaves them for dead on the floor. Oh, yes. You’ve just met Lady Deathwhisper. Want to take her down a peg or two? Here’s what you need to know.

This isn’t just hints and tips to help you get by. If you’ve met Deathwhisper and, more pointedly, the cobblestones in her lair, you’re the embittered adversary. You need a full guide on how to handle it. You need to know everything from basics to tricks for every role of your team. This guide is your friend. It’s going to walk you through the basic tactic for either 10 or 25 mans, and as a bonus I’ll throw in the alternative tactic for 25 mans and a note on the quest you may find yourself on to save Darnavan. It doesn’t matter if you’re there with a PUG group rather than a guild run. In fact, all the better if you are, because this guide assumes it’s not a given that your team know what to do. Just that they – and you – have a grudge against her Ladyship.

So an encounter with Deathwhisper follows a basic two-phase pattern. In the first phase the Lady will, like any leader-with-minions, stay at the back hiding behind a barrier while calling forth waves of minions to attack your group and doing some damage to random players with frostbolts and death and decay. You need to burn down her barrier – which is actually a mana shield – before phase 2 will kick in. Phase 2 is mostly a tank and spank affair, in which you just need to burn her down while she throws frostbolts, death and decay and angry ghosts at your party.

Tanks:

Left side will be 2 melee (fanatic) and 1 ranged (adherent) mobs. Any tanking class should be able to deal with this.

Right side will be 2 ranged (adherent) and 1 melee (fanatic) mobs. Ideally you want a DK or warrior on this side as they have more tricks for annoying ranged types.

  • Be aware that the fanatics cleave: don’t move them around any more than you have to unless you want withering glances from your enhancement shaman.
  • On 10 man the left and right side mobs appear alternately. On 25 man they appear at the same time, as well as an extra wave at the back, which consists of one random mob. You want to put your best kiting tank on the back wave: they tank that mob and take responsibility for kiting any deformed fanatics that spawn in the room.
  • When Deathwhisper’s mana shield goes down your tanks need to tank the Lady herself. She stacks a debuff called Touch of Insignificance on the current tank. It reduces their threat generation by 20% and stacks to five; have your tanks taunt to swap on three stacks.

Healers:

This largely depends on what classes your healing team consists of, and that may or may not change the more times you bounce. The basics apply – if you have a holy paladin he should be able to take care of two tanks, using beacon. Otherwise, put your disc priest, or if they’re confident to do so, resto shaman on tanks.

Healers should just be ready for a lot of damage. More than the fight merits, probably. People will stand in death and decay, probably for a jot longer than they should. Melee might get cleaved in their own rush to get stabbing things. Got a reanimated adherent loose? Oh yep, he’s going to merrily throw deathchill bolts around until someone notices him. Not to mention frostbolt volleys and some rather unhappy ghosts thrown into the mix.

  • Any healer who can cleanse curses – should. Everyone should drop what they’re doing and cleanse Curse of Torpor as soon as anyone in the raid is afflicted by it.
  • Priests can help out by mass dispelling Adherents when they put up the spell reflect shield called Shield of the Occult.
  • Watch your range – this room is just big enough to get out of range of your healing targets or them to outrange you. Be on your toes.

DPS:

Basic kill order:

Deformed Fanatic > Empowered Adherent > normal Fanatic/Adherent > Reanimated Fanatic Adherent > Deathwhisper

  • Some people place reanimated as a higher priority than normals – I don’t, because the less normal adds you have running around the less reanimated adds you might get.
  • Deformed/reanimated fanatics are mostly immune to physical damage: ranged DPS need to kill them. Empowered/reanimated Adherents are mostly immune to magical damage, so they’re meleers’ priority.
  • Normal adherents can be interrupted when casting Deathchill Bolt. They can also be deathgripped. Just be careful not to interrupt or deathgrip them while they have Shroud of the Occult up because it’ll bounce and you’ll be interrupted or, as our unlucky DK found, deathgripped to them. Adherents’ Curse of Torpor should be removed from the party by anyone who can (mages, boomkins, we’re looking at you).
  • Melee should watch out for Reanimated Adherents – we find it can be easy to miss them by assuming that adherents that drop dead are dead, rather than the actual case of the Lady about to reanimate them
  • Normal fanatics cleave. Melee: be sure to stand behind them, eh? Fanatics also have an ability called Vampiric Might, which can be spell stolen by mages.
  • Deathwhisper also mind controls party members on 25 man, one on normal, more on Heroic. DPSers should be ready to CC and snare/slow them before they cause havoc.
  • We also generally find it useful to have some pre-arranged DPS focus solely on the boss in order to get her mana shield down and phase 2 started. In 10 man we have one DPS do this (our enhancement shammy due to her mixture of magical and physical damage making neither add type overly suited to her). In 25 man, at least three should stay on the boss.
  • We’ve found that if you’re a DPS class with a pet it’s generally worth leaving the pet to DPS Deathwhisper unless your pet has an ability that makes him move quicksmart. Otherwise the travel time dragging him around the room will significantly reduce his overall DPS. And give him aching legs.
  • As a last tip and trick, our DK has also found that anti-magic shield is your friend in phase 2. It helps the healers and takes a bit of pressure off all round – and you get free runic power. Win.

The above are exact tactics for 10 man version and extra explanations for 25 mans where necessary. There is an alternative 25 man tactic:

The entire group stands behind Deathwhisper. You can get into position before the fight starts. Melee adds will come towards healers and should be taken down on the way to them in a snare-and-AoE heavy zone created by the ranged DPS. The tanks draw ranged adds in by line of sighting them using the pillars. This tactic has the benefit of reducing run distances for melee and switching times for everyone: the entire group will get more time nuking through Deathwhisper’s mana shield. It’s not so great when everyone’s bunched together and a death and decay patch hits, though.

Oh, and if you find yourself charged with rescuing Darnavan from Deathwhisper’s charms in return for a Sack of Frosty Treasures, the following are all viable tactics when he spawns (usually in the first wave of adds):

  • Have a plate meleer (preferably with some tank kit) tank him off to the side. Be careful not to do too much damage to him as he doesn’t have that much health.
  • Have a hunter pet do the same. It may be difficult for the pet to get it away from the tank. Our hunter solved this with a distracting shot and a bit of kiting to a safe spot where his pet could taunt and tank
  • Have a druid root him, continually. Other CCs don’t work

So, that should be all. Follow these tactics and you should suitably reduce Deathwhisper – that is, to nothing more than a pile of gaudy wrappings under your boots. Ah, justice. Oh, and the elevator will likely land on your head. Don’t be alarmed, elevators aren’t nearly as painful as Deathwhisper laying you low.

How about you? Do you think I’ve forgotten anything glaringly obvious, or have any small tips and tricks to share? This fight is still one of those that can turn from peachy fine to disaster in seconds – do you regularly have problems with this fight?  Do you think there are any particular group setups which work better for this fight – or make it all the more challenging?

ICC Plagueworks: How Not To Die A Poisonous Death

So you’re standing in the heart of the citadel. You’ve just walked through fire to get here – quite literally. Before that you ran the gauntlet of the lower spire and left the Lich King’s doormen smattered over the walls. That place feels like home to you now.

But now you’re on the upper levels you’re choking on the Citadel’s hostility, which is no surprise given the fat ochre clouds seeping out of the Plagueworks nearby. You must conquer it – but how?

I’ve been there too, alongside nine others. Here are my tips for your group regarding the trash guarding the entrance, a strategy for Precious, and some healing advice for the Rotface encounter.


Getting your foot in the door – trash tips:

1. Bitesize the trash pull as it’s more dangerous the more you pull here. It’s very easy to get mobbed by everything lurking in the entrance to the Plagueworks. It’s also very easy not to do so.

From our experiments we believe that everything will pull if you set foot on the platform in front of the door to the Plagueworks, upon which the Blighted Abominations are standing. Have your group gather a bit back – at the blue brazier on the left-side platform perhaps – and have your tanks pull the abominations back to the group.

2. Healers! Be on the ball. When you engage the large trash group just inside the door in combat, be aware that it will be a hectic fight. Plague Scientists will be turning random group members into slimes, and those players will take the opportunity to bounce around playfully. Because it’s fun. Meanwhile (shackle-able) geists will be jumping on people and eating them alive. Not to mention the fact that the rest of the mobs will be inflicting various nature-based attacks on chunks of your group.

3. Be on your toes. That applies to everyone. The abominations will emit plague clouds. Yuck. Move whatever’s standing in it out, be that you as a healer or the mob needing a tank to kite him out.

Also, the Pustulating Horrors will start the 5 second cast of Blight Bomb when they’re nearly dead: a kamikaze move. Everyone should watch out and move away before it’s cast; it does a lot of AoE damage and DPS or healers may explode alongside the Pustulating Horror.

Precious tactic: Making the Dog Play Dead. Er.

When my group first met Precious we wiped. We’d stand and nuke him; sometimes we AoE’ed the zombies, sometimes we didn’t because our 10 man didn’t have many AoE options. Either way we died horrible deaths. So, we did a bit of research and brainstorming. This is the tactic we have adopted since.

1. Have your healers and ranged DPS stand halfway down the circular staircase. Pull Precious to the stairs. Kite him round past them (decide clockwise or anti clockwise beforehand). Have healers and ranged run ahead of you so they don’t become zombie chow later.

2. When Precious summons zombies, speed up the kiting a bit to get ahead of them. If you have any shamans or hunters – or both – then earthbind and frost trap really help to put some distance between you and the braaaaaain munchers. I’m sure other slowing effects work. Be creative. Don’t speed up so much that you lap the zombies.

3. Rinse repeat with kiting and earthbind/traps until the dog is dead. Turn round and deal with the zombies. AoEs you can run in, drop, then out – like consecrate – work well. Pre-positionable AoEs like shamans putting up earthbinds and fire totem/fire nova repeatedly while still running away also work. While we were perfecting this my guild had an attempt whereby the group’s several shamans finished off the zombies while everyone else ran in – er, I mean, recovered from temporary inability to help.


Rotface tricks for healers:

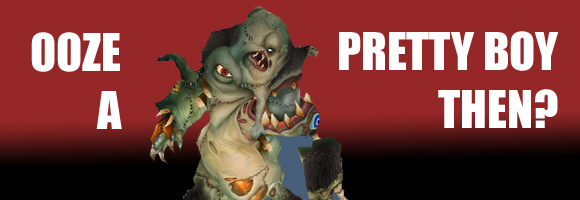
1. Surround him. Rather than clumping together in one huge mass, have your group stand in smaller clumps round Rotface’s…. well, I guess they’re feet. At least one healer to each clump. This has two benefits for healers. Firstly it reduces the number of people who may get hit by slime spray. Secondly it means that at least one healer should always be in range of the tank who is kiting the big ooze, wherever they are in the room, in case of problems.

2. GO team Heal! If another healer gets mutated infection and so has to run, heal him until it’s gone and he’s safe. This may sound silly but sometimes when the elephant hits the jet fan, healers assume that other healers can look after themselves. Yep, usually. But you should always remember you’re a team and work like one. Particularly here, where the infection ticks for a fair chunk and a lot of healers can’t heal and keep running at the same time.

3. Assume the worst. We all make mistakes: we’re human. But this is an encounter in which one person making a mistake can make things three times more hectic and it’s us healers who have to try to get the group through it. The retri paladin thinks he’s delivered his ooze to the big ooze but has actually dragged it into the melee and is standing there? Someone’s got two infections in a row and not realised?

Watch as much as you can. Watch for people making mistakes so you can go into overdrive. Watch your and other healers’ mana and pop things like mana tide or hymn of hope either early or at (an early) crunch time. Importantly, watch *your* positioning. You might think that concentrating on your own situational awareness might make it a bit harder to focus on healing when there’s a lot of damage. Instead, consider how doing so will make your job easier rather than if you get caught up in healing and, say, forget to move during an Unstable Ooze Explosion.


The Plagueworks is not a friendly place and only the bold set foot on its flagstones. Although, looking at Rotface I think Professor Putricide has other ideas about what feet should do. I hope your bravery is rewarded by victory, and that something here has helped if you were bouncing off those flagstones!

What about you? Have you got any tips, either general or class/healer specific, to add for any of these three encounters? Are you having trouble on any of them, or have been and are slowly getting better at dealing with them? Do you actively like or dislike these fights, given that they go in a different direction to the fights in the first wing?

Healer 101: How To Storm Citadels More Smoothly

ICCHealing1

Say you’re storming the Citadel on a fairly regular basis, massacring the Lich King’s advance nasties from Lord Marrowgar right up – literally – to Deathbringer Saurfang. You might be progressing through it at your own pace, or you might have it on farm and are running through weekly as a warm-up to pick up gear. Well, either way. Here are some general and some shaman-specific tips from my own experience on how to healing can help your group steamroller the nasties.

Lord Marrowgar:

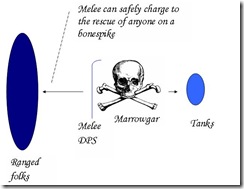
1. Bone Spike Graveyard: Pain. In. The. There are two things you can do to mitigate its effect on your healing. Firstly, make sure you remind your healing  Marrowgar diagram 3teammates to watch out for bonespike on each other. For example, if your tank healer is spiked then you need to pick up the slack for him and heal the tanks. Just til he gets back on his feet. Secondly, standing behind Marrowgar as shown in the diagram will help your DPS get you un-spiked as quickly and safely as  possible.

2. Coldflame is not cool. Really. Move out of the fire before it gets to you. Yep, I know it’s a pain and it seems to as soon as a healer has moved there’s more coldflame racing towards you. Standing at range will give you time to see it and move.

3. One shaman to another: people stand in fire. Us healers know it like we know the sky is (sometimes) blue. Bone Storm and Bone Spike Graveyard do damage. There’s a lot of it going round. So consider dropping mana tide early to have it ready again later if needed and using bloodlust after the first Bone Storm so that DPS get time to use it when Marrowgar’s not doing the tango.


Lady Deathwhisper:

1. Spread out. At least a bit. Deathwhisper’s room is just big enough that if you stand too far to either side you won’t be able to reach the people on the other side. Spread your healer team out so that tank healer A is covering the tank on the left, tank healer B on the right and raid healer in the middle. If you’re running two healers then they’ll need to be a bit closer to the middle for raid coverage. There’s also less chance you’ll all get caught in death and decay if you spread out.

2. Healer, cleanse… everything. This fight has some status changes which give Deathwhisper and her crew an edge. If Curse of Torpor is running amok on your raid then cleanse it, first on you then on other targets. If a Cult Fanatic casts Vampiric Might (magic effect) on itself then cleanse it in order to down it quicker. Or tell your mages to spellsteal it: they’ll love you.

3. Shamanic wisdoms: think about your totem placement; you might want to manually place them rather than drop all four in one place. Personally I drop stoneskin and healing stream well to the left with the tank I watch over. I then separately drop Flametongue and Wrath of Air nearer the middle/mid-back, depending on whether it’s 10 or 25 man. I re-place totems at Deathwhisper when phase 2 hits.


Gunship battle:

1. Welcome returning soldiers back. With a lot of healing. When the boarding party returns Muradin might well still be trying to kill at least one of them, probably with rending throw. In my opinion it’s best to play it safe: overheal them all as they come back over rather than waiting for them to take an unexpected damage spike they might not survive. If at all possible have one member of the boarding party announce when they’re returning.

2. You’re a field medic, not a pirate. I think healers should stay on their ship rather than boarding. Healing on the Edge ™ of the ship works just fine. Yes, you have to move out of the cannon fire patches but at least there is ample time to do that. Things can and do go wrong for the boarding party and the chance of that goes up exponentially according to how many people jet over. You don’t need to.

3. Shaman talk: Consider earthshielding a different target, particularly a DPS on the boarding party. My 10 man run usually has an enhancement shammy swinging over to swash some buckles, and full of health they’re not. If Muradin/Saurfang decides he doesn’t like her she’s the most likely to go splat quickly and she is aware of it. I put earthshield on her for this fight: not only might it help in a pinch but it also makes her feel a tad bit safer when jetting off to hostile territory. She hasn’t died here since I made that change.


Deathbringer Saurfang:

1. Healers need time to breathe. Mark of the Fallen Champion can make things hectic if everyone’s trying to deal with everything on this fight. Arrange for one person to deal solely with victims of the mark when it starts hitting. Personally I have our disc priest doing that while our shamans chain heal around the rest of the group. It just gives everyone enough slack to not turn into headless chickens.

2. Be prepared. You’d be forgiven for thinking this was a healing-easy fight based on the first couple of minutes of it. Remember that the longer it goes on the more healing-intensive it gets, and its length is dependent on your group’s general level of kit and knowledge of the fight. Don’t let boredom tempt you into overhealing early on. Manage mana well and be ready for it to be challenged.

3. If you’re a shaman: Earth bind is your friend. Place it near-ish the platform to catch blood beasts as they spawn. It’ll just give the ranged DPS some breathing time, which should give you breathing time with less potential for blood beasts tearing up your warlock. Keep it refreshed. If you have more than one shaman co-ordinate to have your earthbinds cover a greater area.


World of Matticus: helping healers storm their local citadels since 2010. As with many fights at present the thing to remember above all else is to be mobile and flexible if the situation requires. I’ll also briefly be extolling the virtues and citing an example of shamans retreating to advance, later in the week.

How about you – are you a healer with any tips to add for the first wing? Any widely held tactics you’d particularly like to discredit? Any questions been troubling you about the healing on wing the first, whether or not you’re a healer? Comments are very welcome!

Rot-Face the Music, People!

The second wing of Icecrown Citadel has been open for just two lockout periods.  There have been the outcries from all sides:

“It’s too soon!”

“Thank God, it’s finally here!”

“Why can’t we just fight Arthas already?”

But my new personal favorite, has GOT to be:

“Rotface is too hard!”

First, let me go on the record that I’m thankful for fights like these.  I’ve mentioned here before, and also when I’ve guest-hosted on Raid Warning (shameless plug), that I loved bosses back in the BC days.  Fights like Leotheras or Al’ar took coordination, teamwork, and dedication.  I remember the guild I was in never took down Al’ar.  Primarily, we lacked perseverance.  We would spend 3-4 attempts on that bird, and then people would gripe about how hard it was and we’d move onto Loot Reaver, I mean Void Reaver.

My point is that in Wrath, we’ve essentially seen easier bosses in raids.  Yogg was hard, Faction Champions held up a lot of guilds, true.  Aside from examples like those, we haven’t seen any fights in ICC thus far that have resembled the challenging nature of a true raid boss.

Rotface as a challenge?  I welcome it.  I think we, as raiders, get tunnel vision too easily.  Most of the fights have been the following:

  • Switching targets to an add or group of adds
  • Stay out of the stuff on the ground
  • Heal through this bout of incoming damage

Hence, Rotface is a breath of fresh air, even if it’s the leading cause of my healer-rage on any given raid night.  Healers, because of the instances of raid damage, have to step it up.  Any combination of the following mechanics will make for a bad experience:

Mutated infection – [UNAVOIDABLE] The primary mechanic for the fight.  Your choice to cleanse it early, though I wouldn’t recommend it unless your raid is totally on their A-Game.  You have to get on top of this as fast as possible because of the Mortal Strike-styled healing debuff.  When I’m assigned to the mutated peeps, I throw PW: Shield, Prayer of Mending, and a quick Penance to pile on Grace.  It’s better to keep them topped off than just keep them alive.

Slime Spray –  [AVOIDABLE] This is a pain in the butt to deal with if people don’t move out of the way.  At roughly 5k each second, multiple victims make healing rough, especially in the later stages of the fight.  It’s a short cast but on a regular timer, so it’s easy to anticipate.  If you keep your raid clumped behind the boss, a simple run-through to the other side is all that’s needed.  Don’t always assume it’s going to the majority of the raid.  Rotface may target the slime tank/kiter.  I’ve seen attempts almost wipe because people ran right into the spray without thinking.

Ooze Flood – [AVOIDABLE] The standard WoW rule of “Don’t stand in the crap on the ground!”  A lot of raiders claim to be taken by surprise, but I don’t buy it.  Not only do you get an audible warning from Petricide, but you see ooze spouting from the pipes before the flood appears.  At crucial moments of kiting or fleeing the ooze explosion, it’s not impossible to miss these entirely.

Radiating Ooze – [SEMI-AVOIDABLE] The only time anyone should be taking damage from this is the person merging an ooze with the big ooze and possibly the player kiting the ooze.  They’ll take damage from their own smaller ooze, which is less, and then momentarily from the big ooze.  I see too many people run INTO the ooze to try to get it to merge.  In actuality, you just need to get the ooze into the 10 yard radius of the big ooze for it to merge.  Even at that, it’s best to wait until your disease is gone to step into that area.  A near-full ooze will tick for a lot of damage, and a half-heal debuff is horrible to try to work through, let alone the tick from the disease itself.  It’s easy to die to this, even with a lot of healers on you.

Unstable Ooze Explosion – [AVOIDABLE] It’s simple.  It’s like the orbs in Void Reaver, except smaller.  Once the ooze explodes, and not before, you should start running away.  From personal experience, try not to be by the tank when it explodes.  If the tank is caught in about 4-5 of those projectile oozes, he or she is a goner.  Don’t run into ooze puddles, and don’t run near other oozes that are still growing.

—–

I highly recommend that you read and know each of the mechanics that I’ve explained above.  These debuffs and mechanics aren’t just for the healers to heal through but for every raider to avoid.  One or two of them together is manageable, but when you’re consistently not paying attention to the different intricacies of the fight, it just makes my soul hurt.

I know there’s a tendency to just want muscle through some of the fights, but on some of these Icecrown fights, it’s imperative to actually know what you’re being afflicted with.  Your little extra focus can get you through that last 30% that most guilds may be struggling with.

Healing Icecrown from a Druid’s Perspective – Part 2

This is a guest post by Epiphanize, a Resto Druid, and co-host of Raid Warning.

Now that we got all that out of the way, it is time to get down to business. You didn’t really show up just to listen to me go on about glyphs, did you? No, you came to heal your branches off! One quick thing: Be sure to check out the comments in my previous article; there were some good suggestions for alternative point distribution.

Lord Marrowgar

So here we are, Lord Marrowgar, a very interesting challenge for healers. However, it does give Druids a chance to show off their ability to heal on the run. This can be a relatively hectic fight, so regardless of whether you are tank or raid healing, you will need to be tossing HoTs at some points during the fight.

Tank Healing

This is the easier of two roles against Marrowgar.  During his initial phase and all the ones where he is not spinning all over the place, it is essentially a one tank fight. Since the nerf, Marrowgar does quit a bit less melee damage. So the damage your meat shield will be taking will be fairly minimal. This is pretty manageable for Trees, as we can keep the tank pretty well topped off with our HoTs.

One ability you need to be prepared for though is Saber Lash.  Saber Lash is an ability similar to Koralon’s Meteor Fists, in which two tanks will need to stack in order to distribute the damage. Your healing priority will be the Main Tank followed by the Off-Tank after a Saber Lash. As a tree, you have the added benefit of hitting both with Wild Growth before topping off the Main Tank. Other than dodging the occasional slow-motion blue flames, there is not much to deal with during this phase.

Raid Healing

As stated above, this fight can be quite hectic for a raid healer. During the first phase you will have quite a bit to manage. In 10-player, one random player will be Bone Spiked. DPS will be turning to focus on getting the player down as quickly as possible. This presents two things for you as a raid healer. You obviously will need to be focusing on healing the spiked player. I’ve managed to safely keep them up with Rejuvenation and Swiftmend, though this can also be accomplished with a few Nourishes as well. The other thing is people taking Coldflame damage, as they will often be ignoring the flames to get the person off the spike. Again this is usually handled by tossing some Rejuvenations and Wild Growth, saving Swiftmend for anyone who stands in the fire just a bit too long.

The last thing you will be concerned with during the pre-Bone Storm phases is the aforementioned Coldflame. As the raid healer, you will be responsible for topping off anyone who doesn’t get out of the way of the flames quick enough. The damage it does is not too horrible as long as no one just stands there. Its actually more of a nuisance avoiding it yourself, as you will often need to decide between standing their long enough to finish casting a heal, or cutting it short to avoid taking too much damage yourself.

Bone Storm

This phase is pretty similar for Druids regardless of your role. Marrowgar will become untauntable and spin around the room doing relatively minor AOE damage. It is still good to avoid him if possible, as it makes life a bit easier on all the healers. The big thing you will be dealing with is blue flames (of ice?) again. Only this time he drops 4 at a time. This phase is all about survival. Since you will be on the move during this, Druids will be arguably the best healer for this phase. This is where glyphs like Rapid Rejuvenation and Wild Growth start to shine in ICC. Just keep HoTs on everyone and toss Wild Growth on cooldown and you should be fine. Make sure to keep Swiftmend and your NS-HT macro at the ready in case anyone gets into trouble.

One last thing that the Tank Healer needs to consider is the position of the tanks during all chaos. The tanks will be sticking close to Marrowgar during Bone Storm in order to pick him up at the end of the phase. Not only will the tanks be taking a bit extra damage, but you will want to be nearby to keep the Main Tank healed up while everyone gets back to some semblance of order.

Lady Deathwhisper

The next boss in The Citadel is quite a bit easier on the healers than Marrowgar. If your group is good about staying out of Death and Decay and interrupting Frost Bolts, you won’t have to mash the keyboard nearly as much. For Druids, this fight is all about situational awareness and keeping in range of the players taking damage.

Phase 1

The key to Lady Deathwhisper is getting through her first phase. During this phase she will be behind a mana shield that DPS will need to burn through in between dealing with adds that spawn from either side of the room. After that, the fight is pretty much tank and spank. In my experience, this is the fight where you are most likely to only use 2 healers.

The mechanics of the adds are pretty complicated at times, so it is good to familiarize yourself with them. There will be times the tank and raid will be taking increased damage based on these mechanics. There is a lot of movement involved, so there will often be times you will have to drag your stump across the room to toss a heal or two.

There are a few other considerations during this phase. First,  Adherents will place Curse of Torpor on random raid members that increases the cooldown of their abilities, so you will want to make sure you are decursing as often as possible. There will be a bit of randomness from the Death and Decay and Shadow Bolts, so be on the look out. Again, there is going to be some bouncing back and forth because of adds, so communicate with the other healer(s) to make sure you have all your bases covered.

Phase 2

Congratulations, you have made it through the hard part. After her shield is down she becomes tauntable, only has 3 million hit points, and the adds stop spawning. Since this is often 2-healed, you will more than likely be both on raid duty and tank duty. While this phase is pretty much tank and spank, there are some things going on that affect the healers.

The tanks will be swapping as Deathwhisper places a stacking debuff on the tank that reduces their threat. So you will want to keep an ear out for who is tanking her and focus your healing accordingly. She will still be dropping Death and Decay, as well as random frost bolts that should be interrupted. Finally, she will summon on non-targetable Vengeful Shade that will follow a player around and explode if it catches them. You will need to do your best to avoid them if they follow you, and be prepared to heal someone if they get caught (if they don’t get one-shotted).  It’s a pretty quick phase though, and you will be on your way up the elevator in no time.

Gunship Battle

This is a gimmick fight through and through and is a lot of fun. There aren’t really a lot of important mechanics here for healers. Your gunship has two guns that you use to attack the enemy’s gunship.  Occasionally, the opposing ship will summon a mage/sorcerer that will freeze your guns. You will then need to send some raid members over to kill it in order free up your cannons. Back on your own ship, mobs will appear through a portal that will need to be killed, while avoiding incoming rockets and axe-throwers.

Defenders

This is the easier of the two healing roles. Usually one tank and some ranged DPS will stay behind to deal with the enemy boarding party.  The portal will spawn a Sergeant and some Marines. The Sergeant is the only one that really poses any threat, as he has pretty nasty Bladestorm and Wounding Strike abilities. Most of your healing will be focused on the tank, especially if you only have ranged DPS defending. Just be prepared to work a bit extra to overcome the -25% healing debuff.

Two other items of note: First, stay out of shinnies! Rockets will be coming over to your side and the big shiny circle on the ground is an indicator your in the path of said rocket. Be prepared to heal anyone who has yet to learn this golden rule of Warcraft. Second, keep an eye on your boarding party tank. They will be taking damage as they fly back over to your ship, and not every healer is as equipped to heal in the air as us Trees. I have seen quite a few tanks bite it on their way back over as they still have the aggro from the ranged mobs on the enemy ship. A well timed heal from you can be the thing that saves them.

Boarding Party

As the boarding party healer you got the short end of the branch (no, the bad tree jokes will not stop). You will be heading over to the enemy ship with most of the DPS and a Tank to take down the mage/sorcerer while fending off the general and adds. On your way over it will be a good idea to HoT up the tank, as things will be a bit chaotic when you first get over there.

The tank will be keeping the enemy commander busy why DPS take down the mage/sorcerer. Keep an eye out because the longer you are over there the stronger the enemy gets. This will cause everyone to take quite a bit of damage. As mentioned earlier, you will need to keep some heals on the tank as he will take some damage on his way back over. Probably a good idea to leave a Rejuvenation in case you need to toss an emergency Swiftmend on the return flight. Again, a fairly straightforward fight for healers.

Deathbringer Saurfang

Phew, here we are, the final encounter of the entrance to the Citadel. This is probably the most interesting fight so far. A lot of what you need to do as a healer will be determined by your groups strategy, but Druids have a few things to keep in mind both as a tank or raid healer, regardless of how you handle Mark of the Fallen Champion.

Raid Healing

First, you do not have any way to stop the damage people will be taking like priests do. So your main role will be to heal up the damage that does get through. There are three mechanics that will be causing you trouble: Boiling Blood, Blood Nova and Mark of the Fallen Champion.

The first ability, Boiling Blood, will be case on a random raid target. If you have a Priest, they will mitigate a lot of the damage to avoid Saurfang building Blood Power. Its still a good idea, whether you have a Priest or not, to toss Rejuvenation on the Boiling Blood target to keep them topped off. The damage isn’t too bad, and one HoT should be enough to keep them safe.

Blood Nova can be more troublesome depending on how much melee you have. If this gets cast on one, a good amount of people will be taking damage. The player that get Blood Nova should run out of the raid to minimize damage and blood power gain. However, if they don’t get out in time, be prepared to throw out Wild Growth and a couple single target heals.

Finally, there is Mark of the Fallen Champion. How you handle this (if at all) is going to depend on your raid strategy. A lot of guilds, mine included, will just let that player die. This minimizes the buildup of blood power and puts a lot less stress on the healers. If you do decide to keep that person alive you will want to give them full HoTs. Yes, you may have to dust off Lifebloom for this one. I usually put up Rejuvenation and Regrowth, with a Swiftmend if needed.

Tank Healing

There is not nearly as much to deal with as a tank healer. The tanks will be switching when they gain the Rune of Blood debuff, so as per most two tank fights you will need to be paying attention. You will also need to be concerned if a player gets Blood Nova near the tank, which could cause a nasty damage spike. Your final obstacle is at 30%, where Saurfang will Frenzy. This means you need to get your stump in gear and heal faster! Other than that, he is business as usual for a tank healer.

—–

And that’s it! You’ve Stormed the Citadel. Just in time for the Plague Works to open. Thus is the life of a WoW player. In the next installment we will be covering healing Rotface, Festergut, and Putricide, all while avoiding getting any goo on your leaves.