Initial Setup
For talents, I recommend running something like this one.
BEQA16pR6xQxvK1VWhXk+w0/GQDAAAAAAAQhoFSSiESJkk0okQJAAAAAkkWokkDAlISEEUKBJJkCADivine Star’s a must here just due to the positioning of the raid. You’ll get the most out of it with your whole raid grouped the way it is.
Recommended WeakAuras
Left Right: https://wago.io/rlubMIWq5
The Fight Overview
Our plan involves starting on fire and going to full energy before entering intermission and activating both the fire and storm elementals. After that, we enter earth before the second intermission involving the earth and frost elementals. We finish in frost and hope Kurog is defeated before the enrage begins. Stay well clear of the storm altar.
Figure out your soak group immunities in advance for the fire altar. Paladins, Rogues, and Hunters are great for this.
Phase 1 – Fire Altar
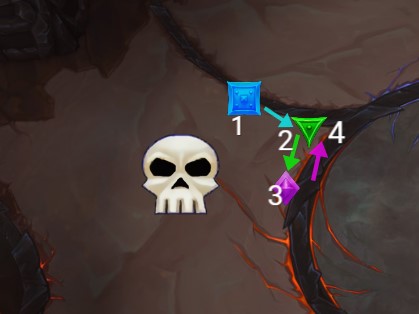
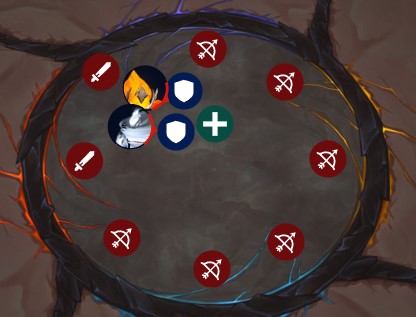
Here’s the route that we end up with. The ranged group and the melee group are quite close to each other (about 2 pandas apart). Try to squeeze as much damage as you can here. I like to let Prayer of Mending do the bulk of the lifting. I drop Divine Word buffed Holy Word: Sanctify in such a way that it can capture both the range and melee groups.
For progression’s sake, practice moving as pixel-perfect as possible. The range group wants to drop the fires on top of each other as close as possible to allow for easy soaking of the Raging Infernos.
On the second Searing Carnage, I’ll move to safety and then fire off a Divine Hymn during that stage. Once Searing Carnage ends, I’ll race back to the group stack and immediately cast Holy Word: Salvation (there should be enough time before the Raging Inferno lands.
At this point, the first intermission should begin.
First Intermission
Immediately Hymn of Hope, then dodge any damaging AoE and start chugging a Potion of Frozen Focus until you’re back up to full (or near full).
A Note About Lethal Current
The Thundering Ravager seems to target then teleport to a healer. Our healers stay near the Blazing Fiend to try to bait the Thundering Ravager to teleport over near the fire ad. Then the healer runs out, the tank then intercepts Lethal Current (because it channels that spell into the closest player). The tank then runs the Lethal Current out allowing DPS and healers to continue.
When Blazing Fiend casts Searing Carnage, anyone not targeted by the ad moves toward the center of the room (but not dead center, just to an edge). Anyone that is targeted with Searing Carnage is going to slowly move their way to that same area and survive. Once again, this allows the Thundering Ravager to teleport to that center area allowing for maximum cleave on both ads.

This also has the added benefit of setting up the raid in the best possible position to soak the Thunder Strike circles. Ranged should soak any far ones, melee can step into any that are close to the two ads. Healers should not soak in any unless there’s no other option.
Your raid’s damage is in a great spot if the Thundering Ravager gets defeated before the Blazing Fiend casts its next Searing Carnage.
Your raid’s damage is lacking if the Thundering Ravager casts a second Thunder Strike (in which case, it’s a wipe).
Phase 2 – Earth Altar
Now we get to the real healing intensive part of the encounter.
If you have the raid glows Weak Aura, it’ll highlight the players affected by Enveloping Earth (the thick healing absorb). Prioritize your single target spells on those players to remove it. If a tank happens to catch it and they’re not at full, I would hit them with Guardian Spirit right away.
This is the tricky part. There will come a moment where Kurog casts Erupting Bedrock, and then the Earthwrought Smasher will also cast Erupting Bedrock. Dodge the one from Kurog, then the one from the Smasher, and plant yourself in a safe spot for a Divine Hymn. I’ll wait a few seconds and by now my Holy Word: Salvation should be off cooldown. I’ll cast it again here to help us get to the end of this phase. This is the definitive healing check.
Second Intermission
In this intermission phase, we will tackle the Frozen Destroyer and the Tectonic Crusher. Initial DPS should be focused on the Frozen Destroyer. Like Heroic, run the earth circles outside of the group and drop them off.
Important: Identify the players with immunities (Ice Blocks, Paladin Bubbles, Hunter Turtles, etc). When the Frozen Destroyer casts Absolute Zero, those players should stay out of the first one. When the Destroyer casts Absolute Zero a second time, it should target the players that didn’t stand in it the first time thereby allowing them to immune the second Absolute Zero and take the circles outside of the group.
I have time to cast Hymn of Hope and take another Potion of Frozen Focus towards the end of this phase (usually when one ad is dead so that the healing is a little less intensive).
Phase 3 – Frost Altar
There should be two groups set up here: One for melee and one for ranged. Both groups will be soaking the first set of Absolute Zeros. Great spot for a damage reduction or a Rallying Cry. On the second set, you’ll want to sacrifice the two players that get them.
This is the final push to get the boss defeated here and if you run into the enrage, it’s a quick wipe. Dodge the orbs from both Kurog and the Frostwrought Dominator.
Now you get to move onwards to Dathea!