Healing Crusader’s Coliseum: Faction Champions

faction-champions

Back from Blizzcon and now well rested. Got some pretty cool announcements coming up. I’m working on a very special project right now that I’ll disclose later.

Anyway, I’ve gotten several requests for tips on Faction Champions.

And it’s just going to be that: Tips. The same day I touched down at Vancouver, it was back to business in the raid machine. After blitzing through Northrend Beasts and Lord Jaraxxus, it’s time to check out Faction Champions from a healer perspective.

Not a traditional fight

This is the key. There is no such thing as aggro management or threat on this encounter. This is an extremely chaotic, fast paced, arena-esque fight. Players that dual spec into PvP may even wish to consider doing so for extra survival or abilities. Your raid group is going to be facing off against 10 champions of the opposing faction (6 on normal). They’re selected from a random pool of NPCs.

  • Death Knight
  • Balance Druid
  • Resto Druid
  • Hunter
  • Mage
  • Holy Paladin
  • Retribution Paladin
  • Healing Priest
  • Shadow Priest
  • Rogue
  • Caster/Healing Shaman
  • Enhancement Shaman
  • Warlock
  • Warrior

Ones in bold are your raid’s targets of interest. Isn’t it rather odd that they’re all healers?

Execution

It’s difficult to provide an exact outline of what your group has to do. The best I can provide is a general guideline. Go ahead and move your group under the Alliance (or Horde) section first before activating the NPC. It’s a good idea to take stock of what class combination you’re group is going to be facing so that crowd control can be used accordingly.

In most cases, our raid group initially crowd controls every NPC as much as possible other than healers. For example, this week we had a healing Priest, the caster Shaman along with the Holy Paladin. We opted to zero in on the Shaman first. Our Warrior tank started working on the Holy Paladin just by keeping him locked down and interrupted. Placing a Rogue or 3 on the Priest is also a nice idea.

Our basic mentality is that if we run down the healers first, then the other NPC’s are a cake walk. The next dangerous Champion after healers is the Rogue based on the speed at which it can kill a target.

This is an endurance fight. Expect to invest around 10 minutes from start to finish. Each NPC has around 2.4 million health (some have 1.9 million).

Communication is extremely important here. If you’re being pursued, say something. Someone might be able to jump in and snare or CC a Champion.

General class tips

  1. Keep the melee NPC’s busy as much as possible.
  2. Death Knights should defensive Death Grip Rogues, Warriors, Ret Paladins, and Death Knights away from the raid and slow them down. Minimize their movement with slows and stuns
  3. Typhoon and Thunderstorm intelligently. Again, use them defensively to keep NPCs away from your healers.
  4. Drop a Fear Bomb if multiple NPCs are closing in on someone.
  5. Crowd control incurs diminishing returns. Example, after casting 3 Polymorphs on one Champion, it’ll become immune to Polymorph. Spread that CC out.
  6. Offensive Dispels are a virtual requirement. Shamans should be Purging, Priests should be Dispelling. Things you want to get rid of are Druid HoTs and Shaman Earth Shields.
  7. If you have a PvP Trinket, consider equipping it for the fight.
  8. Heroism/Bloodlust on the initial pull. The sooner you kill an NPC or 2, the easier it becomes.

For Priests

As a Priest, my limited arena training has taught me two important skills: Running and healing. If you can manage to run and heal at the same time, you’ll be in good condition. I mainly stuck to firing off blind Mass Dispels (targeting an area with a lot of traffic and hoping it connects) and specific single target Dispels. Keep Shields active on players who get focused and are soft. Don’t bother with mana burning or mind controlling.

Use Psychic Scream everytime it’s available. Just run into a crowd and drop the fear bomb.

Your first priority is to keep yourself alive. If you have to run, drop what you’re doing and run. This isn’t exactly a fight where you can sit there and just grind heal your way through.

Use your defensive cooldowns liberally. Pain Suppression and Guardian Spirit will save lives. After I see a big spike on someone, I’ll drop a cooldown on them. If I see 3 Champions close in on a player, I’ll drop a cooldown on them. If I get death gripped, I’ll crap my pants then use a cooldown on myself (No joke. That Death Knight is a pain).

For Druids

This is just from me watching Sydera. Hopefully she’ll chime in here at some point. I’ve seen Druids use their Cyclone in between healing on various NPCs. Reserve Roots for melee NPCs if they’re chasing after people. Go cat form to put distance between you and Champions. If you’re out of tricks, it’s bear form until the Champion gets peeled off you.

For Paladins

Platewearers are usually durable in this one. Have the Hammer stun ready and use it when the cooldown is up. Hand of Sacrifice or Divine Sacrifice and follow it up with a Paladin bubble to help out the raid. The Champions are smart enough to occasionally focus fire on one target.

For Shamans

I reconfigured my totem setup to include Earthbind, Cleansing, and Grounding totem. Every so often, I’d run into a crowd and drop them all down again. Really aware Shamans will know to keep a healer focused and Wind Shear to help with the interrupting process. Bonus points if you can squeeze off Frost Shocks on a Champion who is chasing someone. Do all that while healing, and your raiding group will love you.

Hope this helps! Feel free to comment below with any extra tips or tricks in general or against specific Champions.

Good luck!

Healing Crusader’s Coliseum: Northrend Beasts Encounter

Image, abilities courtesy of MMO Champion

The Beasts encounter consists of three separate fights within 1 encounter. Consider the strategies here in beta. The information is pulled from watching various videos and reading further into datamined abilities. Feel free to make any adjustments or corrections in the comments below. Once I knock out the fight myself, I’ll update this with further information.

Watch this video here. I’ll be referencing it.

Phase 1: Gormok the Impaler

25 man health: 8.92 million

Abilities

Staggering Stomp

Deals a staggering stomp that inflicts 9263 to 9737 Physical damage to all enemies within 15 yards and interrupts spellcasting for 8 seconds.

Impale

Inflicts 150% of weapon damage to an enemy and causes it to bleed for 3500 to 4500 damage per application every 2 sec. for 30 sec. (10 second cooldown)

Your tank is going to position Gormok in the middle of the room.

The raid is going to be assaulted by Snobold Vassal. They come from the boss. Various raid members are going to be attacked by them. Seems like they jump onto players individually and prevent them from using abilities or spells. The only way for them to be removed is for your raid members to target them and kill them.

/target Snobold Vassal

I’d suggest adding that to your macro list and having it bound.

Watch out for patches of fire on the ground. Just stay out of them. No idea how much damage players take. No reason to stand in them.

You will need two tanks to handle this. The cooldown on impale is every 10 seconds. Your tanks have to switch and taunt every 30 seconds before the stacking debuff overwhelms them.

Healing Gormok

Start off with 6 healers.

Assign 2 to the tanks who are switching back and forth.

You may need 1-2 healers on the melee as they will be affected by the Staggering Stomp.

Put the last healers on raid to take care of any Vassal or fire damage. They should also help support the tanks if they’re idle.

Once he dies, you have about 15-20 seconds before the twin worms appear.

Phase 2: Acidmaw and Dreadscale

25 man health: ~6.97 million each

Abilities

Acidmaw Dreadscale
Paralytic Bite

Inflicts 12950 to 15050 Nature damage on an enemy and injects them with a paralytic toxin.

Burning Bite

Inflicts 11100 to 12900 Fire damage to an enemy and coats them with burning bile.

5 yd range, Instant

Paralytic Spray

Sprays acid at an enemy and nearby targets, dealing 8325 to 9675 Nature damage and applying a debilitating paralytic toxin.

Burning Spray

Sprays fluid at an enemy and nearby targets, dealing 8325 to 9675 Fire damage and coating them with burning bile.

100 yd range, 1.1 sec cast

Acidic Spew

Deals 2775 to 3225 Nature damage per 0.25 sec. to enemies in front of the caster.

100 yd range, Instant

Fire Spit

Deals 9250 to 10750 Fire damage to an enemy.

100 yd range, 1.1 sec cast

Slime Pool

Inflicts 5088 to 5912 Nature damage to enemy targets within the Poison Cloud.

Molten Spew

Deals 3700 to 4300 Fire damage per 0.25 sec. to enemies in front of the caster.

100 yd range, Instant

You can see the similarities between the 2 snakes. One snake will be grounded at a time while the other will be above ground. They alternative every so often.

First thing you’ll notice is that the tanks immediately face them away from the group. This helps offset Molten Spew and Acidic Spew. Make sure the tanks aren’t near each other either. You want to avoid overlapping spews.

Take note that all DPS is focused on the snake currently above ground. The snake that’s grounded probably has some sort of damage reduction modifier.

Snake above ground

Kite him in a clockwise fashion. He has to be kept moving. Around the 3:25 mark, you can see poison clouds being left. Think of Grobbulus. Have a traditional tank kite whichever snake is up. What we’re seeing is a caster tank (presumable a Warlock) on Acidmaw and holding aggro (or whoever snake is grounded). You can probably keep one healer on it.

When the snakes switch, keep an eye on the ground. Look for dust particles. Get clear of them as that’s your cue as to the snake positions.

IMPORTANT!

When Acidmaw is grounded, he’s going to be able to hit any player with Paralytic Spray. Targets nearby will be hit with that as well.

Applies a paralytic toxin that inflicts increasing Nature damage every 1 sec. and reduces movement speed over time until the victim is entirely paralyzed.

This is what Burning Bile does:

Coats enemies with burning bile, inflicting periodic Fire damage to them and their nearby allies. The burning bile of a jormungar is known to neutralize paralytic toxins.

So one of these toxins is going to cause your raiders to slowly become paralyzed and take increasing nature damage. The burning bile can clean that crap off. The raiders affected by burning bile have to run towards the toxin affected players. Make it easy and have both players run towards each other to speed it up even more.

If you wish to make it even easier for yourself, just have affected raid members run towards the main tank. It won’t matter who has what buffs as they’ll be able to cancel each other out.

Be sure that you kill Acidmaw first. If you kill Dreadscale first, you won’t have a way of removing the Paralysis.

Acidmaw above ground

The situation is going to be reversed. The main tank is going to be hit with the paralytic poison. Designate a player to run in periodically and stand near the tank to wipe off the poison.

Healing Acidmaw and Dreadscale

2 healers on the main tanks, 1 on the caster tank, and 3 on the rest of the raid. Remember that raiders will take damage from Burning Bile so they have to take care where they stand.

I’m not quite sure when they switch. I don’t know if its time based or percentage based.

Phase 3: Icehowl

25 man health: 13.3 million

Abilities

Ferocious Butt

Delivers a ferocious headbutt to an enemy, inflicting 69375 to 80625 Physical damage and stunning for 3 sec.

8 yd range, Instant

Arctic Breath

An icy breath that freezes targets in a cone in front of the caster, inflicting 20000 Frost damage over 5 sec.

100 yd range, Channeled

Massive Crash

Leaps into the air and crashes down with massive force, dealing 11000 Physical damage to all enemies, stunning them, and knocking them back.

1 sec cast

Whirl

Whirls around, dealing 9250 to 10750 Physical damage to all nearby enemies and knocking them back.

15 yd range, Instant

Frothing Rage

Increases Physical damage and attack speed by 50%.

Instant

No downtime between snakes and Icemaw. He’s tanked near the middle of the room.

Artic Breath doesn’t seem to be controllable. He’ll just turn and spray. Think to those big Sons of Hodir trash mobs in front of Hodir. Have an off tank ready to pick  him up just in case. The Breath is a channelled. As long as hes channeling the spell, players caught in the breath can’t do anything.

Dealing with Ferocious Butt

Okay, fast forward to 7:36. Icehowl leaps in the air and knocks everyone towards the wall (Massive Crash). The boss mod will announce that Icehowl is glaring at a player and lets out a bellowing roar. A quicker way is to see if the boss is facing your direction. If he is, RUN TO THE SIDE AND GET OUT OF THE DAMN WAY. At this point, Icehowl gets stunned for several seconds allowing the raid to get back into position. It seems like he takes extra damage during this stage. Looks like the stun lasts 15 seconds.

After his stun wears off, his Whirl kicks in (spins around and knocks back everyone). Your tank needs to haul ass back in range fast.

Icehowl gains an enrage and it must be dispelled. It’s called Frothing Rage. A Hunter’s Tranquilizing Shot should negate that quite nicely. Look at 8:29 for a better idea. I think this happens if Icehowl manages to connect on a player with Ferocious Butt and kills a guy or manages to hit someone. Note that the Enrage appears to wear off after 10 – 15 seconds if you’re not able to Tranq Shot it.

Healing Icehowl

Same thing as before. 2-3 healers on the main tank (I recommend a Disc Priest). Everyone else is on raid healing.

Keep tanking him centralized. When he nukes the ground, get the heck out of the way. Resume DPS. Rinse, repeat, link loot.

I hope this helps you guys out! Again, any other observations or corrections, please post in the comments. Strategies here were pulled from watching the video and from reading the datamined stuff. I’ll probably end up modifying this later depending on how off I am or if there’s a better idea.

Patch 3.2: Crusader’s Coliseum Reactions

In case you haven’t heard, some details of Patch 3.2 have been released. The biggest change that appeals to me is the Crusader’s Coliseum. We’re not even done Ulduar yet and already there’s another instance being released.

What is it?

It looks to be the new instance hub that 3.2 will offer.

Let’s stop for a second. Lots of reactions on Twitter have been knee-jerk negative reactions.

“I don’t want to 25 man joust!”
“What? A PvP instance?”

Take a step back and start analyzing. We don’t know anything about this instance yet. All we know is that:

  • There is an instance
  • It will come in 5-player, 10-player, and 25-player varieties

I want to stress that we do not know what type instance it’s going to be inside.

Speculations

I love raiding. I love looking at the lore behind it and the mechanics, the environment and so forth.

I don’t think the Coliseum is any sort of PvP type instance.

What I think will happen is that a raid group is going to march in there and engage in gladiatorial combat against raid bosses. Think of an instanced version of the Ring of Blood quests that we first saw in Nagrand and then in Zul’Drak.

Are we going to see mounted combat? It’s a possibility. Maybe half the raid is on horseback and the other half is on their feet. I honestly have no idea.

New Battleground: Isle of Conquest

A new large-scale siege Battleground where Horde and Alliance have to battle head-to-head for control of strategic resources to lay siege to the keeps of their opponents.

Not quite death match. Sounds to me like it’s another control-the-point battleground with vehicles (large-scale and siege). Now I wonder if it means large-scale as in 15 player or large-scale as in 40 player.

Yeah. Alterac Valley in siege tanks.

Also, note that it’s called Isle of Conquest. (The island part, not the Conquest part, although it’ll be corny to jump in there and go “GET OFF MY ISLAND!”, because you know my guild’s name is Conquest, hah.). This leads me to wonder if we’ll get access to naval units. Maybe drivable ships or something to attack from the water in addition to laying siege on land.

Final Notes

Don’t perceive that this is what’s actually going to happen. Take a step back. We’re only seeing pieces of the puzzle here. There could be more stuff coming out. Actually, there will be more stuff coming out.

What do you guys think? How’s my reasoning? Sound? Terrible? Are you looking forward to any of these? (Bloggers can link and trackback here too!)

Reader Request: Wyn’s Guide to Northrend Reputation

Rep

Thanks for voting in the Poll. I still can’t believe this won, but since it did, I’ll do my best to give you the best information available.

Once you hit 80, and the xp grind is over, a new grind starts – this time for reputation and gear. There are really only 3 reasons to grind rep: Gear upgrades, Profession needs, and vanity items. The best way to start churning out rep for ANY faction is to start doing quests in the zone where you find the majority of their NPC’s. After that, some factions will allow you to wear their tabbard into heroic dungeons and gain rep for them, regardless of the zone-location of the instance, while for others you’ll have to diligently knock out daily quests. Either way, it takes some planning to know which factions are worth it. I’m not listing EVERYTHING that’s available for each rep-level with each faction. I doubt you, as a healer, care much about non-spellpower shields and 2H axes.

Wyn’s Guide to Northrend Reputation

Horde Expedition

  • The Hand of Vengeance
  • The Sunreavers
  • The Taunka
  • Warsong Offensive

Alliance Vanguard

  • Explorer’s League
  • The Frostborn
  • The Silver Covenant
  • Valiance Expedition

This is a group of factions, and your rep with the umbrella faction will depend directly on your rep within each of the sub-factions. As you do quests for the sub-factions, 1/2 of the rep is also counted toward the main faction – WoWwiki explains it well: “For example, doing a quest for the Valiance Expedition, earning you 250 reputation with the Valiance Expedition, also gives 125 reputation with the Alliance Vanguard. Therefore, you must have two of the four sub-factions at Exalted in order to be exalted with the Alliance Vanguard, or the equivalent amount of reputation spread across all four.” Got it? Additionally, most dungeons will give you Rep for this faction as default when you’re not wearing the tabard of another faction.

For Horde, you can purchase these items from either Gara Skullcrush in Warsong Hold or Sebastian Crane in Vengeance Landing.
Allies, do your shopping with Logistics Officer Silverstone at Valiance Keep or Logistics Officer Brighton at Valgarde.

Revered:

Exalted

Wyn’s Verdict: The truth is, by the time you’re revered with these factions, you’ll probably have had access to better equipment in both slots, either from non-heroics, heroics, or quest-rewards. However, if you PvP, that head glyph* is going to be a MUST. If you are an engineer, you will almost certainly want to be able to make the motorcycles. If you are an engineer that PvP’s, you got lucky – since you don’t have to farm an otherwise useless faction for only one item. *Note: These slot-enchants USED to be called “glyphs” in Classic and BC. To avoid confusion with stuff made via Inscription, they’re now called Arcanums. I’m still calling them Glyphs, because it was going to be confusing either way.
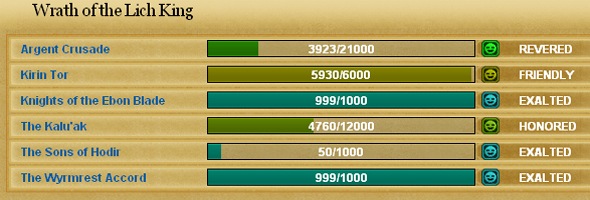
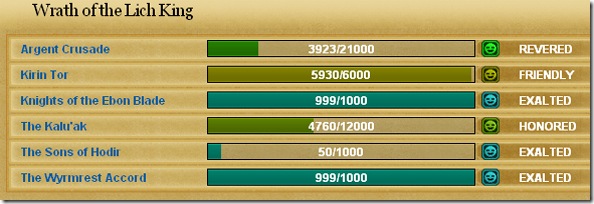
Argent Crusade

The new and improved version of the Argent Dawn, the Crusade has a few bases around Northrend:

  • Argent Vanguard, on the borders of Icecrown and Storm Peaks
  • Dawn’s Reach, in Dragonblight
  • Light’s Breach, in Zul’Drak
  • The Argent Stand, in Zul’Drak

I found quite a few quests for AC rep in Zul’Drak – so that’s probably where you’ll want to start. There are also two daily quests: Slaves to Saronite and Pa’Troll.

There’s a small bug with Pa’Troll that is worth noting: Pa’Troll is a quest that requires you to go to 4 individuals around the zone, and do a quest for each of them, so it’s kind of 5-quests-in-one. The first time you get the quest (when it’s NOT a daily), go to Alchemist Finklestein and complete The Alchemist’s Apprentice. This involves you picking up 4 random things off the shelves in his lab – very easy. Turn in The Alchemist’s Apprentice for an easy 250 rep, and abandon Pa’Troll. Go back to the Argent Stand, re-accept Pa’Troll, and go back to the Alchemist. Lather, rinse, repeat until you’re exalted. I had a few people in my guild grind to exalted in a few hours, just repeating the Alchemist’s Apprentice.

When you’re ready to make your purchases, you’ll find Quartermaster Aliocha Segard at the Argent Vanguard in Icecrown. (Be aware, she’s stuck under a tent, in the back. It’s kind of a pain to find at first.)

Friendly

Honored

Revered

Exalted

Wyn’s Verdict: You’ll probably want to farm Exalted with this one, since that ring is pretty nifty. The gear in the Honored range is really just gravy – I’m sure you can get better from running the dungeons it’ll take you to finish out to Exalted. The JC pattern is a tanking pattern, but the Spellthread is one tailors wil be able to sell for cash. (You won’t use it yourself, since it’s on-par with the trainable tailor-only thread.)

Kirin Tor

The ruling mages of Dalaran. This faction is related to BC’s Violet Eye – but all those Kara runs won’t help you get any of their rewards in this xpac. Most of the rep gains will be from doing quests in Borean Tundra, around Amber Ledge and in Coldarra, and wearing the Tabard. The Daily cooking and dungeon quests also give Kirin Tor rep.

Friendly

Honored

Revered

Exalted

Wyn’s Verdict: You can’t get around needing a helm-enchant. It’s a gotta-do. And if you want the one with Crit, here’s your faction. JC’ers will definitely want the Exalted gem pattern – it’ll be a big money-maker on the AH, and all the casters in your guild will want it. Tailors will have guildies asking them for the spellthread, mostly for PvP gear, but maybe for some Shammies.

Knights of the Ebon Blade

These are your Death-Knights-turned-good-guys. They do have a base in good ol’ EPL, but for Northrend purposes, you’ll first meet them at Ebon Watch in Zul’Drak. Their main quest hub and Quartermaster, Duchess Mynx, are in Icecrown at the Shadow Vault. You cannot access the Quartermaster until you take back the Vault – a phased quest line which starts with It’s All Fun and Games and is available at lvl 77.
Friendly

Honored

Revered

Exalted

Wyn’s Verdict: Again, Jewel Crafters are going to want to farm this, for completion’s sake, and to fill special orders. The gloves at Revered are really quite nice, especially if you prefer questing to instancing. Tailors will want to make the Warlocks in their lives happy, and most casters will be very impressed with that belt (even without any regen.)

The Kalu’ak
These rather loveable Walrus-people have quest hubs on the southern coasts of Borean Tundra, Dragonblight, and Howling Fjord. Each zone has one daily quest for the faction. The quartermaster, Sairuk, is southeast of the inn at Moa’ki Harbor.
Friendly

Honored

Revered

Exalted

Wyn’s Verdict: Ask all of your JC’s VERY NICELY to pick up that gem pattern at Friendly. Buy them cookies, if necessary. Those of us that fish will want the fishing pole – it’s now the best in the game. Those that collect pets will definitely want the penguin- he’s adorable. For raiders, I would say this is a faction that can wait, since you’ll replace the gear from Honored rather quickly, and none of it is essential for boss-killing.
The Sons of Hodir

Based at Dun Niffelem in the Storm Peaks, this is a cool, lore-based faction, tying into a war with Loken and the titans. These ice giants start out aggressive to you, and you have to do a quest chain starting with They Took Our Men! in K3 to be able to talk to them. Once you’ve completed the quest chain, there are only two ways to earn rep: dailys, and turning in rather hard-to-find items called Everfrost Chips. If you don’t find any chips, it’ll take you 8 days from Friendly to Honored, 8 more for Honored to Revered, and 11 from Revered to Exalted. The Quartermaster, Lillehoff, is inside Dun Niffelem. He’s the big ice giant. Heh.
Honored

Revered

Exalted

Wyn’s Verdict: If you’re not a Scribe (Inscriber? Inscriptionist?) farming this to exalted is essential. JCs and Tailors will will want the patterns anyway, and the mounts are a nice money-sink if you swing that way. Also, this faction has some pretty cool dalies – you don’t have to run all over the place like you did with Ogri’la, and killing the Wild Wyrm is really pretty exciting.

The Wyrmrest Accord

Another example of Blizzard using the lore much earlier in the levelling experience, you’ll find the Wyrmrest Temple in Dragonblight. Joined together against Malygos’ perversion of the Blue Dragonflight, the other Dragon-factions have decided to enlist your help. Quests throughout Dragonblight will give you Wyrmrest rep (say that 3x fast), but there are also 3 daily quests and a tabard to wear in heroic dungeons. Rep rewards can be purchased from Cielstrasza, who is on the very top level of the temple, along with the queen.

Friendly

Honored

Revered

Exalted

Wyn’s Verdict: Your other helm-enchant option comes from this faction. Depending on the rest of your gear, you’ll probably want the Mp5 option over the Crit from the Kirin Tor, but that’s pretty much personal preference. Tailors who are enchanters will certainly want the bag, and this is going to be another long slog for JCers. The gear is relatively meh compared to what you’ll pick up in heroics as you grind the rep, but I know a lot of people will want the Mount. And it DOES look pretty cool.

These last two factions are a little different, in that their rep gains are inversely linked. Once you choose one, you’ll be hated by the other. I’ll go over how you choose between them at the bottom – it can be a little confusing.

The Frenzyheart Tribe

These little badger people are not as cuddly as they look, since they tend to ask you to do mean things to The Oracles – who lived in Sholazar basin first. Once you’re affiliated with the Frenzyhearts (see below), you’ll have to do daily quests to farm the rest. The dailies It takes about 8 days to hit Revered from Honored, and 12 or so more for Exalted. Buy your loot from Tanak.

Friendly

Revered

Exalted

Wyn’s Verdict: I’m never really as impressed with the gear from rep factions as I am with the gear from instance-grinding. But, again, if you’re a solo player, there are some solid choices here. Of course, if you’re a solo player, I’ll need to ask you why you’re healy-spec’d. The haste trinket seems pretty useless for casters. A word on the Pet-jar: The one you buy has to ferment for 7 days before it becomes a pet… it’s kind of like letting your fridge marinate long enough to spawn intelligent life. It also has a small chance to give you a reusable Wolvar costume, so once you hit Revered, you can buy one of those suckers every week for your chance.

The Oracles

The Oracles are a sort of super-murloc. I find them rather endearing, what with their naive devotion to the relics of the Titans, quickness to forgive you for fraternizing with the Frenzyheart, and love for “shinies.” Friendly

Revered

Exalted

Wyn’s Verdict: I think this exalted trinket is better for casters than the Frenzyheart one, but that’s not to say it’s a particularly good trinket. If you’re grinding this rep, it’s more than likely for the Egg, which is even MORE special than the jar of ooze. Like the jar, you have to hold onto the egg for 7 days before it will give you a pet. The egg can give you one of FOUR pets, and has a VERY RARE chance to give a Green Proto-Drake mount.

Okay, both the Frenzyheart and the Oracles are located in Sholazar Basin. As you quest through the Nessingwary lines, you’ll eventually meet up with the Frenzyhearts – who will have you do some rather disrespectful things to the Oracles. Eventually, you’ll be given a quest to kill an Oracle caught in a trap… but the only option presented to your character is to talk to the Oracle, and let him go free. This doesn’t sit well with the Frenzyheart, who are watching your every move for signs of disloyalty. You are then forgiven by the Oracles, and start doing quests for them. Eventually, clearing out the zone will lead you to another, seemingly unrelated, chain: A Hero’s Burden. The final quest here has you fighting Artruis the Heartless in a cave – and this nasy piece of work has enslaved both an Oracle and a Frenzyheart. In order to kill him, you must choose which one of them to save, and which to kill. The one you save is the faction you choose, starting you at honored rep – so don’t let it catch you off guard. If you make a mistake, it’s okay – the quest to kill Artruis is a repeatable daily, so you can always go back tomorrow and kill the other one. Now, if you’re a title or achievement collector, you should know that farming to exalted with the Frenzyheart will give you the title Frenzyheart Tribe, while exalted with the Oracles gives you THe Oracles. If you do first one, then the other (the order doesn’t matter), you can also call yourself a Mercenary of Sholazar.

The Bottom Line

The majority of raiding healers will need to farm their Sons of Hodir dailies every day for their shoulder enchants, and will need to pick either the Kirin Tor or Wyrmrest tabards to wear in heroics untill they get their helm-glyph. You’ll also probaby want to toss in Argent Crusade for the ring.

Scribes don’t have to farm Sons of Hodir, since their profession-only shoulder enchants are better. Jewel crafters, tailors, and leatherworkers will have a pleasant boredom-free time in the xpac, since they need revered or exalted with nearly every faction (and sometimes conflicting factions) to complete their pattern-lists.

People who like mounts and pets will want to farm Kalu’ak, Wyrmrest, Sons of Hodir, and both Sholazar Basin factions.

Update as I went to publish: Check out the lovely Seri’s perspective at Snarkcraft.

Luv,
Wyn