Zul’Gurub and Zul’Aman Boss Strategy Notes

Plan on invading Troll instances today? Not quite sure what to expect? Got you covered. You can find the TLDR versions here. Comment if there’s any additional noteworthy mechanics that you find on live servers that glossed over. Notes were taken from my experiences on the PTR and from kill videos.

Zul’Gurub

Venoxxis

Stay within the maze.

Players will get linked (Toxic Link) which deals damage to both players. Break the link by increasing the distance between the two players. Poison bolts get shot at players, heal through it. Boss has a frontal cone attack. At some point, watch out for pools of poison. Not sure if that’s linked to time or health.

Bloodlord Mandokir

Randomly targets a player and one-shots them. Mandokir levels up. Kill the raptor. The raptor goes around killing ghosts (which will resurrect you when you de) and you have a certain amount of them.

Watch out for big conical, fire spike thing

Kilnara (Panther boss)

First 50%: Tank and spank. Last 50%: Calls in panther buddies.

Interrupt Tears of Blood. Pull 2 packs of panthers during phase 1 and kill them to reduce the amount of panthers coming in the final phase. When they do engage you, AoE them down.

Zan’zil

Three phases (Fire, Ice, Poison)

Zombie troll phase: Grab red cauldron . Gives your attacks additional AoE powers. Destroy zombies.

Berserker phase: One big mob? Grab the Ice cauldron. Attacks gain freezing powers. Slows down Berserker and kills them quick.

Cloud phase: Entire environment covered in gas. Grab poison cauldron, become i mmune.

Jin’do

Phase 1:

Casts a green shield bubble reducing magic effectiveness within it. Keep the tank and Jin’do within it. When Jin’do casts Shadow of Hakkar, run into the shield. Then run back out and resume DPS. Last I checked, he’ll do an AoE chain nuke of some kind if you stay too long within the shield.

Phase 2: Hakkar

There are four chains on the ground. They each have 1 million health. Those chains need to be broken. Look for Gurubashi Spirits. Really big mobs that have the ability to jump. The group needs to stay near chains so that the big guys will jump onto the chain thereby breaking it. Arrow on the player’s head signifies the target. Clear out the Twisted Spirit mobs.

Kicker: Need to keep moving to dodge assorted Shadow Blasts.

Zul’Aman

Akil’Zon (Eagle boss)

Eagles will pick players up and fly them around. DPS the birds. If you’re picked up, you can still DPS them. Look for the thundercloud and stand beneath it.

Nalorakk (Bear boss)

Standard tank and spank. Also does an AoE silence.

Charges the furthest player standing away. Inflicts a +500% damage taken debuff on the target. Don’t get charged twiced. Rotate with other group members in being the furthest person away. (Thanks Katherine and Wynn)

Halazzi (Lynx boss)

Kill totems. Kill the pet Lynx (likes to randomly rush players, healers need to stay on top of that). Lynx form frequently hits random players for massive damage. Your healer needs to be on the ball. Any self surviving cooldowns are encouraged to be used. (Thanks Katherine)

Jan’Alai (Dragonhawk)

Has a straight line fire attack, watch for it.

Watch for fire orbs and make sure you don ‘t stand near them. That hit box is a little larger than the graphic. Kill 1 of the hatchers. Healers need to dispel a fire debuff which comes from the hatched eggs. If Jan’Alai drops beneath a certain percentage, he hatches all of the eggs.

Hexlord Malacrass

Only 2 ads now. Kill them, blow up Malacrass. Remember Malacrass will assume the powers at random of the different classes in your group due to his power drain.

Daakara

Similar to Zul’Jin, he instead undergoes 2 animal forms instead of 4. Switches phases every 33%.

  • Lynx form: He rushes everybody and his damage gradually ramps up.
  • Dragonhawk form: He will dish out fires in a line from him as a center point. Watch out for flame pillars. It was a pain in BC, it’s a pain now.
  • Bear form: Randomly charges a player.
  • Eagle form: Spawns 5 random cyclones. They tend to stay stationary but will shift position every few seconds. Will shoot out lightning to players nearby.
Healing Heroic Magmaw

h-magmaw-480

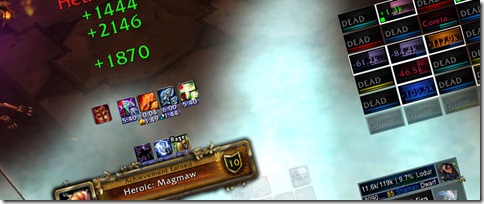
Note: That’s actually Lodur’s kill screenshot. How he heals with raid frames that small, I have no idea =).

Healing from World of Logs

Conquest is officially 2/13 in the hard mode 25 progression. It was nice getting the kill and getting the monkey off our backs. It had been weeks since our last progression kill and this was much needed.

Why Magmaw?

We had been struggling for a long time on heroic Chimaeron and it was felt that a change of pace was needed. Knowing it was nerfed, we detoured straight to him instead. I think it took us about ~20 wipes.

Setting up

The first 14 attempts of the night saw us using 7 healers and 4 tanks (1 Frost DK kiting). On the kill, we ended up with 7 healers and 5 tanks (2 Frost DKs kiting).

Healers

2 x Resto Shaman
1 x Resto Druid
1 x Holy Paladin
1 x Disc Priest (Shields)
1 x Disc Priest (Atonement)
1 x Holy Priest

magmaw-heroic

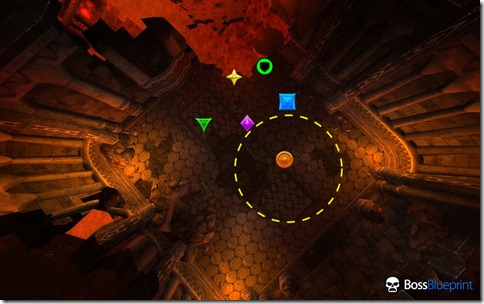
Every DPS player and healer stands on the star and DPS’s from close quarters. The two tanks on Magmaw positioned themselves on the shield depicted above. Our resident Holy Paladin and Resto Druid were assigned to both of them. The triangle, diamond and square marks served a purpose.

We had a group of players who would stand on the outside in order to draw fire from pillars and Nef’s fireballs. We had a Frost Deathknight pick up the parasites but I was having trouble keeping him alive towards the end. This was offset with a second Frost Deathknight who assisted on picking up additional parasites (and split the parasite damage accordingly).

Bro tip: Place all of your outside players together in a group to maximize group healing. In our case, both of the Frost Deathknights, myself and two Hunters were placed in that group. Prayer of Healing combined with Chain Heals and other spells were enough to keep us alive through the pillars.

Tank healing

You will want to use two dedicated players. One healer by themselves may not be enough (at least, when learning). If you’re tank healing, you can’t even deviate for a moment because that tank will die. It’s going to take everything you have to keep them alive. Configure your raid frames to show debuffs like Mangle. If necessary, get your tanks to call the switches so you can keep pace with them. 

Assign another healer to cover the tank grabbing the Constructs. They can switch between the tank and the raid if they choose.

Raid healing

Raid damage is going to continue slamming the players (the outside group especially). I wasn’t able to keep them and the kiters alive myself. You’re going to want to use 2-3 healers at least. It’s to counteract the damage from Magma Spit and Lava Spew. Be fast with any Ignitions. It’s up to the players to move, but if you’re standing at the right spot, it shouldn’t take more then a few steps to get clear.

Head phase

When Magmaw eats the spike, this is the time to regenerate and use mana cooldowns. With 3 Priests, we used our Hymn of Hopes separately. Our Resto Shamans used their Mana Tide totems earlier on. Telluric Currents for Resto Shamans helps immensely from what I understand.

Additionally, you may want to consider having 1 Atonement Priest. Smite during the head phase to heal up any residual damage from the transition.

Concentration Potions are awesome here.

Parasite kiting

For the kiting healer on the outside, I suggest using a Holy Priest. My main job was to heal our Frost DKs as they were weaving figure eights around the room. Body and Soul was enough to give them a little burst of speed if they needed it. The benefit of a Priest is that if the DKs get trapped with incoming parasites or encroaching fires, Life Grip gave them a way out. If the kiters were in no danger, I’d default to throwing Renews on the group while running around fire dodging.

This job sucked for me. I had to hog Innervates and use the expensive spells. There  were times when I had to swing through in front of the marked positions to get in range of Druids. With the amount of cooldowns we had and the DPS, we were able to afford to do that. The faster a fight goes, the higher the HPS since you’ll have more mana.

Hunters: Don’t use Ice Traps. Outside group may not be able to see Pillars or Nef’s Blazing Infernos

Final phase (sub-30% health)

Spread out immediately (Try 6 – 8 yards). This is the most stressful part of the encounter.

Your healing lead is going to want to take a broader look at the health of the raid. Use Tranquility and Divine Hymn accordingly. Don’t forget about DPS Druids or Priests.

The DKs and I drop back further away to allow room for players. Shadowflame Barrages are going to hurt. You may wish to take a moment before the encounter to manually position your healers to maximize the area.

Continue to keep 2  tank healers for Magmaw, 1-2 on the Construct tank and the rest on the raid. Construct tank healing is going to be sketchy. Your raid leader might have to call a DPS burn on a Construct if there’s too many up when you transition. It’s going to be nearly impossible to keep a tank alive with 3 Constructs up. It’s doable if they have 2 Constructs. Watch their tank cooldowns and when theirs wear off, use yours. That should buy you about 30-50 seconds if healers have their single target cooldowns free.

Good luck!

The next question is heroic Maloriakk or heroic Atramedes next.

Also, Conquest healing corps is looking for another Holy Paladin, Boomkin/Resto Druid, Shaman (all specs) and Priest (all specs are welcome). DPS classes are also encouraged to apply.

Full list

Application page

Raid Leading 101: Starting your Roster

**Forgive the absence of last week’s post. I got “blessed” by a crazy work schedule that had me away from my desk a lot. Don’t forget that if there’s anything you’d like to discuss or see in a RL101 post, you can always email me**

So, you’ve made the choice between 10 and 25. You know which feels right for you and your friends. Now you need to look at your roster. Your roster is the list of players on your team that you can pull from to make your raid on any given night. Hopefully you’ve got a group of friends that you’ve started with, which will take some of the stress off of recruiting and assembling your team. We’ll start out with the basics of your raid (this is a 101 course, remember). You need tanks, healers, ranged DPS and melee DPS.

Tanks

Tanks are the classes that will take the brunt of the damage while protecting your raid. The classes that can fulfill this role are:

  • Protection Paladin (“Prot Pally”, “Tankadin”)
  • Feral Druid in Bear Form (“Bear”, “Meatshield”)
  • Protection Warrior (“Prot Warrior”)
  • Blood Death Knight (“Blood DK”, “BDK”)

It’s best in a 10-man raid to have ~3 Tanks on your roster (~4 for 25-man). Most raids encounters will require 2 tanks for encounters. Either your 2 tanks will have to alternate who is tanking the boss, one will tank the boss while the other tanks one or more mobs that join the fight, or you’re doing a Council-style fight.

Your Main Tank (or “MT”) should be your most talented tank and will seldom need a DPS off-spec. The other tanks on your roster (“Off-tanks” or “OTs”) should have a DPS off-spec so they don’t need to be totally swapped out mid-fight. Warriors can spec into Fury or Arms, Druids into Balance or Feral Cat, Paladins into Retribution, and Death Knights into Frost or Unholy.

Healers

Healers are the players that you pay to keep you alive long enough to see the boss take its last breath. Classes blessed with this ability:

  • Restoration Shaman (“Resto Shammy”)
  • Restoration Druid (“Resto Druid”, “Tree Druid”)
  • Holy Paladin (“Holy Pally”, “HPally”)
  • Holy Priest
  • Discipline Priest (“Disc”)

For your 10-man crew, count on having ~4 Healers on your roster (~9 for 25man). You’ll always need a minimum of 2 healers (5 in 25-man) for an encounter, depending on how healing intensive it is. It’s best to have the other healers in your roster work on a DPS offspec in case you need to convert to more DPS in an encounter. Priests can spec into Shadow, Druids into Balance or Feral Cat, Paladins into Retribution, and Shamans into Enhancement (Melee) or Elemental (Ranged).

Melee/Ranged DPS

DPS are the players that put the hurtin’ on the boss. They’re primarily responsible for dealing damage to the boss and any adds that may pop up, as well as crowd control, interrupt, off-heal, or help mitigate damage. Here’s the laundry list of DPS you’ll find:

Melee

  • Enhancement Shaman (“Enh Shammy”)
  • Rogue (Subtlety, Assassination, Combat)
  • Arms or Fury Warrior (“Arms War”, “Fury War”)
  • Retribution Paladin (“Ret Pally”, “lolret”)
  • Feral Druid in Cat Form (“Cat”, “Kitty DPS”)
  • Death Knight (Unholy, Frost)

Ranged

  • Elemental Shaman (“Ele Shammy”)
  • Hunter (Marksmanship, Beast Mastery, Survival)
  • Warlock (Affliction, Demonology, Destruction)
  • Mage (Arcane, Fire, Frost)
  • Balance Druid (“Moonkin”, “Boomkin”, “Boom Chicken”, “Lazer Turkey”)
  • Shadow Priest

In 10-man, you’ll want ~8 DPS’ers (~22 for 25-man) on your roster, with a mix of melee and ranged. There will be some fights that will be better for melee DPS or ranged DPS, so a mix will give you a good chance of success. Having any of your DPS players with a tank or heal off-spec is great, but more often than not, you’ll be better off if your tanks and healers are all main-spec.

Summing It Up

A standard 10-man raid will consist of: 2 Tanks, 3 Healers, 5 DPS.

A standard 25-man raid will consist of: 2-3 Tanks, 6-7 Healers, and the rest DPS.

Of course different raids will deviate from this basic model, but in my raiding experience, this is usually what you’ll find. To start out, aim for those numbers. Once you have your 10 or 25, add 1-2 more for each role to solidify your team. Your raiders will need nights off or have real-life commitments from time to time, and those extra people will help keep your raid going consistently.

Coming up, we’ll look at more advanced roster planning, as well as a couple recruitment tips!

7 + 1 Simple Ways to Pull Trash

Trash pulling can be a bane to players new to the game or new to the raiding scene. Its a basic coordination skill to learn which is employed from the 5 man level to the 25 man level. The act of pulling bosses are generally easy. There’s typically one boss to worry about.

But trash?

There’s a ton of trash. At this level, they can’t exactly be taken lightly! If your group isn’t properly focused or directed, trash packs can easily overwhelm your group.

Assuming you’re not taking on trash mobs with really specific mechanics, here’s a few general strategies your group can use to handle them.

Crowd Control Pull

This is the standard and textbook method that most groups use when grabbing trash. Let the players with crowd control skills open up. Remaining mobs which are either immune or designated as kill targets will automatically chase the raid allowing the tank to grab them.

Misdirect Pull

Have any Hunters around? Good as this is where they’ll come in handy! While a tank is building threat on one mob, a Hunter can send another mob their way. Just remember that the Misdirect mechanics have changed slightly. Best used against trash pulls with many mobs.

Misdirect
The current party or raid member targeted will receive the threat caused by your next damaging attack and all actions taken for 4 sec afterwards.  Transferred threat is not permanent, and will fade after 30 sec.

Charge Pull

No crowd control. The tank literally charges straight in and generates as much aggro as possible on all targets. Heavy reliance on the healer to keep them alive. DPS players are typically called upon to focus fire targets or to AoE mobs down. The side pulls in the first chamber of Bastion of Twilight are excellent examples of using a charge pull. The tanks jump in and it turns into a race between DPS and healer mana.

Line of Sight Pull

I would imagine Protection Paladins would be used to using this (for historical reasons). The line of sight pull involves the tank aggroing mobs and then running behind a pillar or a rock or some other object. This forces the mobs to chase after that player because they can’t actually see said player. Just make sure the rest of the group doesn’t start opening up on them until the mobs get into position. Use this if you’re worried about patrols.

Use the LOS pull if you’re up against ranged mobs or if you’re worried about patrols.

Distance Pull

Usually executed on trash packs consisting of all casters, your tank will want to run in and then back out as quick as possible. As the casters begin attempting to cast and chase you, they’ll eventually reach a point where they’ll stack up. This is when the tank then re-engages them in order to generate threat on all of the trash allowing group to open up. (Thanks Hi Ya).

Interrupt Pull

Reserved for any trash packs involving casters, this pull involves the use of an interrupt. I had to practice this one a few times on my Elemental Shaman. I’d manually break the Hex on the target with a few Lightning Bolts. Once the mob started casting, I’d hit it with a Wind Shear to get it to start running towards me thereby allowing the tank to snatch it up in place. This is especially useful if there are no immediate landscape features for the group to hide behind but you still need trash to move due to patrols.

Mind Control Pull

If you can’t line of sight pull, this is the next best thing. Naturally it requires a Priest. Your Priest Mind Controls a mob while the rest of the group stays back. The trash should then gang up and utterly destroy the Mind Controlled mob.* Just keep in mind that you may not get reputation or any loot from the death of the Mind Controlled mob.

Exception: If your Priest is named Matt, he will fat finger Mind Blast instead of Mind Control. Do not assign him to any Mind Control duties.

Bonus: The pet pull.

Yeah.

You know what the pet pull is. Everyone’s experienced the pet pull before. If you haven’t, well that can be easily arranged.

Healing Chimaeron

Feel free to scroll down and watch Conquest’s kill video as well as read the comments I had on my own performance.

As Priests, we have it easy. There are so many simple tools we can use to heal this unique encounter. I’m going to break this post down by spells and healing techniques.

Best advice I can give you about healing through Chimaeron is to not panic. The first couple of attempts, my eyes were glued to my screen. I imagine every healer who sees this fight for the first time feels the same way. Its simply overwhelming and you experience this feeling of helplessness washing over you as you watch the rest of your raid plummet.

But don’t worry. There is a light at the end of a tunnel.

Assignments

I recommend raids start with 7 healers on 25 man (3 on 10 man). This early in the end game, I think that having that extra healing GCD is going to be a must.

2 healers on the tanks
5 healers on the raid

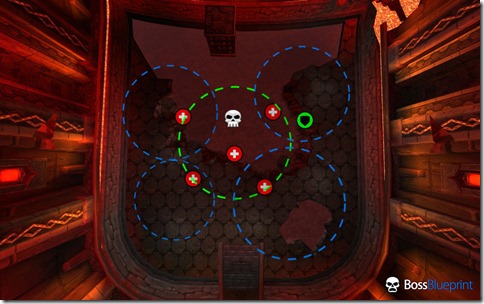
Assign each healer to 1 group. Make sure those groups are relatively close to each other so that healers can spring AoE heals when needed. I’d drop a Prayer of Healing after a Massacre to elevate them past 10k and keeping them in the safe zone. You’ll want your positioning to look something like this:

BossBlueprintStrat_1294778027

As you can imagine, the + symbols represent the raid healers. The blue circles represent where their groups should be. The two groups near the top are for melee while the two near the bottom are for ranged. I’m the one right in the middle. The green circle represents my approximate AoE healing radius.

Also note that I didn’t draw this to scale. It’s an idea of how I wanted our groups to array ourselves.

On a side note, check out Boss Blueprint if you want to create your own boss strategies and tactics. It’s how I created this one.

Phase 1 (Triage healing)

You have 4 spells at your disposal when trying to keeping your group alive.

Holy Word: Serenity

Get in this Chakra state. The instant heal is a life saver. You have about 5 seconds to heal affected players up past 10k health otherwise you risk them dying to a Massacre or a Caustic Slime.

Flash Heal

Your fast heal will get plenty of action and work on this encounter. I’ve seen players frown at using such an inefficient heal. But guess what? This is one of those encounters where its warranted. You can’t spend your time worry about mana efficiency here. If you’ve gotten to this point, then you already know how to manage your mana, cooldowns and spell usages anyway. Besides, its not like you’ll be chain casting Flash Heal on the same player repeatedly. All you need is just one. In most cases, only one player in your group will be below 10000 health.

Heal

Yes, it is a little slow to use. I’ve developed a habit where I would just continue chain casting Heal on myself or another player in my group even if they didn’t need it. Why? Because there’s a 20% chance that my Heal will land on a player in my group who is the target of my Heal. If I’m casting Heal and a Caustic Slime strikes my target, I can simply let the heal go through and it will get that player above 10000 anyway. Just be prepared to switch to your assignments within your party.

Work that Mastery while you’re at it!

Binding Heal

Great spell to have if both you and another player in your group have been hit. One cast will get you and your target to safety. I’m not seeing this spell used often enough.

Phase 2 (Brute force healing)

Group up and unload your biggest AoE healing spells.

Prayer of Healing

Identify the members in the raid who do not have personal cooldowns they can use to survive. I got into the habit of Flash Healing that player and a second player before casting Prayer of Healing on my own group with help from Serendipity. As a Disc Priest, you’ll want to do the same with a shield into a hasted Prayer of Healing (due to Borrowed Time).

Holy Word: Sanctuary

Stack the healing circles on top of each other for maximum effect.

Yeah.

No brainer, eh?

Divine Hymn

You’ll want to coordinates Hymns and Tranquilities across the raid. If you have a Disc priest, find a way to weave in their Power Word: Barrier. I find that the first Feud can be healed through without cooldowns. But any Feuds after that are best done with rotating cooldowns. If you’re just learning the fight, I suggest going with using 2 cooldowns per Feud. As your raid gets geared and stronger, you can drop down to 1 per feud.

Phase 3

Smite

Your healing spells are useless. Switch to Smite mode and go to town. You deserve it.

Leap of Faith

Keep this spell in your back pocket. It isn’t exactly a heal, but it does buy time for your raid to take down Chimaeron when you Life Grip the target he is chasing to a safe area in the room.

Conquest Video

Chimaeron normal mode on 25

In this video from my perspective, I’ve been assigned to group 5 (The all healer group). I’m using Real UI (and you can read up on my thoughts on this UI compilation on NSUI). Note that my group 5 is the last row not necessarily the farther right column.

Things you shouldn’t do in a raid

You’ll notice I make a number of key mistakes on our first kill.

Open bag, find mana potion: I started using Real UI recently as an experiment on compilations. I completely forgot to ensure my Mana Potions were on my bar. So what did I do? Open up my bags, find my potions, and click on them.

Have the character sheet open: In the biggest example of healer tunnel vision in the HISTORY of tunnel visioning, yours truly fat fingers the character sheet. I must have left it up for a solid 2 minutes or so before I realized I had it open. My eyes were that glued to my raid frames. Even my raiders are perplexed as to how I left my expanded character sheet up taht long.

Remember your DPS spells: Yeah, I had to rearrange my keys. Once we hit the final phase, you’ll notice I kept trying to cast Holy Word: Sanctuary. I forgot what I had Smite bound to and it took me a few seconds to remember what keys they were. Whoops.

Need specific advice on your own individual play or on your healing team? Feel free to leave a comment or question here.

For a different perspective, check out a blog entry by Kae from a Resto Druid perspective. If you’re a blogger and you’ve written a blog post on Chimaeron as well, let me know and I’ll add a link straight to yours.