Crusader’s Coliseum: Heroic Hard Mode Details (Updated 10:30 AM)

Updated with more details, 10:30 AM.

These details come as a courtesy of my officer, KimboSlice and is obtained from the TankSpot forums (which is reposted on MMO Champion). Figured I’d share it (summarized) with everyone who is waiting for maintenance to expire (and who don’t actively check MMO Champion or Tankspot).

Northrend Beasts Encounter

Gormok the Impaler

  • Impale does 150% weapon damage instead of 100%.
  • DoT ticks for 80% more damage and lasts 5 seconds longer. Tanks must switch at 2 stacks.
  • Yes, you will need 3 tanks to handle the DoT rotation. All 3 will need heals.
  • Each Snobold that is out there increases his damage by 15%.
  • The direct damage from Impale will hit for ~35000.
  • Stomp on melee from 9k to 12k

Acidmaw and Dreadscale

  • Imperative for players to spread out.
  • Acid hits for 5000 every 2 seconds.
  • Burning bile is 9000 damage every 2 seconds to players within 10 yards.
  • It is expected that if one enrages, it will be a wipe. Therefore, both snakes may have to be taken down together. Not sure of this, but keep it in mind.
  • Whatever happened to that third snake?

Icehowl

  • Arctic breath does 30000 damage over 5 seconds. I suggest assigning healers to the left or right of Icehowl to help reduce increase survivability.
  • Random whirlwind on melee from 10k to 14k

Lord Jaraxxus

  • Touch of Jaraxxus inflicts ~4000 damage over 12 seconds which causes players to be affected by Curse of the Nether (AoE dot). Possible decurse?
  • Mistress’ Kiss: Next spell with a cast time gets that school interrupted for 8 seconds and causes 8000+ damage.
  • Incinerate Flesh needs 85000 healing instead of 60000 to remove it.
  • Burning Inferno (Incinerate Flesh after it’s not removed) ticks for 8000 damage a second for 5 seconds (Yeah, that’s a wipe)
  • Pain Spike from the Mistress does 100% of a target’s health over time
  • Legion Flame now ticks for 12000
  • Fel Lightning from 10k to 12k

Faction Champions

  • Spells and abilities are more potent.
  • Shaman LHW from 20k to 60k
  • Paladin Holy Light from 50k to 80k
  • Warlock Corruptionf rom 18k to 24k
  • Expect the trend to continue with the other class abilities.

Val’kyr Twins

  • Touch of Light (or Dark): Inflicts 4000 damage to players of the opposite essence every second. For example, Touch of Light will do ~4000+ damage to players under the effect of dark Essence every second. Light touched players will not take any damage.
  • Surge of Light (or Dark): Inflicts 1500 damage every 2 seconds to enemies of the opposite essence. For example, Surge of Light deals 1500 damage every 2 seconds to Dark essence
  • Shield health increased from 700k to 1.2 million (Ouch)
  • Power of the Twins: +20% damage and hit, 10% attack speed if Twins are too close.
  • Unleashed Light/Dark orb hits increased from 9000 to 15000.

Anub’arak

  • Leeching swarm ticks for 20% health instead of 10%
  • Extra add: Nerubian Ice Darter (No other details)

There might be some more surprises tonight as we head into the Coliseum. If there’s anything else you or your raid group notices, I encourage you to post comments to reflect that. As I experience the encounters myself, I’ll do a follow up post later on with more healing specific tips on getting through them.

Good luck and good hunting!
13 Express Methods to Wipe Your Ulduar Raid

header-ulduar-wipe

It’s been done. Your main tank is dead. Your healing corps is decimated. It seems as though your stealthers continue to be found and shredded. Plate armor is sundered and scattered across the battlefield. The clothwearers torn apart with nothing left aside from their robes.

It’s a wipe.

What’s the best course of action you can take to assist your raid?

Suiciding yourself and wiping along with them.

Don’t give me the rallying cries of “Mimiron will never take me alive!” either. You can’t solo a boss unless he’s within one or two spell casts of death. How many times have I witnessed a player single handedly declare victory against a raid boss? I can count that number on one hand.

So don’t be a hero unless you can actually do it. Here’s how you can make yourself useful when a wipe’s called. Ever wondered what the fastest way to die on each boss was in Ulduar?

Oh and a special note to healers. When a wipe is called, there is thing that you have to actually do that can help hasten the process.

Stop fracking healing!

Flame Leviathan

Wipes when: You’re down to 3 choppers, no tanks, and maybe a few demolishers. Unless the bucket of bolts is at a ridiculously low level, you’re done.

Methods: Jump out and close within melee range of the boss. If the Flame Vent doesn’t get you, the rockets will.

Ignis

Wipes when: Main tank is dead with no other alternatives or when a Construct gets pulled into the raid and gets stupidly detonated taking out the entire crew.

Methods: Jump into a scorch. Cast a spell before Flame Jets connects. Hug a Brittle construct before blowing it up.

Razorscale

Wipes when: No tanks are alive and that big honkin’ Titan guy does what Right Said Fred sings by doing more than a little turn on the catwalk. Yes, I’ve seen pickup raids demolished by that one trash mob. Also consider a bailout when an off tank isn’t able to tank quick enough and the debuffs continue to stack too high on the main tank.

Methods: Go die in a fire. Literally. The blue fire will do the trick. Give big honkin’ Titan guy a hug. If it’s phase 2, the plan is to try to pop a breath mint into Razor’s mouth by getting in front of him. I’m sure he’d appreciate some juicy fruit when you’re being blasted with his Flame Breath.

Deconstructor

Wipes when: Completely pounds the crap out of your main tank. Or when Joe Paladin forgets to run out of the raid with a light bomb. Also happens when Deconstructor wolfs down some grilled repair bot burgers. Oh yes, and if your raid forgot to eat their wheaties this morning and managed to close in on the enrage timer.

Methods: See that guy that’s glowing white? Give him a big hug. Let’s not forget the guy in black and purple either. Run to him! Tantrums, when they occur, will auto-slaughter the raid.

Iron Council

Wipes when: One of the tanks gets Falcon (Fusion) Punched. Raid eats a green rune and is too slow getting out of it. Anytime those Iron Council folks are basking in blues of glory. There’s a multitude of causational factors that could lead to a wipe.

Methods: Do everything I mentioned in the last paragraph. Oh, and hug the small Iron Dwarf. He’s the lonely one of the bunch. Gets frequently picked on all the time. When he’s doing that Overload thing, he’s just trying to unload his problems. It doesn’t hurt.

Much.

Kologarn

Wipes when: Eyebeam fail. Stone grip fail. Tank-falls-off-ledge fail. No one in melee range of Kologarn fail.

Methods: Just repeat everything above. Stand in beams or jump off the ledge or run far away from him.

Auriaya

Wipes when: Not enough players absorb a sonic screech. Alternatively, difficulty with the pull. If you can master the pull you can master the boss. But the pull is what gets to raids.

Methods: Just get eaten up by the various cats. Stand in the void zone.

Hodir

Wipes when: Frozen blows dominates your entire raid. Tank dies. Raid doesn’t know how to either keep moving or watch for camp fires.

Methods: Stop moving. Avoid the big snow drifts and get flash frozen. Stand under falling icicles.

Thorim

Wipes when: Either the arena team doesn’t hold out long enough or the gauntlet team is too slow. In phase 3, it happens because a taunt’s not quick enough.

Methods: During the second phase, if you’re gauntlet, do run into the line of fire. Do stand next to the guy with the fire shield icon above him. If you’re in the arena, make some friends. During the third phase, dive into the lightning streams.

Freya

Wipes when: Have you heard the phrase:

“Oh what the frack. Who killed the Stormlasher/Snaplasher/Water elemental before the others were down?”

Yeah. Happens to us. Too anxious on the trigger finger. AoEing detonators is also a very bad idea…

Methods: …But AoEing detonators leads to a speedy death. If it’s on ‘shrooms, look for the player who is flashing lightning and stand next to them. Lashers are a bit of a pain to die to however. Freya’s one of the worse bosses to wipe on because it can take a while for everyone to die.

Mimiron

Wipes when: I don’t even know where to start. Missing tanks? Nuked healers? Not enough DPS? It could be any number or combination.

Methods: Here’s a quick list.

  • Phase 1: Run into land mines
  • Phase 2: Get up close to the boss. Let the fires engulf you or have the entire raid stand in one direction and simply eat the arcane guns.
  • Phase 3: Run into any bots you see. Bomb bots are great for this.
  • Phase 4: Run into land mines.

General Vezax

Wipes when: Healers run out of juice with no Saronite vapors around. Lack of interrupts on Vezax. Tank faces a super saiyan General Vezax who dishes out 50000 damage. Yeah. Happened to us before too. Not pretty.

Methods: Stand in a Saronite vapos for more than 7 ticks. Hug Vezax without interrupting anything. Let him warm you up some.

Yogg-Saron

Wipes when: Anything bad that can happen will happen. Players become magically blind to the color green. It happens.

Method: Run into clouds and run into the green beams emanating from Yogg-Saron.

Healing Ulduar: Kologarn

kologarn

For other bosses in Ulduar, check the Ulduar Healing Strategy Page.

Kologarn is the sentinel that stands in the way between your raid group and the rest of Ulduear. He is a challenging boss for guilds that are new to raiding. Like Deconstructor, victory lies in the ultimate ability of individual players.

Abilities

Eyebeams: Two ways to handle this. Run out the door or run circles on the right side of the platform. More on this later.

Stone grip: He’s going to pluck three players into the palm of his hand and attempt to squeeze them to death until they get broken out. The only way to break players out is by DPSing the arm. Once it takes 380000 damage, the players are released.

Execution

DPS priority is going to approach the boss in this order: Right arm, Elementals, torso. When any arm is destroyed, the torso loses the same amount of health.

It’s best to call out right arm health at 5% intervals starting from 20 so your tanks know when to switch. After the right arm falls, elementals will spawn.

Two tanks are needed to hold Kologarn’s attention. He’s got a Gluth-like debuff that requires two tanks to taunt off each other. Otherwise, the debuff becomes flat-out unbearable.

kolo-beams

Dodging eye beams

When you get focused by twin green beams, you have around 2 seconds to start hustling before you get rocked. There are two ways to handle avoiding them:

Out the door

Make a beeline for the door and down the stairs. The upside is that it presents minimal risk to the players in your raid group. The down side is if the player is too slow, they might die due to line of sight issues. As healers, we don’t have to worry about this.

Laps on the right side

Have beam-focused players run circles along the right side of the room. The pros and cons are the exact inverse of the bailing-out-the-door method. Focused players are well within the range of healers. But poor kiting can lead to multiple casualties.

Whatever solution you choose, drill it in the heads of the rest of the raid to immediately get out of the green. The beams are extremely hard to miss. Keep your head up.

The Elemental Tank

It’s happened before. I’ve seen the off tank gain aggro of all ads and get focused by beams at the exact same time. As a tank, he’ll live for a few extra seconds but not anymore after that. Use whatever saves you can on him to help lessen the blow. Pain Suppression, Guardian Spirit and Blessing of Sacrifice work admirably.

Healing strategy

Around 6-7, healers is a good number to start with. This can drop with more gear and experience. Expect an enormous amount of raid damage being doled out. His left arm sweeps the entire raid for around 15000+. Pick two of your strongest tank healers and assign them to the main tank (this will vary as they’re taunting off each other). Be sure to have Kologarn’s target up so you can see which tank he’s presently on.

If you have access to two Resto Shamans, they can anchor the Stone Grips quite easily.

Healer items

Ironmender OH (Priests, Druids)

Gloves of the Pythonic Guardian Gloves (Paladin)

Robes of the Umbral Brute Chest (Priests)

Unfaltering Armguards Wrists (Paladin)

Healing Ulduar: Hodir

creature_hodir

For other bosses in Ulduar, check the Ulduar Healing Strategy Page

Hodir is a fight that requires a lot of movement. This boss is a big cuddly snowman who likes to spread the love, and the iceblocks. This fight will keep you on your toes.

Notes about the fight:

  • Lots of movement
  • Raid wide damage

Abilities

Biting Cold – This is an aura like affect that pulses through the entire raid. This is much like the ability from Keristrasza in the nexus, you need to keep moving to keep it from stacking up on you. Each stack increases the periodic damage it deals.

Freeze – This deals about 5k frost damage to all players within 10 yards of the target, it also roots the targets in place.

Flash Freeze – This encases the entire raid in blocks of ice. This is prevented by standing on snowdrifts.ÂÂ

Icicle – Occasionally giant blocks of ice will fall from the ceiling. These deal 12,000 damage to anyone hit and have a knock back component. You can see which areas will be hit by a small circular glyph on the ground. If you are having trouble seeing the glyphs, go into your video settings and turn on Projected Textures. Before a flash freeze, a larger glyph will show on the ground before the ice falls and will leave behind Snowdrifts which must be used to avoid flash freeze.

Frozen Blows – Reduces Hodir’s physical damage but adds a frost damage component to his attacks. This also has a raid wide frost damage effect.

Enrage – Hodir has a 9 minute Enrage Timer

Ability Examples:

ice

Icicle

snowdrift

Snowdrift

freeze

Freeze

NPCs

Hodir also comes with a selection of NPC’s that must be broken out of their icy prisons. There will be four on normal and 8 on heroic. The npc’s consists of the following.

2x Druids: The druids are hard to miss, they’re in boomkin form. When you break them out they DPS Hodir but also cast Starlight which increases the attack speed of anyone standing in it by 100%

2x Shaman: The shamans DPS Hodir elemental style and will occasionally cast Storm Cloud on a raid member. This ability lets you buff several raid members with Storm Power which increases their critical strike damage by 135%.

2x Mages: The mages will help try to break fellow NPCs out of ice blocks and will cast a Toasty Fire. The fire is literally a campfire on the ground, but it fights off the effects of biting cold. Falling ice and Flash Freeze will wipe out the fire.

2x Priests: The priests will smite and occasionally throw out a heal, but most importantly they will cast Dispel Magic to free players from the effects of Freeze

Execution

Your raid will head in following the Main Tank. The tank will take Hodir back towards the rear of the room. DPS will begin by breaking out the NPCs. After all the NPCs have been broken out, DPS can start in on Hodir. When DPS first engages Hodir it is a good time to blow Heroism / Bloodlust. Healers should move into position near the Main Tank while everyone else needs to move into position around the raid. DPS continues on Hodir until he is about to cast Flash Freeze. Everyone needs to move to the Snowdrifts to avoid being frozen. After the Flash Freeze any raiders who were frozen should be broken free ASAP. DPS will then begin on the NPCs again until all are free, and then will resume DPS on Hodir. Rinse and repeat until the big guy is done.

Healing Hodir

Healing Hodir has two major components.

Main Tank – Three healers should be assigned to the main tank. They should be in close proximity at all times and moving with the tank as needed. Grace from a Disc Priest helps even out the damage from Hodir.

Raid – The rest of the healers should be spread out along the outside of the raid to cover as many raiders as possible.

All healers will be moving quite a bit during this fight, dodging falling ice and shaking off the effect of biting cold until the NPC’s are broken loose. Shamans will be using a lot of Riptide and Lesser Healing Wave, Druids will be right at home rolling HoTs, Paladins will be using quick Flash Heals, as well as priests utilizing renews and quick heals. It is possible to toss out a longer cast heal such as Greater Heal or Chain Heal and move before biting cold stacks, as long as you can find yourself a rhythm for move and cast. Your main goal as healers should be to find a Toasty Fire close enough to the raid to sit on. If you have the Toasty Fire buff, you can spam heals without the worry of stacking Biting Cold. Since the rest of the raid will be moving around though, be prepared to move to keep people in range. Once you learn to balance the movement and the heals the fight is pretty straightforward.

Until next time, Happy Healing.

Healing Ulduar: Ignis the Furnace Master

header

For other bosses in Ulduar, check the Ulduar Healing strategy page.

Here’s a rather unconventional approach to killing Ignis which utilizes the side of the instance. Using this method does appear to be rather cheesy, but it takes a lot of pressure off many players. Credit this to Kimbo for figuring this out. Ignis is one of the early optional bosses you’ll encounter first in Ulduar. I recommend working on Razorscale first before doubling back to the Furnace Master.

Quick notes

  • Standard tank and spank
  • Periodic Constructs will activate

Abilities

Scorch – All enemies in front of Ignis will take quick dot damage for 3 seconds (ticks every half-a-second). Constructs within the area will start to heat up and become Molten.

Flame Jets – Geysers of flame shoot up from the ground and throw raid members up into the air. If the Flame Jets connect while a player is casting, they’ll be interrupted for 8 seconds. Targets take fire damage over 8 seconds.

Slag Pot – Ignis will charge a player and grab them tossing them into his Slag Pot (the pot hanging around his waist).

Activate Construct – Activates a Construct with 3.8 million health.

Strength of the Creator – When a Construct is active, damage done by Ignis is increased by 15%. It’s a stacking buff. When a Construct is taken out, the stack is removed.

Ability examples

ignis-flame-patch

Scorch on the ground

ignis-constructs

Construct

flame-jet

Here’s a shot of some of the melee players in the air after a Flame Jet.

Setup

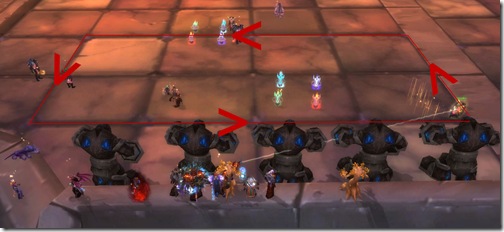
Here’s our non-conventional setup. If you look to your left and right, you’ll see two pools of water that are surrounded by a ledge. Start heading for the one on the left (facing Ignis) that’s nearest the entrance ramp. All ranged DPS and healers should stand on the ledge.

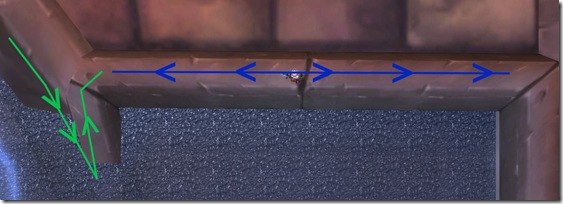
The reason you want to set up in this position is to think back to the days of Starcraft where players set up choke points for enemies to go through. Constructs that spawn, if their aggro is gained by a ranged player, will have to run all the way into the pool and then up the ramp in order to take out a player (green path). The extra distance the Construct has to run should be more than enough time for your off tank to attract the Construct’s attention.

healer-pos-choke

Main tank

ignis-kite-path

Your tank’s going to be running laps along the red path. The ranged group should not be affected by Scorches. Your healers are going to have to strafe along the blue arrow to maintain range with the tank. The upper line is a little under 40 yards.

Execution

Once Ignis is engaged, your main tank will pick him up and start keeping him moving in a roundabout fashion pictured above. After a period of time has passed, Ignis will begin to activate Constructs. Off tanks need to snatch them up and bring them into Scorched areas and hold them in there until they turn Molten. When it hits 20 stacks, it becomes Brittle.

What do you get when you combine something incredibly hot with something incredibly cold? The object becomes extremely brittle. The same thing applies here. The chance to crit the Construct increases. Damage done over 5000 will effectively kill it. Be sure to target Brittle’d Constructs with your ranged players as they explode dealing damage to players in close proximity.

Have players keep an eye on Flame Jets. If spellcasters are caught casting when Flame Jet connects, they’re locked out of casting for 8 seconds. Not good if you’re a healer.

Healing

There are four healing areas to cover in this fight:

Main tank – One healer should be enough but other healers will need to keep HoTs as active as possible especially with numerous Constructs.

Off tank – If there are Constructs up, your off tank is going to need heals as well.

Slag Pot – Ignis is going to charge and pick up a player and toss them into his sack. While in his sack, they will take 5000 damage every second for 10 seconds. Keep a dedicated raid healer on Slag Pot duty. If there’s no one in there, that healer then returns back to healing the raid.

Healers won’t be able to cast too many spells in there. But healers with instant spells should be able to cast them as much as they can. Priests, for example, can Holy Nova while inside the pot.

Raid – Flame Jet and Scorched melee players are going to involve the bulk of the healing here. Chain Healing Shamans will be at their finest especially since ranged players will be strafing along the ledge. After getting hit by a Flame Jet, I will personally light up a few Holy Novas while I’m in the air.

Healing loot

Flamewrought Cinch – Leather

Lifeforge Breastplate – Plate

Pyrelight Circle – Ring

Scepter of Creation – Wand